
Welcome to the infomation page about Mixing Music
The fine art of mixing single audio tracks together as a whole is difficult, specially when you do not have some guidelines. First rule for explaining tthe name 'mixing' is that it stands for mixing it al up together, to make a whole overall sound. This means adjusting overal sound levels and making use of Fader Levels, Panning, EQ, Compression, Reverb, Delay or any kind of effect towards a good balanced track. Several issues come up while mixing, technique and equipment. Also offcourse like in composing, improvisation and goofing around might help you more to understand the difficult task to mix. Important is that the overal mix should be sounding tight and together as one. This Mixing page will try to explain some things about mixing, where to start and how to finish the mixing stage with good results. Remeber that time and understading is the way to go, knowing how to mix is a good thing before starting one. Take a good look around and read the information you find on our mixing information page.

Basic Mixing
Mixing or Mix.
Mixing is not only an art by itself as music is, it is called mixing because the word means just what it is about. Mixing or making a Mix is adjusting all different instruments or individual tracks to sound well together, composition wise and mix wise. How to start mixing a mix is a simple task when you understand what to do and what not. Later on we will also discuss the static mix and dynamic mix. According to some common rules, the Basic Mixing chapters explain common mixing standards as well being informational about sound subjects.
The Starter Mix, Static Mix and Dynamic Mix.
As of a process being broken down into parts, we can divide mixing into three basic steps. When starting a mix, mostly you will have some previously recorded tracks you need to mix furthermore. We will explain to setup all tracks fast, so you can have a default setup and progress to the static mix. Mostly the starter mix can be setup in less than 1 hour of working time. The static mix takes a bit longer, about 4 hours or so. The Dynamic mix and finishing up a mix can take from 4 to 12 hours of working time. Finishing off the mix can take 1 o2 two days or more depending on creativity, style and experience. It is good to know the total working time in hours finishing a mix, can be divided into three parts. First the Starter Mix. Then the Static Mix. Then the Dynamic Mix. Starter, Static and Dynamic mix are the basic three standard parts. Then finishing off. At last part 4 should be just working until the mix is finished. Before we discuss these subjects, we will start off with some more sound or audio details.
Overall Loudness while mixing.
The first mistake might be in thinking that how loud this mix will sound is important; a lot of beginners who start with mixing will actually try to get their mix as loud as they can get it to be. They try to push-up all faders until they get a desired overall loudness level, don't do that. The master vu-meter does look attractive when it is showing all green and red lights, you might get confused into thinking that louder is better. Louder is not meaning better when mixing, as we are in the mixing stage loudness is less important as this is part of the mastering stage. In the mixing stage we try to have a balance in the three dimensions of mixing, therefore creating separation and togetherness (at the same time). Though separation and togetherness might seem contradicting, every instrument needs to have a place on the stage, together they sound as a mix. So mixing is more about balancing (adjusting) single tracks to sound well. By a general rule on digital systems we do not like to pass 0 dB on the master track. Keeping a nice gap between 0 dB and -6 dB can help your mix well without distortion going on. Some like to place a limiter on the master track and so try to mix louder, maybe it works for them but we do not recommend doing this until you are experienced with a common dry mix under 0 dB. Anyway if you need your mix to be louder, just raise the volume of your speakers instead. That is a normal way of doing it. We will explain later on what to do with the master track of your mixer. Also when mixing do not place anything other on the master fader, so no plugins, reverb, maximizers etc. Just maybe a Brickwall limiter on the master fader with a threshold -0.3 db, or reducing just 1 or 2 dB only when peaks occur. For real beginner and not so experienced, we recommend nothing on the master fader and set to 0 dB.

Human Hearing and Speakers / Monitors
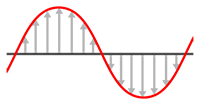
Everything you hear in the real world is basically mono sound and lots of ambiance and reverbs. The mouth that sings is mono, the world is ambiance reverbs of that mono sound.
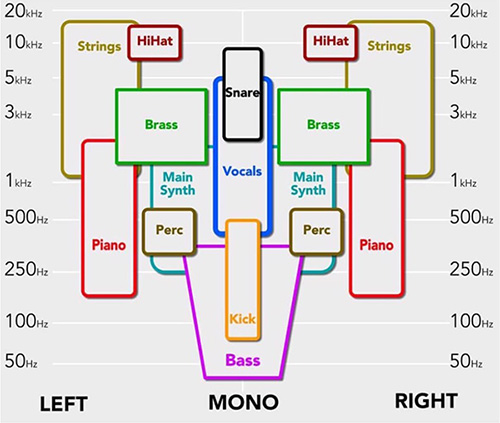
Even a car passingby or birgds singing are mono sounds in the real world. In stereo or on stereo speaker systems the ideaal real world sound is not replicated. It is technics against the real world. So how do we recreate a good mix as humanly possible ? Well we try to think in human hearing in the real world and the disadvantages the common speaker systems have. Also a stereo system can create ambiance and reverbs etc, with plugins you mix in like reverbs and delays, etc. Anything like what is possible works. What works best is having lower frequencies in the middle and higher frequencies more panned outwards on left and right, or even discribute them across the stereo field with intent to place higher frequency sound mor outwards and low frequency more inwards. Stage thinking. But the stereo speakers or headphones do have many disadvantages as to get the human hearing into an amusant pleasurable experience.
Speakers come in all shapes and sizes, enabling you to listen to music on your iPod, enjoy a film at the cinema or hear a friend’s voice over the phone. In order to translate an electrical signal into an audible sound, speakers contain an electromagnet: a metal coil which creates a magnetic field when an electric current flows through it. This coil behaves much like a normal (permanent) magnet, with one particularly handy property: reversing the direction of the current in the coil flips the poles of the magnet. Inside a speaker, an electromagnet is placed in front of a permanent magnet. The permanent magnet is fixed firmly into position whereas the electromagnet is mobile. As pulses of electricity pass through the coil of the electromagnet, the direction of its magnetic field is rapidly changed. This means that it is in turn attracted to and repelled from the permanent magnet, vibrating back and forth. The electromagnet is attached to a cone made of a flexible material such as paper or plastic which amplifies these vibrations, pumping sound waves into the surrounding air and towards your ears.
Inside a speaker:
A. Cone
B. Permanent magnet
C. Electromagnet (coil)
The frequency of the vibrations governs the pitch of the sound produced, and their amplitude affects the volume – turn your stereo up high enough and you might even be able to see the diaphragm covering the cone move.
To reproduce all the different frequencies of sound in a piece of music faithfully, top quality speakers typically use different sized cones dedicated to high, medium and low frequencies.
A microphone uses the same mechanism as a speaker in reverse to convert sound into an electrical signal. In fact, you can even use a pair of headphones as a microphone!
Thomas Edison is credited with creating the first device for recording and playing back sounds in 1877. His approach used a very simple mechanism to store an analog wave mechanically. In Edison's original phonograph, a diaphragm directly controlled a needle, and the needle scratched an analog signal onto a tinfoil cylinder. What is it that the needle in Edison's phonograph is scratching onto the tin cylinder? It is an analog wave representing the vibrations created by your voice. For example, here is a graph showing the analog wave created by saying the word "hello". When CDs were first introduced in the early 1980s, their single purpose in life was to hold music in a digital format. In order to understand how a CD works, you need to first understand how digital recording and playback works and the difference between analog and digital technologies.
Audio Sampling
In signal processing, sampling is the reduction of a continuous signal to a discrete signal. A common example is the conversion of a sound wave (a continuous signal) to a sequence of samples (a discrete-time signal). A sample is a value or set of values at a point in time and/or space. A sampler is a subsystem or operation that extracts samples from a continuous signal. A theoretical ideal sampler produces samples equivalent to the instantaneous value of the continuous signal at the desired points. Digital audio uses pulse-code modulation and digital signals for sound reproduction. This includes analog-to-digital conversion (ADC), digital-to-analog conversion (DAC), storage, and transmission. In effect, the system commonly referred to as digital is in fact a discrete-time, discrete-level analog of a previous electrical analog. While modern systems can be quite subtle in their methods, the primary usefulness of a digital system is the ability to store, retrieve and transmit signals without any loss of quality.

Digital Clipping
Clipping is a form of waveform distortion that occurs when an amplifier is overdriven and attempts to deliver an output voltage or current beyond its maximum capability. Driving an amplifier into clipping may cause it to output power in excess of its published ratings. In digital signal processing, clipping occurs when the signal is restricted by the range of a chosen representation. For example in a system using 16-bit signed integers, 32767 is the largest positive value that can be represented, and if during processing the amplitude of the signal is doubled, sample values of, for instance, 32000 should become 64000, but instead they are truncated to the maximum, 32767. Clipping is preferable to the alternative in digital systems—wrapping—which occurs if the digital hardware is allowed to "overflow", ignoring the most significant bits of the magnitude, and sometimes even the sign of the sample value, resulting in gross distortion of the signal.
Avoid Clipping while Recording and Mixing
Keep your peaks below -3db - Keep peaks below -3db on your individual track peak meters, plug-in peak meters and on your master output peak meters. All meters lie, so don't trust them about clipping. Don't worry about the loudness, just turn your monitors up. Leave it to a good mastering studio to take care of the final loudness perception. Some meters are not peak meters and do not stop at 0. If you are using one of those meters, such as the K-System meters which may show 20, 14, or 12, then please take the time to understand K-System Meters.
Check for clipping between every plug-in - You have to make sure that clipping is not occuring between plug-ins. Plug-ins usually have meters where you can check the input and output levels. Sometimes a plug-in can raise the output and introduce clipping, but later in the signal chain, another plug-in will reduce the overall output, but the clipping is still there. So it's always good to make sure that clipping is not occurring between every plug-in in the signal chain.
Think of the flow - The signal flows through the signal chain. It starts with the digital recording and then it flows through any plug-ins and then through the master output. You must check that the peaks are below -3db at everywhere in this flow. That means taking charge of your signal flows by checking individual track meters, plug-in meters and master output meters before saying that the mix is final.
Volume or Level.
As the human ear can detect sounds with a very wide range of amplitudes, sound pressure is often measured as a level on a logarithmic decibel scale in dB. Commonly used are faders from a mixer or a single volume knob of any stereo audio system. Because volume is commonly known as level, beginning users might overlook the possibilities. The different volume faders of any mixer count up all levels towards the master fader as a mix. Summing up levels of tracks towards the master bus. When talking about sound or a note that has been played, the frequency and amplitude (level, volume) will allow our ears to record and our brains to understand it's information. You can guess playing at different frequencies and amplitudes, our hearing will react differently, allowing loud or soft sound to be understood. Allowing to perceive loud or soft, left, center or right, distance and environment. Our hearing is a wonderful natural device.

The Fletcher Muson chart shows different hearing amplitudes for frequencies at certain loudness levels. As you can see, how loud a note is played is affecting the frequency a bit. As well as with Frequency and Volume (amplitude, loudness), we can get a sense of direction and distance (depth). Our brains will always try to make sense as if sounds are naturally reproduced. Music or mixing is mostly unnatural (or less natural), but our brains understands music better when it is mixer for our natural hearing in a natural way. Mixing to affect our natural hearing by perceiving natural elements correctly (dry signal, reverberation, effects, summing towards the master bus). So as well for separating or togetherness, we can refer fist to the volume of a sound, instrument, track or mix that is playing. As well as Balance or Pan, Volume is an easily overlooked item of a mix. You might want to fiddle with effects more or keep it to more interesting things, volume is most important. Actually volume and pan (balance) are the first things that need to be set when starting a mix and throughout the mixing process. Not only fader, level and panning is important for a mix, composition wise volume or level is a first tool when you are using the mute button for instance.
Balance or Pan.
On a single speaker system (mono) where Frequency and Volume is applied, we would not have to worry about pan or balance, so all sound is coming from the center (mono). With a pair of speakers (stereo) it is possible to pan or balance from left, center to right. We call this left, center and right of the Panorama. So we are allowed to perceive some direction in the panorama from left to right. Just as effective to our hearing, the volume or level, panning or balance, is mostly overlooked by beginning users. What can be difficult about setting two knobs, fader and balance? Easy it sounds, but planning what you’re doing might avoid a muddy or fuzzy mix later on, keeping things natural to our hearing. Pan (Panorama) or Balance are both the same. As to where instruments are placed, Panorama is important it is the first sense of direction. By a common rule Volume Faders and Balance Knobs are the first things to do, and refer to, when setting up a mix. Beginning users who just setup Volume and Panning without a plan or understanding dimensional mixing are quite often lost and are struggling to finish off a completed mix.
Dimensional Mixing.
As a concept dimensional mixing has got something to do with 3D (three dimensional). You can understand that Frequency, Amplitude and Direction, make the listener understand (by hearing with our ears and understanding by brains) the 3D Spatial Information. When mixing a dry-signal towards a naturally understandable signal, we need some effects as well as some basic mixer settings to accomplish a natural perception. Setting the Pan to the left makes the listener believe the sound is coming from the left. Setting the Pan to center makes the listener believe the sound is coming from the center. Setting the Pan to the right makes the listener believe the sound is coming from the right. All very easy to understand. As we focus on frequency we can also do something about the way the listener will perceive depth. As sounds with a lot of trebles (higher frequencies) are perceived as close distance, and a more muddy sound (with lesser trebles) is perceived as more distanced (further backwards). Next our human brain can understand reverberation when for instance we clap our hands inside a room. The dry clap sound (transients) from our hands is heard accompanied by reverberation sound coming from the walls (early reflections). Reverberation, specially the delay between the dry clap and the first reverberations (reflections), will make our brains believe there is some distance and depth, as we hear first the transient original signal information of the clap then the reverberations. The more natural the more understandable. So there are quite some influences on what our hearing believes as being 3D Spatial Information. Make the listener believe in the mix as being true. Our hearing also likes natural and believable sounds, sometimes addressed as stage depth. With all controls of a mixer you can influence the way the 3d spatial information is transmitted to the listener. You can assume that Volume (Fader or Level), Panorama (Balance or Pan), Frequency (Fundamental Frequency Range) and Reverberation (Reverb or Delay) are tools you can use to make the listener understand the mix you’re trying to transmit. We will discuss dimensional mixing later on; now let's head to the frequency or frequency range of a sound. We perceive distance, direction, space ,etc, through clues such as volume, frequency, the difference in time it takes a sound to enter both ears (if it hits the left ear louder and quicker than the right) and reverberation.
The Frequency Spectrum.
A normal Frequency Spectrum is ranged from 0 Hz to 22000 Hz, actually all normal human hearing will fit in this range. Each of instruments will play in this frequency range, so the Spectrum will be filled with all sounds from instruments or tracks the mix is filled with. On a normal two-way speaker system these frequencies will be presented as Stereo. A speaker for Left hearing and a speaker for Right Hearing. So, on a stereo system there are two frequency spectrums played (Left Speaker and Right Speaker). Basically the sound coming from both Left and Right speakers together, makes up for the Stereo Frequency Spectrum as is presented below. Combined Left and Right (stereo), makes Centre (mono).

This chart is showing a commercial recording, finished song or mix. The x-axis shows the frequency range of the spectrum 0 Hz to 22 KHz. The Y-Axis is showing level in dB. On digital systems now days we go from 0 dB (loudest) downwards to about -100 db (soft or quit). In this chart (AAMS Analyzer Spectrum Display) you can see that the lower frequency range 1 KHz. The loudest levels are at about 64 Hz and -35 dB, while the softest levels are about -65 dB and range from 4 KHz to 22 KHz. The difference is 65 dB - 35 dB = 30 dB! As with every -10 dB of level reduction the sound volume for human hearing will halve (times 0.5). Instruments like bass or base drum (that have more lower frequencies in their range) are generating way more power (level) than the HI hat or higher frequency instruments. Even though we might perceive a HI hat clearly when listening, the HI hat by itself produces mainly higher frequencies and generates way less volume (amplitude, power, level) compared to a Basedrum or bass. This is the way our hearing is working naturally. But however a master Vu-meter of a mix will only display loudness, you’re actually watching the lower frequencies responding. The difference between lows and highs can be 3 times the sound level. From left to right mainly above > 120 Hz towards 22 KHz are the levels of frequencies all going downwards. Speakers will show more movement when playing lower frequencies and less movement when playing higher frequencies. This chart is taken from AAMS Auto Audio Mastering System, this software package is for mastering audio, but actually can show also spectrum and can give suggestions based on source and reference calculations for mixing. This can be handy to investigate sound of finished mixes or tracks, showing frequencies and levels.
Human Hearing.
Human hearing is perceptive and difficult to explain, it is logarithmic. As lower frequency range sound levels are measured louder. Higher frequencies measured as soft. They are both heard good (perceived naturally) at their own levels independent. Not only is human hearing good at understanding frequencies and perceives them logarithmical, also acoustics from rooms and reverberations play a great deal in understanding direction of sound. Generally a natural mix will be more understandable to the listener. We can expain all you hear in the real world is mono sound with the world reflections on in. In most cases many mono sounds on a busy day. Anyway the human hearing is two ears, stereo because you brains need direction of where the sound is comming from, what you hear is actually in the real world a mono sound source with reverberation on it. We use two ears and hear in stereo, in fact in nature everything you hear is actually in mono. Only technique gets mono to stereo sound in nature a stereo sound does not exist. A mono source can be directional because we hear with out two ears apart from ech other a slight difference betwoon the two ears, our brain will quess the difference of the two ears and gets direction information. Where is the mono sound placed ? Left or Right ? Middle ? Above ? Far or near ? That all depends on the reverberation added.
Tuning your Instruments
For all instruments including Drums, Bass, Guitar, Piano, Samples, Etc, so in just one wordt ALL Instruments, be sure they are in Tune. That means you can use a Tuner to tune your instruments. Even VSTi Synths or Sampling devices, tune them. One good thing can be using a Tuner to tune at 0 zero detuning, or you could use something like an auto tuner (like Antares Autotune with fast settings in the right chord settings or key setting). Once you get into tuning new or maybe older projects, you will notice that an In Tune Mix sound way better then out of tune Mix. Even for Drums you can tune each drum and the result will be a better Mix. Tuning is the most forgotten, but is very important. We have the 440 hz tuning but the 432 hz tuning is a discussion in it's own, besauce it seems 432 Hz is actually more human like frequencies or world real frequency based system. But anywahy 440 Hz is the standard and there is nothing wrong with it. As long as your instruments are tuned.
The Basic Frequency Rule.
The rule for mixing, that the bottom end or lower frequencies are important, because the bottom end or lower frequencies are taking so much headroom away and have the loudest effect on the Vu-Meters (dynamic level). The lower frequencies will fill up a mix and are the main portion to be looked after. The Vu-Meter is mainly showing you a feel of how the lowest fundamental frequencies are behaving. The Vu-Meter will respond more to lower frequencies and responds lesser to higher frequencies (3 times lesser). Mainly the mix fundamentals of loudness are ranging from 0 Hz to about 1 KHz; these will show good on a Vu-Meter. A range from 0 Hz to 4 KHz, will be shown by the VU-Meters as loudness, and is the range where you must pay attention to detail. If you can see the difference in loudness of a Basedrum and a HI hat you will understand that the HI hat (though can heard good) brings way less power than the Basedrum does. A beginners mistake would be mixing the Basedrum and bass loud and then try to add more instruments inside the mix, thus will give you limited headroom inside your mix (dynamic level). Most common to adjust frequency are EQ or Equalizers, but as we will learn later on, there are quite a bit more tools to adjust the frequency spectrum. As we did explain before, Volume (Amplitude), Panorama (Pan or Balance) and Frequency Range (EQ or Compression, limiter, gate) are the main components of mixing (dimensions). Before we add reverberation, we must get some mix that is dry and uses these components; we call this a starter mix.
Notes and Frequencies.
To make frequencies more understandable, you can imagine a single instrument playing all sorts of notes, melodies, in time on a timeline. To have some feeling where notes are placed in the frequency spectrum and how to range them, the chart below is showing a keyboard and some instruments and their range of notes (frequency range) they can normally play. All notes from C1 to C7 on a keyboard have their own main frequency. You can see Bass, Tuba, Piano, etc, in the lower range and Violin, Piccolo and again piano that can play high notes.

It is important to know about every instruments range, but as you go mixing it is better to know to give an instrument a place inside the available spectrum. The colored areas are the fundamental frequency ranges. It is likely when we need to do something about the quality of each instrument we will look inside their fundamental frequency range. It is likely when we boost or cut in these areas, we can do something about the instruments quality of playing. More interesting are the black areas of the chart above, these will represent the frequencies that are not fundamental. These frequencies are not fundamental frequencies and therefore when saving the mix for some headroom and get some clearness (separation), we are likely to cut heavily in these area's with EQ. Most of the hidden mix headroom is taken up in the first bass octave and the second octave (0 Hz - 120 Hz). Most notes played or sounds from instruments are notes that have a fundamental frequency below < 4 KHz. And when you really look at the fundamentals of a mix the frequencies 50 Hz to 500 Hz are really filling it, this is where almost any instrument will play its range and is much crowed therefore. The misery area between 120 Hz to 350 Hz is really crowded and is the second frequency range to look after (1st is 0 Hz - 120 Hz). The headroom required for the proper mixing of any frequency is inversed proportional to its audibility or overall level. The lower you go in frequency the more it costs hidden energy of the mix or headroom (dynamic level). This is why the first two frequency ranges need to be the most efficiently negotiated parts of any mix (the foundation of the house) and the part most often fiddled by the inexperienced. Decide what instruments will be inside this range and where they have their fundamental notes played. Keeping what is needed and deleting what is not needed (reduction) seems better than just making it all louder (boosting). To hear all instruments inside a mix, you need to separate, use Volume, Panorama, and its Frequency Range. You can get more clearness by cutting the higher frequencies out of the bass and play a piano on top that has cut lower frequencies. By this frequency rule, they do not affect each other and the mix will sound less muddy and more clear (separation). Both bass and piano have therefore funded their place inside the whole available frequency spectrum of a mix. You will hear them both together and clean sounding following the fundamental frequency range rules. Anyway for most playing instruments a nice frequency cut from 0 Hz upward to 120 Hz is not so uncommon, actually cutting lower frequencies is most common. Apart from Basedrum and Base that really need their information to be present, we are likely to save some headroom on all other instruments or tracks, by cutting some of its lower frequency range anywhere up to 120 Hz. The lower mid-range misery area between 120 and 350 Hz is the second pillar for the warmth in a song, but potential to be unpleasant went distributed unevenly. You should pay attention to this range, because almost all instruments will be present over here.
Fundamental Frequencies and their Harmonics.
Now as notes are played you expect their main frequency to sound each time. But also you will hear much more than just a main fundamental frequency. An instrument is sounding (playing notes), so there is a fundamental frequency range to be expected to sound, the frequency range of this particular instrument. Also recorded instruments like vocals contain reverb and delay from the room that has been recorded in and also quite a few instruments come with body, snare, string sounds as well (even those nasty popping sounds). The whole frequency range of an instrument is caused by its fundamental frequency and its harmonics and several other sounds. As we mix we like to talk in frequency ranges we can expect the instrument or track to be playing inside the frequency range (fundamental frequencies). Therefore we can expect what is important (the frequency range of the instrument or track) and what is less important (the frequencies that fall outside this range).
Harmonics.
The harmonic of a wave is a component frequency of the signal that is integer multiple of the fundamental frequency. For example f is the fundamental frequency; two times f is the first harmonic frequency. Three times f is the third harmonic and so on. The harmonics are all periodic to its fundamental frequency and also lower in level each time they progress.
f
Harmonics double in frequency, so the first harmonic range will be 440 times 2 = 880 Hz. Harmonics multiple very fast inside the whole frequency spectrum. You can expect the range 4 KHz to 8 KHz to be filled with harmonics. If you are looking for some sparkle, the 4 KHz to 8 KHz range is the place to be. Over > 8 KHz towards 16 KHz expect all fizzle and sizzle (air). The HI hat will sound in the range 8 KHz to 16 KHz and this is where the crispiness of your mix will reside. Also when the harmonics double in frequency, their amplitude or volume goes softer. The main fundamental sound will play loud, as de harmonics will decrease in amplitude each time.
Here are some instruments with their fundamental ranges and harmonic ranges.
In this chart you can see that the highest fundamental frequency (the violin) is 3136 Hz. So as a general rule you can say all fundamental frequencies somehow stop at < 4 KHz. For most instruments common notes are played in the lower frequency range < 1 KHz. You can also see that the lowest range of a bass drum < 50 Hz or bass is at about < 30 Hz. This means we have an area of frequencies from 0 Hz to 30 Hz that is normally not used by instruments playing; this area contains mostly rumble and pop noises, and therefore is unwanted. Cutting heavily with EQ in this area, can take the strain of unwanted power out of your mix, leaving more headroom and a clear mix as result (use the steepest cutoff filter you can find for cutting). Anyway try to think in ranges when creating a mix inside the whole frequency spectrum. Expect where to place instruments and what you can cut from them to make some headroom (space) for others. Need more punch? Search in the lower range of the instrument up to 1 KHz (4 KHz max). Need more crispiness? Search in the higher ranges of the instrument 4 KHz to 12 KHz, where the harmonics are situated. Expecting where things can be done in the spectrum, you can now decide how to EQ a mix or use some compression, gate, limiter and effects to correct. By cutting out what is not needed and keeping what is needed is starting a mix. Starting a mix would be getting a clean mix a as whole, before adding more into it. Effects like adding reverb or delay will be added later on (static mix), let’s first focus on what is recorded and getting that clean and sounding good.
Recorded Sound.
First and foremost, composition wise and recording wise, all instruments and tracks need to be recorded clean and clear. Use the best equipment when recording tracks. Even when playing with midi and instruments all recordings need to be clean, clear and crispy. The recorded sound is important, so recording the best as you can is a good thing. For mixing the recorded sound can be adjusted to what we like as pleasant hearing. So knowing where an instrument or track will fit in, will give you an idea what you can do to adjust it. Also giving an idea to record it. Getting some kind of mix where you hear each instrument play (separation) and still have some togetherness as a whole mix combines means also composition wise thinking and recording.
The Fundamental Mix and Swing
The volume of the master fader or the whole mix, is basically not important. So -16 dB or -6 dB levels on the master fader are ok, all dB mix is ok. So do not try to make the mix loud. Make the mix only at whatever volume level.
Next is the Swing, what that swing is depens on the role of the instruments. So how to decide that to adjust to each other ? The way you can do it and works prob. best is frequency wise form low to high.
So basedrum and bass are instruments that sit in the lower end. Carefully shape them first and adjust basedrum and base until you get so good sound and swing. Any placement in volume or panning or do some EQ and Compression.
Certainly on the EQ side expect quite some cutoff doing, a -48 dB or -96 dB cutoff is needed to adjust Low and High frequency cutsoffs. And expect cutoffs from Low even as high as 50 Hz. While people say they hear 5 Hz sounds or 25 Hz or so, that is true. But the cutoff filter for basedrum and base are sometimes needed and expect you mostly for in the mix you will cutoff a lot more then you initially will think wil do.
The swing is still you adjust LOW to HIGH frequency instruments, and the that from Low to High. So when you have a good sound on basedrum and base, mixwise and swingwise, and when they have a good feel together, then go on to the next instruments in line. That could be Guitar and Piano for instance. Try to combine both and mix and swing them (as you would do with baesdrum and base, listen both channels together until they feel good), so the Guitar and Piano need also a good mix and swing together. Then drop in the basedrum and base and listen all 4 tracks together. Hear what is wrong or right, and adjust the Basedrum, Base, Guitar and Piano until you get the mix back and swing back. Then pass on to like Vocals and Background vocals and reapet the procedure until you are at the end of mixtracks, instruments and vocals. Never adjust the Master fader keep that at 0 dB. Anyhow the lower frequencies are more important and the need a more centre pan approach, while go more up in frequencies the middle panning can be done more outwards left or right. So combinations like Guitar and Piano, almost need to be panned from each other more outwards. The higher frequencies can be center or left right panned, even hard panned. To understand that, the frequencies 0 - 250 - 666 Hz need to be level wise out the speaker on a left speaker and right speaker together to produce Low Frequencies good and correctly. Higher Frequencies are more easy to project trough left, right or centre and do not affect the speakers performance mostly (as low frequencies do). What is very important in technical side set aside. Get some swing into the mix anyhow by choosing Together instruments or tracks. From Low to High. Finishing the mix this way seems to me a very fast working order that works. This mixing is kind of longtime effort anyway. So mixing takes time, but mixing rules like i say here, are important not to get frustrated (why does my mix sound so bad ?). Anyway expect each instrument or track or vocal or audio to be EQ wise been cut hard at both Low and High end side. Sometimes a lot more cutting then you would even expect.
If some how the Highhats for instance are important for the swing of the music, expect to cut EQ Low or High (cutoff filter) for all other instruments to keep the highhats clear from highs comming from other instruments.
Expect that rule that Basedrum and Base go from centre, but need also clear pass. So other instruments are better paned left or right more outwards. And high sounding instruments can be panned maybe even more outwards.
Expect also to pan more then you think. So expect cutoffs more then you think and pan more than you think. Then hear if still instruments are muffed off by other. Try to make a pass for all instruments, human hearing wise that still bassy frequency instruments come more from centre speakers at the same sound, and left and right speakers with panning are more for mid and high frequency instruments. Expect more panning and more cutoffs! I mean i had the same problem i thought any eq cutoff is a loss of sound. That is true, but sometimes and most of the time, cutoffs can be more in power and frequency. So mix feel and swing are important. Swing is basically keeping the songs swing in tempo or instruments that interact need to keep their together swing and not be lost by bad EQ or Panning or Levels. Search for combination instruments and get some togetherness in mix and swing, adjust them both unitil that is done. Then more on to other combinations of instruments, Drums, Base, Guitar, Piano, Keys, Strings, Brass, Vocals, Etc. Understand ? This is important that you see frequency wise you need centre and left right to own the frequency domain and the way speakers work best. Do do not try to up the mix all the time with more power and more levels until max master is reached, keep some moderate levels in the greens. Think about volume, pan, EQ and maybe some compression. Those are your tools to setup for a good mix and frequency wise smart thinking centre is bass freq and highs are more panned outwards. Also the same works for Stage Mixing, that also uses the same system of low freq is centre and rest is more panned left or right.
Less is More
The way a mix is looked at is, less is more. Often the mix is filled to much so we need a lot more cutting then adding. Before we can use reverbs and delays, thing more of volume and pan, EQ and Crompession even limiting. The starter mix we discuss over here must first be setup and cleaned of unwanted sound. Also the use of mono sources like mono instruments is not a wrong thing at al. Because it will target more and be easyer to deal within a started mic. We just cut more then we bring in. Less is more.
The working place of audio
The equipment, how many plugins you have, what kind of expencive equipment you have, never be fooled by that. It is basic function like volume, pan, EQ and Compression that must be the first tought when mixing tracks. Also some have big discussions about their room sound, that is not needed as much, as long as you know what you do with a mix to get it right. Do not try to skip Volume, Panning and EQ must be the first thing on your mind and to work on that more till you get it, do not pass until you understand this. It is a mono source, volume, pan, EQ that must be handled first per recorded track or instrument. Tuning is a part of it. A starter mix should sound dry but good. Do not add thing like delay or reverb when you do not understand you first need to control the source. The discussion about your equipment is good enough or not is not done, think of what you can do with the current mix to make it all more clear and clean. Less is more. Also the discussion between using speakers or headphones is not an issue. Do as you like. As we do not use any reverbs now, but vol, pan and eq, on both systems you can hear it good. The room you play it in is not of such importance also (now).
Cutting / Removing is better than Adding / Gaining.
The work that can be done by a low cut on all instruments except Basedrum and Bass by EQ, is essential in getting the heavy bass sound out of all instruments including vocal, to let the Basedrum and Bass shine in their own low frequency range. Even cut out the Badedrum and Bass on the mids and higs can help clear your mix, so that all other instruments that are above the Basedrum and Bass frequencies get to shine also. Even when you do not have a Basedrum or Bass or both, rethink your mix tracks frequency wise. The instruments that really need the Low Frequencies keep it there, cut it out of the rest. Mostly a cut that at least covers 0 -> 120 Hz, but depending on the instrument try to cut out the lows as much as possible without really hurting the sound per track. The EQ part is eessential in mixing and beginners or even experienced mixers sometimes do not understand how much of a cut your need to do. Mustly this cut is way more then way less. The EQ understading is making rough cuts with a -48 db slope in the 0-666 Hz range for every instrument. Basedrum or Bass sometimes need a cut also in the 0 - 50 Hz range to make them work together. Anyway the instruments as Basedrum and Bass or (if you do not have them) do a mind mix scan and decide what instruments needs to keep their low frequencies and what do not need it. Starting with a low cut per instrument can clear up your mix so you can at least hear every instrument or track in the mix. Then the EQ ings is not over, then start per instrument to get a steady and natural sound. If you have vocals try to get them sounding at -9 db volume levels and if you have some kind of correct sound in your vocals, compare each track against the main vocals. So start off with playing only Basedrum and Bass, get them to work with each other can take some EQ work. But also compare Basedrum and Vocals, Bass and Vocals. Play each time a track and the vocals together and try to adjust the volume so that it sounds with the vocals volumewise correct. So each instruments needs to be compared against the vocals. If you do not have vocals, select the melody part or most dominant part of your songs, as instrument wise it will be the one you compare against. Vocals (main vocals) are mostly need to be heard all the time (else we do not know what text info they try to tell us listeners) so that is a good compare method. Offcourse your main vocals most sound good and be EQ wise correct beforehand. The main part of all of this is getting the frequency spectrum correct for each intrument or track with EQ. Specially cutting out lows when not needed (if they might interfeer with tracks that need lows) of all tracks.
The second EQ thing is determine that Highats or high signals like Drum Snare, Hi, House Hi, and anything that needs the high band must be maintained, while cutting out highs out of all other instruments and vocals, even FX or group tracks. So we need per instrument or track at least a low cut and also a high cut. And we try to compare method that Basedrum and Bass needs to sound correctly and with some kind of swing in it. Also we need the main vocals to stay clear all the time. EQ Wise is that you return to EQ even when you are longtime mixing your tracks, it does not matter. Just learn that Low Cuts and be quite heavy to do, and can be mind blowing, because if you think EQ vuts are not good for the sound, you might be wrong in thinking that. Rethink that Low Cuts can be quite hard to do, because you lose so much power of the sound, but that is really what is going on. EQ needs often be hard cuts, only to make room for all that is sounding out of all your instruments or tracks. EQ is the number one return to thingy in doing a mix correctly. So return to EQ and do not leave EQ to fast alone. Do not try to jump in the compression or FX bandwagon to soon. It might also blurr more your mix and you cannot even hear what most be done at all, you are stuck ? Read all above again ? Well mixing is mostly EQ, get a good long time into that before adding other things.
Often throwing in Reverb or Delay (too early) will taste up the sound of instruments and most beginners will start with adding these kinds of effects. Trying to make more sound that they like. Well just don't! You won’t have to add effects at first; you will have to decide what will stay and what must go. As well as setting up for some togetherness of all combined tracks, you will need some headroom for later freedom (creative things) to add into the mix. It is quite easy to fill your mix with mud; this can be done with adding a reverb or two. A new beginner with mixing will think they cram in sounds and instruments place effects and then be done. It is quite easy to make a booming sound by adding all kinds of effects or just pump up (boost) the EQ. Do not do that, try to stay away from adding when you mix is blasted on the whole out of proportion. To take away mud when you have already added it is a hell of a job. But EQ Wise can still be done with low and high cuts, low cuts are needed i explained that before. So starting with a nice clean mix that has all important sounds left over (without adding), is way better and gives less change for muddiness. Remember to do more cutting then boosting or gaining. Manual editing comes as a first task to decide what must be removed and what can stay. Leaving some headroom for furthermore mixing purposes. This is quite a task. In most cases EQ or Equalization can be used to do work with the frequency spectrum (range) as a whole. But on a DAW you can also delete what is not needed or mute it. You can decide to cut all lower frequencies out of a HI hat, just because you expect they are not useful. Leaving some frequency space (headroom) in the lower frequencies for other instruments to play. This kind of cutting (the HI hat) in the lower frequency range to leave some lower frequency space unaffected is the way to make every instrument have their own place inside the whole frequency spectrum or mix. Using Level (Fader), Balance, EQ and Compression (limiter and gating), these are good tools to start a basic mix setup. But a good start is meaning better results for later on, when your adding more to the mix to make it sound better and together. Starting with a clean mix is starting with a clean slate. With EQ for instance cutting/lowering can be done with a steep bell filter, raising can be done with a wider bell filter.
The Master Fader.
What not to do while mixing is adjusting the master fader each time you need to correct the overall level of your track, keep the master fader always at 0 dB (Only when you’re using the master fader to adjust the main volume of your monitor speakers, headphones or output to you listening system, it is allowed to adjust only that single master fader of your desk while mixing). This means that all other master faders (soundcard, recording program, sequencer, etc.) must be left in the same 0 dB position while mixing. Also this will go for the direct Master Fader of summing up the mix and Balance (Mater Pan), keep this always centered. The main reason is simple; the master fader is not for mixing, leave it alone. When you set the main master bus (summing) fader below 0 dB you are lowering the overall volume, this might seem plausible but especially with digital systems you will have problems not hearing distortion while you are pushing the instrument faders upwards. Also by lowering the master fader you will have less dynamic range, This means that internal mixing can be going over 0 dB (creating internal distortion) but it will not be visible or show on the VU-meter, will not light up the Limit Led, it will give you no warning that you’re going over 0 dB. When a signal goes over 0 dB on a digital system, there will be distortion of the signal going on (set your DAW for 32 bit float processing). But you will not notice any distortion going on when this happens internal. If you hear this or not, this is (mostly) not allowed. Try to keep all master faders and master balance in the same position when mixing, preferred at 0 dB. Also the human ear is hearing frequencies different at variable volume's (loudness). Listening while playing soft might reveal to your hearing in a certain way, when you raise the volume it will be slightly different to your hearing. So listening loud or soft, it is close but differs, by this it is always good when you like it loud, play your mix soft and see what happens to the sound (disappearing?). It is a good check to see if your mix will stand out as well played loud or softly. How the human hearing is responding is showed in this chart.
Low Band
To keep in mind speakers work best for low frequencies played in centre, so both speakers do the work simultaniously, there are plugins that do frequencies 0 - 250 - 666 Hz and make them mono. In tracks and to save processor time , a plugin that does this can be placed on the master fader. And help you to have centre speaker used in the low frequencies together in mono. While leaving higher frequencies above 666 Hz more outwards. The mone tunnel of bass frequencies they create works well to keep low frequency instruments in centre of both speakers all the time. And is a timesaver.

This chart shows different loudness levels, you can see that the frequency range between 250 Hz to 5 KHz is quite unaffected by playing loud or soft. But however the 20 Hz to 250 Hz is greatly different in loudness when played loud or soft. Also the higher frequencies transfer different when played loud or soft. This is the way human hearing perceives loudness.
A good starting point ?
Solo your lead vocal, mute all other channels. Set your lead vocal peak level at -9db. Set your Kick Drum peak level at -6db. Then Set your Snare Drum peak level at -7db. All other instruments peak levels may be set by taste.
Why does my mix sound so muddy ?
We go into this now because a lot of people are having problems with their sound when having to mix a set of instruments. Also recordings or vocals, the mix will get more muddy and unclear. The more sound you add, the more frequencies are taken from the open spectrum to use. So we should use the frequency spectrum from 5 Hz to 22,500 Hz wisely! When the lower frequencies are needed for Basedrum or Bass, do not let other instruments sound is these frequency spectrum area's. Specially the low bottom end must be clear from obstruction. Each sound extra will upset the bottom end more and more, and as bottom end eats up the dynamics, better be clear and wise. A good help is added when using a compressor to duck out sound from other sounding instruments. When the basedrum hits it can duck the sound of the base by using compression and side chaining. The use of this extends when you duck the other instruments execpt the main vocals. The main vocal will sound upfront suddenly. A combination of compressing the sound syou need to duck out, while others are playing is a good dynamic and spectrum wise tool to use inside a mix. Also ofcourse panning, delay or reverb, are good tools, but sometimes while hitting a good sound, the mix will not be clearly revealing all sounds as perfect as can be. Some mixes or tracks are so wisely mixed, they stand out. The use of a Plugin like Wavesfactory Trackspacer is a very good tool to duck out and is even an improvement above compression and side chaining. Basically it is an insert effect plugin that you use to reduce frequencies on one track in favor of another track. Trackspacer is an award winning plugin, so take a look at it. Some sounds are always fighting extra much with each other. Such as the kick drum vs the bass, or the leading melody vs the chords.
Well, simply slap on the Trackspacer on the two opposing tracks and get instant improvement in separation. Anyway i hope you understand that when you balance instruments that are Bottom frequency based in the middle and vocal in the middle, the rest of instruments can be panned. This will improve a mix a lot, just cutoff with an EQ all bottom end frequencies not needed by other instruments. You find out, you can do a lot off cutting on maybe a piano or strings, maybe even above 200 hz - 500 hz. And why not, it creates room for others to come true. So the main vocals are heard all the time it produces audio or sound, by just ducking all others by 0.707 or 30%. So when the vocal sounds, the strings and piano are ducked out for only 30 % of their volume. But when the vocals are not heard, the piano and strings play like normal. This EQ, Compression, Balancing, Panning and ducking are mixing techniques that need to be understand first and learned second. They are the tools to unmuddy your mix.
Bass Is The Foundation
Having a tight, punchy low end in your musical mix is a prerequisite. Regardless of whether you make electronic music, rock, pop, folk or any other style or genre. Get the low end component right and you have the perfect stable foundation for the rest of the production. Get it wrong and leaving it unrefined, you will find almost everything else you try will be something of an uphill struggle. If bass elements of a mix are coming through too muddy, boxy, or turn acoustically hidden invisible, you will struggle to finish the mix. Bass is the foundation towards getting a consistent powerful mix.
The mix there must not be a huge number of different elements whose primary frequency ranges are in the low frequencies. First keeping everything else out of the way Low Frequency Wise with filtering and EQ, making the Basedrum and Bass come trough. Then getting bass guitars or synth basslines and kick drums working together, supplying the low end groove and weight. The environment in which you mix or listen to your music has a huge bearing on the perceived level of the different frequencies. In small rooms it is the bass frequencies that are most affected by poor acoustics and short distances between surfaces because bass frequencies. This is because with their longer wavelengths than higher frequencies, bass sounds are much more prone to phase cancellation. However, when playing music very loud and over large systems, the apparent freuqency response will change.
First of all, consider that even decent home hi-fis don’t reproduce frequencies lower than 40Hz! And most domestic listening systems won’t do much below 80Hz! So begin your journey towards a good bass by making sure the bass sound is providing plenty of energy somewhere in the 70-100Hz range. This will ensure the fundamental bass frequency won’t be lost on the vast majority of playback systems. Where exactly the bass hits most will partly depend on where the kick drum sits as well, as you want the two working together.
Subharmonic Synths Generators work in a similar way to harmonic enhancers, but here you’re adding lower frequency harmonics rather than higher. This can be used to add extra weight and sub-bass frequencies that just weren’t present in the original sound. Some producers also use pitch shifters at this stage for similar effect, pitching a copy of the bass part (and often kick drum too) down by an octave and mixing this with the original. In a sense, this works in the same way as layering different components. It is generally accepted that the main bass and kick drum parts should always be kept panned to the centre, for a couple of reasons. First is that this shares the high level bass energy equally between the two stereo speakers, so you maintain maximum impact overall. Another reason is that it maximizes the chances that listeners will always be able to hear the bass properly. For example, you’ll want to keep sub-bass and any deep layers central. But any mid or higher frequency elements of the bass sound, some fizzy distortion or filter swooshes can be more widened.
The Basedrum and Base
I find in most cases the low end freqncies 5 Hz tot 120 Hz are the most important to get a closed look at. Dependant on what you are working on and with. Using speakers or headphones, be adjusted with your gear to listen commercial music and other mans music. Be convinced that the amount of base and low frequencies is not overendulgend, so compare and know your equipment. Specially the 5 Hz - 50 hz range can be forgotten, but is most important to have at least not too much frequencies in this range. Why ? Because it will lift and sweep all other frequencies with it. So some balance and level here is where you can get you music to sound really good. And the main problem for us humans is our hearing will not be so great in these ranges. So maybe you need to see and hear. Anyway if your using headphones be a long time working with your headphones listening to all kinds of music. So you know how they sound and what the low end will sound like. It is very easy to overdue the low end and that will hurt the rest of your mix. Some apply steep cuts below 30 Hz, the best thing is to cut here but know how much. If the low end is good and steady correct, it will lift your mix to be commercial.

Instruments.
Everything that you record on a track is likely to be an instrument. Common instruments are Drums, Bass, Guitar, Keyboard, Percussion, Vocals, etc. So when talking about instruments we do mean the full range of available instruments or sounds that are placed each on their own single track. When you mix, you only adjust the instrument faders to adjust the volumes (levels) of the different instruments or single recorded tracks (don't touch that master fader). Hopefully you have recorded every instrument separately like Drums, Bass, Guitar, Keyboard, Vocals, etc. On single tracks and on your mixer they are labeled from left to right. Each fader will adjust volume (or the level) of a single instrument or track, as a total summed up by the master bus fader. It would be wise to start with Drums on the first fader and then Bass. The rest of the faders can be Guitar, Keyboard, Vocals, etc, whatever instruments you have recorded.
Separation and Planning, Labeling and placement on a mixer.
Most likely you will start with the Base drum on fader 1 and working upwards with Snare, Claps, HI hat, Toms, Etc, each on their own fader 2,3,4,5,6,etc. So the whole Drums are sitting on the first faders. Then place the Bass, Guitar, Piano, Keyboard, Organ, Brass, Strings, Background Vocals, Vocals, Etc. on the next faders. You can use any kind of system. If you have some Send Tracks, place them far right on the mixer, just next to the master fader. Be sure to label all tracks and set the fader at 0 dB and Pan at Centre for each mixer track. To Label names and tracks (instruments) of a mixer is keeping it visible. Most digital sequencers allow this naming of a track on a mixer. Also it is good to work from the loudest instruments (Drums, Bass, Etc) towards softer instruments. Plan this on your mixer from left to right, faders 1,2,3,4,5,6,7,8,9,10,11,12,13,14,15,16,etc. Most likely the Basedrum will be the loudest peaking sound, place it first on the right. Maybe you have no drums on your tracks, just work out what sounds would be mixed and heard the loudest and what would be softer heard.
Making things easier for you to understand, we use labeling the Drums as an example.
Keeping things separated when recording drums is a must. You can do more on drum mixing when Basedrum, Snare, Claps, HI hats, Toms, etc are, each recorded on their own track (separately). This will mean that you are using more tracks on the mixer, but are rewarded by flexibility in mixing. Now days with digital recording, sequencing and sampling instruments, the drums often come from a sampling device, drum synth or recorded with multiple microphone setups. As long as your recording technique allows you to separate tracks or instruments, you will profit from this while mixing. Also for sampled instruments or synthesizers that can output at several multi tracks, it can be rewarding to separate each sound, giving each a single track on the mixer. Again, spreading and separation works best and is most common mixing technique. Deep sounds spread all across the panorama is not a good thing, depending on fundamental instruments (bass drum, snare, bass, main vocals) must have a center placement. Any variation off-center will be noticeable. Follow the panning laws for fundamental and not fundamental instruments, fundamental lower frequencies are centered and higher frequencies more outwards, lower not fundamental instruments more towards center, higher instruments more outwards. Use a goniometer, correlation meter. Working on Daws (digital audio workstations) keep goniometer, correlation meter, level meters and spectrum available as constant checking tools. Maybe even place a second monitor or even another computer to do this job.
Sound Systems.
As with many questions about sound systems, there is no one right answer. A well designed mono system will satisfy more people than a poorly designed or implemented two channel sound system. The important thing to keep in mind is that the best loudspeaker design for any facility is the one that will work effectively within the, programmatic, architectural and acoustical constraints of the room, and that means (to paraphrase the Rolling Stones) "You can't always get the system that you want, but you find some times that you get the system that you need." If the facility design (or budget) won't support an effective stereo playback or reinforcement system, then it is important that the sound system be designed to be as effective as possible. Preferred is a room with no acoustics for recording. For monitoring a room with some acoustics (room reverberation). Quality is an assurance, but however when on a budget at least choose equipment with less or no noise (background noise).
Mono or Stereo.
Well this question is asked and debated. But for me and many others I like all tracks to be stereo. So I do not like to record in mono at al. But we can refer to fundamental instruments (Basedrum, Snare and Vocals) as panned straight in center and be upfront. So these can be recorded or have converted original signal in mono, this will assure the left speaker and right speaker play both exactly equal and make them appear straight in center where they should be. Most of times I will convert mono tracks to stereo (left right the same) or just record in stereo even when it's a mono signal. So it's no mono for me, but this can be debated. Although of off course I respect the fundamental instruments are straight centered all the time. Specially using a computer or digital systems and recording sequencing software, working in stereo all time will allow you to have all effects in stereo and channels in stereo. Most digital mixer and effects like delay, reverb, phaser, flanger, etc are working in stereo and need to sound in stereo anyway. When playing a mono signal some digital systems will not perform that well, so it is stereo that is creating lesser problems with digital systems. Off course working in complete mono will reduce correlation problems, we mix in stereo with 2 speakers. It is better to have all tracks in stereo even when a recorded bass or guitar is actually recorded in mono. I always convert from mono to stereo or start by recording in stereo, this is just an advice. As long as the original signal is exactly the same left and right, you can work with mono signal in stereo mode. Knowing your tracks are all in stereo, you would not have to worry anymore about mono or stereo tracks at all (and to worry an effect or plugin is not outputting that well). You just know its Stereo all-time! This can help for setting up and making things easy. A well-recorded mono sound source on the other hand (recorded mono or stereo both channels), can be placed with relative ease onto the sound-stage allowing you to much better handle what and how any effects should be applied with regard to your other neighboring instruments, and their positions and frequencies in the mix. Stereo sounds that sway around the panorama alike synths, can be hard to handle. Especially when you have a bunch of these swaying instruments inside your mix. In natural world, it is likely that a dry signal is transmitted as mono, but with reverberation added and perceived as stereo by both our ears. Also in steady mixing, mono signals work best, even when they are filling up a stereo track both channels playing the same amount of sound gives a more steady and natural mix. Remember you can always add an effect to make instruments sway around. So recording a dry and clean signal is rewarded when later mixing purposes have to be free and creative. If two mono sound parts are sharing the same frequency range then just try and simply pan them slightly one to the right, other to the left. A couple of notches either side is usually enough. You must record in stereo, use two mono channels to capture right and left respectively as mono or as stereo. Test your mix in mono mode as well as in stereo mode. Use the mono button on the mixing desk to sum the channels together into one mono channel. This will put all the sounds into the center. Listen for phasing or any sounds that might disappear, so you can correct them. Use a correlation meter, goniometer, spectrum analyzer and level meter on the master bus to have checking tools available when needed.
Mixing in Mono or Stereo ?
I was always using a sampler as a main instrument. Recording samples in stereo and put them across the keys of the sampler. Using VST Instruments in Stereo, because I always thought stereo was it. But in the early days of tracker software (like Renoise), I used One Shot Mono Samples as an instrument. Like a Piano on key C3 as a One Shot Sample. Now with sequencers like Cubase and lots of VST Instruments and Sampling like Steinberg Halion or Steinberg Groove Agent, you get lots of samples and many of them are in stereo. The samples have a long tail, because they are captured with the complete sound and reverberation. Anyway it started to be processor heavy and was a lot to handle sample wise. Also the instruments have longer tails and it seemed that it would overcrowd the mix.
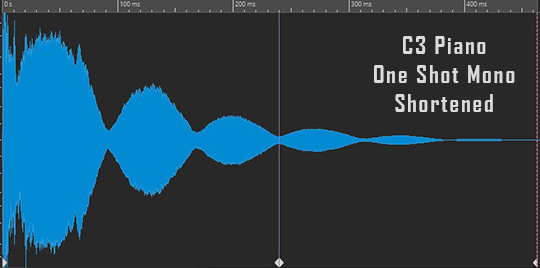
Using One Shot Mono Samples
The human hearing or nature sounds are basically all mono sound sources, there is nothing in the real world that comes as stereo sound, the real world produces mono sounds only. Like when you drop your keys on the floor, that is a mono sound. Actually the keys dropping on the floor is a mono sound with a reverberation tail (depending where you are, in a room or outside). So you could say the sound of dropping the keys on the floor is very short and in mono, the way that short sound is reverberated is also mono, but can come from many directions. We hear with two ears in stereo, that is because we need to know the direction where the sound comes from.
If we keep it short, we only use the keys falling on the floor part, maybe be come up by recording it as a sample with only 2 seconds of recording this sample. And maybe we can cut it more, we just need the dry beginning hit on the floor, we cut the reverb tail. So we have then a One Shot Sample in Mono that is very short in length < 1,5 second.
The same goes for recording a piano as a sample. Most will think we need many samples with long tails for recreating the piano in a sampler. That is why most piano library’s or piano instruments in the digital domain have lots of samples! But do we really need that ? Most of you will believe that it is all needed, big samples, lots of samples, is more quality, not ?
The profit when working with Mono Instruments
For a piano I now days just sample like only the Key C3 and have it as short as can be as a sample. I put that in the Sampler or Sampler Track of Cubase, and that is my piano sound. Many would say that the piano sample will not represent the original piano. And that will be true. But however in the real world everything is mono. So if I play the One Shot Mono Piano Sample on a keyboard it will sound off course mono. The catch is you can easily pan the Mono Piano and it will stay in the pan. A stereo piano might float around the stereo field. A mono piano will stay where I have panned it. So that is way more easy. Then if I use a send on the mono piano, like a stereo reverb behind the mono piano, I will recreate reverberation like in the real world!
The profit is when you use all instruments like Drums, Bass, Guitar, Piano, Strings, Melody, Vocals, etc., as Mono Short One Shot Samples that contain only the hard sound and not the tails, you can use your own chosen reverb(s) behind it. That works a lot better, recreating a human hearing sound in your mix! So from a single One Shot Sample in Mono, there can be created a Natural Human Hearing in the mix with using own chosen delays or reverbs. Not having long tails in the samples that contain already reverberation that was recorded with the samples, means you do not have all kinds of reverberation in your mix. So therefore using Short Mono One Shot Samples is a legitimate option! By first creating a dry mix with One Shot Samples with a short tail, and later on adding your on effects (like reverb or delays) you can control the mix in a better way.
Your mix will not be so overcrowded
Using One Shot Mono Samples, and especially Short Samples that only contain the main sound and not the reverb tails, will make your mix snappy, light and controllable. Losing all that pre-recorded reverb tails on all the instruments will clarify your mix and make it snappy. You can adjust the dry mix way better and hear everything way better. Then at a later stage you can use your own reverberation!
So long samples with a reverb tail recorded into the samples seems ok, but it gets confusing for the human ear when all kinds of different pre-recorded instruments are used, and they all have different reverberations recorded! The different sounding reverb tails, will confuse the human ear. That will crowd your mix and will be un-steerable and confusing to mix to a good result.
Short One Shot Samples in Mono, will clear the problem of having all kinds of reverberation that is unknown to you (because the reverb tails are not there), will not confuse the human ear (a straight natural mono sound like in nature is used), will not crowd your mix and will be steerable and way easier to mix! So think like in nature and human hearing. A sound will come in nature as mono, it picks op reverberations from the room of environment, and we as humans catch that with our two ears. The part of reverberation that has been lost (by cutting all samples short), can be compensated by using you own reverberation inside your mix. That can be a way more clear way to get a good dry mix first, then put on effects that you need. For me that is a way more easy way of working and getting a mix to sound good. Working first with sampled instruments in mono one shot samples, and then recreate the reverberation with reverbs and delays inside your mix effects sections, will give a more human hearing natural sound, as it would be in the real world.
The second is working with just One Sample per Instrument, makes it a lot easier to work with the samples in an audio editor. If you have a Piano the comes from a Library, like a Steinway Piano, this can have lots of samples (maybe even hundreds of samples). We cannot edit or control these samples, that would be a lot of work. Just One Sample per Instrument can make you Autotune it easy! The C3 Piano One Shot Sample, can be cut to size easy, can be tuned easy, and will be played in tune across the whole keyboard. And it can be controller inside the sampler with ADSR real easy. So why work with hundreds of samples that are uncontrollable and you do have across all instruments different unknown reverb tails ? That is confusing the human ears and confuse your mix. Instead working in Mono One Shot Short Tail Samples per Instrument, can make you a dry mix that you can adjust way better, is easy on the hearing, and is a more natural beginning of a mix. You can always recreate you own reverberation inside your mix as effects.
The way of working is, all instruments have One Shot Short Tail Mono Samples, you can pan them across the stereo field, add reverberation later on inside the mix, and control the samples more easy in an audio editor! It works better when all sounds are reverberated the same way, as a human we like to hear all sound from one room, one live concert, one environment. Instead of working with all kinds of library sounds that are stereo and have all different origins in reverberation, start and try working with One Shot Mono Samples!
Creating from Stereo Sample a Mono One Shot Short Sample
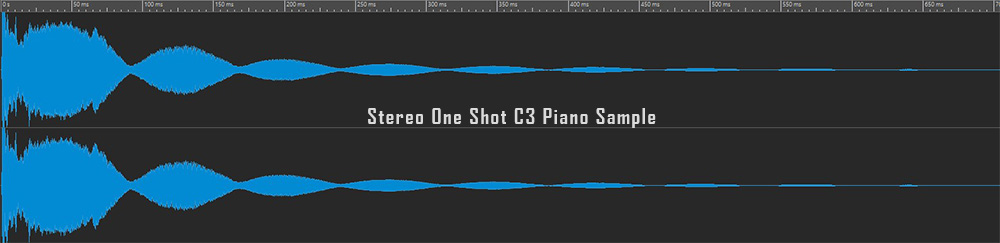
Get one stereo sample, example C3 key sample of a piano sample library. Or record the key C3 from any source instrument. Cut the empty beginning and end, make the sample smaller, with good start point and ending.
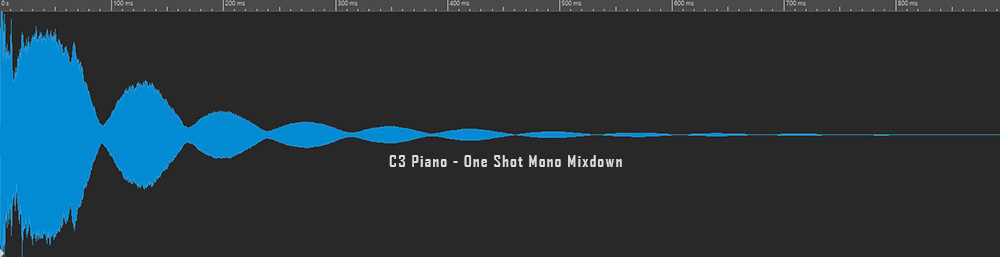
Create a Mono Mixdown, most audio editors can this.
Shorten the end by listening to what part you really need, and what part at the and can be cut off without real loss. Fade out the end part of the sample. You now have a C3 One Shot Piano, that can be very usefull in a sampler.
Human hearing
Generally a natural mix will be more understandable to the listener, when every sound is actually broadcasted in mono. We use in a mix stereo signals, that is true. We can expain all you hear in the real world is mono sound with the world reflections on it. The human hearing is two ears, stereo because you brains need direction of where the sound is comming from, what you hear is actually in the real world a mono sound source with reverberation on it. We use two ears and hear in stereo, in fact in nature everything you hear is actually in mono. Only technique gets mono to stereo sound in nature a stereo sound does not exist. A mono source can be directional because we hear with out two ears apart from ech other a slight difference betwoon the two ears, our brain will quess the difference of the two ears and gets direction information. Where is the mono sound placed ? Left or Right ? Middle ? Above ? Far or near ? That all depends on the reverberation added! So we could do with only mono instruments in a mix, and in the same mix add our own reverberation on top! When we first get rid of all recorded reverberation, in fact use Short Mono One Shot Samples, we have the sound as it would be done in nature without the reverberation on it, a dry short sample. The world around us creates the reverberation on each sound, but when we let the reverberation stay inside our recorded sample, we can have a lot of different reverberations allready inside our mix. That is maybe why you struggle to get the reverberation correct inside your mix ? Why not use only teh One Shot Mono Samples for each instrument. We the have a good dry mix to start with. And can add one kind of reverberation on the mix (by using reverb,delay,etc) so your mix will reside in one reverberation. A human likes to hear the sound is as in nature. You are standing in a room, if you play music there, you will get the reverberation from the room, when you also start talking there you also get the same reverberation. Because in nature where you are, you get that kind of reverbeartion on all that is sounding. In a mix we can use Onse Shot Mono Samples, and mix the reverberation in or onto it.
Basic Mixing.
This is going to be hard to explain, but an example will help you get started mixing. For example you have recorded a Pop, Rock, House or Ballad song. And now you have finished recording it (composition wise and recording wise in audio or midi), you will need to mix to make it sound better and more together. At first separation is needed, cleaning and clearing (single tracks). Getting the mix as dry as can be. You can choose to use Stereo Instruments or Mono Instruments or even One Shot Mono Intruments as explained below. When you are mixing for a long time on Stereo and you cannot seem to get the mix correct ? Try aiming for a Ono Shot Mono Instrument mix on stereo lanes. Then you can add the effects needed for reverberation (room and direction) later on. You choose a complete stereo mix, or get into Mono Instrument Samples on a Stereo Mix. Second quality and togetherness of a mix is what your aiming for, mixing it up (groups towards the master bus, summing up). What you’re not aiming for is loudness or level, how loud your mix is sounding is of lesser importance then having your mix sound well together. Togetherness is what you’re aiming for. So watching the VU-meter go to maximal levels is not so important while mixing, pushing all faders upwards all the time will get you nowhere. So forget how loud your mix is sounding, this is called Mastering and is a whole different subject. Mastering comes after you have finished mixing. Mixing is what you’re looking and that is why it is called mixing, for this means , cleaning, cutting, separation as well as togetherness.
Mixing steps.
We have three sections to fulfill while mixing from beginning to end. First the Starter Mix, where we setup a mix and start off working inside dimensions 1 and 2. Then the Static Mix, where we apply dimension 1, 2 and introduce dimension 3 as a final 3d dimensional mixing stage plan. Finishing off to this part Starter and Static mix is giving a basic reference static mix for later use, and needs to be worked on until the static mix stands as a house stands on its foundation. Then finally the Dynamic Mix, where we introduce automated or time lined events. Make progress in mixing, plan on finishing your projects within a predetermined period of time. This is the only way to see your development in time. Don't fiddle around with DAW’s function but be concrete, improve your mixing skills and decision making capabilities, then learn to trust them . Give yourself a limited amount of time per mix. A static mix should be 80% done after hours of work. The rest is fine tuning and takes the largest amount of time. Building confidence in rhythmic hearing. Trust your ears for listening for rhythmic precision and keep it natural. A DAW and its graphic interface allow for seeing all you need, but allow to trust your ears not the display. When rhythmic timing is needed, your ears will decide something is early or late, or spot on. Trust your ears. When you are not happy with results, make a copy of your project, remove all insert and send effects and put all panning to center. Start right from the beginning, redefine your stage plan with a clear mixing strategy. Re-setting levels, pans, EQ, to zero and start from the beginning, removing all effect or plugins. Necessary to obtain a good mix lies in intelligently distributing all events in the three spatial dimensions, width, height and depth.
The Starter Mix.
Basically as we are staying inside dimension 1 and 2. We will explain the dimensions later on, but for a starter mix we only use Fader, Level, Balance, Pan, EQ, Compression and sometimes some more tools alike Gate, Limiter. Our main goal is togetherness, but as a contradictive we will explain why we need to separate first. As a starter mix will start off good, only when we first separate the bad from the good. Rushing towards togetherness is never doing any good, so this comes second in line. To understand what we must do (our goal for starter mixes) we need to explain the stage and the three dimensions now.
Panning Laws.
Crucial to understanding the first dimension of mixing are the panning laws. Frequency ranges or instruments/events with a low range, are more placed in center. High ranges are more placed outwards to the left or right. This will mean that Basedrum, Snare, Bass and Main Vocals (fundamentals) are always in the dead center, especially with their low frequency content. All other instruments or events are more placed outwards (not fundamental), even if they contain lows, when they are not part of Basedrum, Snare, Bass, or Main Vocals, they are placed outward to the left or right. Lows more centered and Highs more outwards. Also take in mind that send effects that are placed more in center, will draw outward instruments towards the center. So placement of a delay or reverb must be considered for what instrument (fundamental or not fundamental) it is required. The Masking effect, the time and effort of using left/right effects is only correct if the reverb part becomes too large to convey all the spatial information as a result of the masking effect. The more complex a mix, the more time and effort is required for placing all events accurately within the three dimensions. Starting off with panning in the first dimension. Before mixing start, make a sketch of your panning strategy (stage plan). Anything that is not bass, bass drum, snare or lead vocals, should not be in the center. Instruments present in the same or overlaying frequency sectors, should be placed at opposite ends complimenting each other within the panorama. Well panned and carefully automated panning often creates greater clarity in the mix than the use of EQ and is much better then unnecessary EQ ing. If sounding mush, your first step is panning then to resort to EQ. Be courageous, try extreme panorama settings, and make the center free for the fundamental instruments. Never control panning trough groups, only by its individual channel. Never control straight panning or expanding with automation, just small panning and expanding settings for clearing a mix temporarily.
The Stage.
With an orchestra or a live band playing (we are going a little ancient here) there is an always stage to do so. Back in the old day’s people could only listen to music when played by real performing players or artists. There was no means of electricity or even amplified sounds coming from speakers. And furthermore a human is always hearing natural sounds in life. Anyway listening to music just appeals most when the instruments are staged and naturally arranged. We as human's are used to listen to music in this fashion for ages and now we have the common pattern inside our DNA. Human ears like hearing naturally and dislike unnatural hearing. When playing music we hear Volume, Panorama, Frequency, Distance and Depth. Therefore we talk about the musical stage. Mixing is the art of making a stage, this is called orchestral placement and sets all players to a defined space of the stage they are expected to play. For any listener it is more convenient to listen as natural as possible, so a stage is more appealing for the human brain to recognize and understand. A live concert of an orchestra might reveal the stage better in this picture below.

No matter what stage is set, what you are trying to accomplish is stage depth. The next chart display's a setup plan for recording and mixing a whole orchestra. We call this orchestral placement.
In this chart we present a whole orchestra of instruments. The x-axis is showing Panorama, Pan or Balance (left, center and right). The y-axis is showing depth (stage depth). As listeners we do like to hear where instruments are, some are upfront, some are more in the back of the stage. A mix would be quite boring and unappealing to the human ears when all sounds seem to come from one direction only (mono). Anyway we as humans can perceive Volume (level), Direction (Panorama, Pan or Balance), Frequency Spectrum and Depth. These are the three dimensions of mixing. Taken in account we are using two (or more) speakers. It is quite common to think in stage depth when mixing. Even when your material is modern funky house music, still thinking in stage depth might help you mixing a good understandable mix and have some idea where to go and what to accomplish.
Stage Planning.
So it is better to have some kind of system and planning, before starting a mix. Knowing where to place instruments or single tracks inside the three dimensions. Basically all parts of dimensions (we explain the dimensions later on) are easily overcrowded. Therefore we must use a system to give all instruments a place inside the dimensions, just to un-crowd. Making a rough sketch can simplify and visualize the mix. Therefore you will have some pre-definition before you actually start mixing. You will know what you’re doing and what you are after (your goal in mixing). We start with a basic approach. We start with the most crucial or fundamental instruments first.
The Base drum is fundamental, keeps the rhythm and because it is mostly played in the lower frequency range. The base drum is most fundamental, because it keeps rhythm and second because it's fundamental frequency range is mainly lower or bottom end based (dynamic high level). All main fundamental instruments are placed dead center. The Snare is important for the rhythm, but however does not play as much lower frequencies as the base drum. The Bass is fundamental because almost all notes play in the fundamental lower frequency range. Vocals must be understood, upfront and are therefore fundamental to the whole mix. As you can see all important fundamental instruments are planned in the center inside Dimension 1 (Panorama).
All instruments that are fundamental and are playing lower frequencies must be centered, because two speakers left and right, will at the same time give more loudness and therefore can play and represent lower frequencies best (center is coming out evenly on left and right speaker).
The center position is now a bit crowded by the fundamentals, Basedrum, Snare, Bass and Main Vocals. To give some more space between each other (separation) dimension 1 (panning) and 2 (frequency spectrum or frequency range) and dimension 3 (depth) are used to separate them and give some idea what is in front of each other. Most likely you would like the main vocals to be clear and upfront. Think of it as a stage setup. The bass (or bass player) would stand behind the vocals, on a real stage the bass player might move around a bit, for modern mixing still dead is centered (because of transmission problems in the lower frequency range or bottom end, only placed center, and we are still busy with the starter or static mix, no automation can be used). As the drums would be the furthest away backwards on the stage, we place them in the back but still dead center. Anyway placing these fundamental instruments in the center gives definition and clearness to them, without interfering instruments overlapping. Especially Base drum and Bass must be centered to make the most out of your speakers. As the spectrum will fill up in the center because already Base drum, Snare, Bass and Vocals are filling it up (fundamentals), discard and leave this area alone (off limits) for any other instruments (not fundamentals) . Other instruments can be placed in dimension 1 (panorama) and panned or balanced more left or right. This is common in practice for many mixes, but a beginner will hesitate to do this (Panning). Still think of it that guitars and keyboard on stage are always placed left and right. Simply because else the stage would be crowed in the center if all players have their position taken. To imagine where an instrument or player will be placed is also being a bit creative and then be experienced, adding to what a human perceives as natural keeping it all understandable for the listener (finding the clear spots). Keep in mind that lower frequencies play better when played by both speakers (centered) and therefore higher frequencies can be more panned left or right (outwards). Fundamental instruments with bottom end or lower frequency ranges must be more centered, while higher frequency range instruments must be panned more outwards. Next we will place the other drum sounds.

As a decision we place the HI hat next to the snare, by panning the HI hat a bit to the right. Planning the stage or dimensions, this is a creative aspect; the HI hat are placed right from the snare, but also could be placed left. This depends on the natural position of the HI hat, for setting the stage we could look at real life drum placement and take this in account while planning the stage, so mostly the HI hat is placed more right. Now we have the right speaker playing more highs then the left because we placed the HI hat more right. To counter act and give the left speaker some more highs we can place an existing shaker to the left. This counteracting gives a nice balanced feel between left and right, because mostly we like to whole mix to play balanced throughout. Then the toms are only played scarcely in time (toms are just suddenly played once in a while) so are less important in planning, still we place them to show where they are. For toms we place hi-tom far out and low-tom far out, in between the mid-toms. The overheads are placed behind and with some stereo expanding or widening this will give some room and sounds more natural. The main vocals are upfront. The rear can be used for the background vocals (choirs) and strings, bongo's, conga's, etc. Next we place some other instruments and we are looking at not so crowed places to place them in. Separating more and more.
See that Guitar 1 and Guitar 2 are placed Right and Left (this could also be guitars and keyboards), so they are compensating for each other and keep a nice balance. Also Synths and Strings are compensating and in balance, tough with some more distance (we use the strings as counter weight over here). Strings can also be placed back of the stage with a stereo expander to widen the sound at act as a single sound filler. Remember when you place an instrument, it is likely to counteract with another instrument on the opposite side. Also taken in mind instruments that play in the same frequency range can be used to counteract and balance the stereo field. For that we can say the HI hat and Shaker are complimenting each other (togetherness), as well as Guitar 1 and Guitar 2 do. And the Synth with the Strings. So we keep a balance from left, center and right. Don't be afraid to place not fundamental instruments more left or more right, keeping them from the already crowded center. Unbalanced mixes will sound uneven, when the whole outcome of the mix is centered we can hear the setup (stage plan) better and more naturally. When the left speaker plays louder than the right speaker, it will give unpleasant (unbalanced) listening. The total balance of your stage planning should be centered. Adjusting the master balance for this purpose is not recommended. Keep the master balance centered as well as the master fader at 0 dB, as well as any effects on the master bus, we always try to correct things inside the mix, not on the master bus fader. Whenever you have an unbalanced panorama, go back to each instrument or single track and re-check your stage planning. As stage panning or balancing in the first dimension is one of the first tools for setting anything else. With the help of dimension 2 (trebles, boosting for close sounds or cutting higher frequencies for further away sounds) and dimension 3 (reverberation, room, ambience) we can create some kind of distance and depth. A final mix or mixing plan should refer to all of this. Depending on the musical style and what you want to accomplish as a final product. Also do not hesitate to use panorama, beginners will be resultant to do so.
Although this looks a bit crowed when you have all instruments playing at the same time together, it is likely you will not have all instruments inside the mix anyway or playing all-time together (composition, muting). It would be quite boring when all instruments where audible throughout the whole mix. We do fill in our stage plan with all our instruments. We give an indication what is a general setup and a good starting point, planning where instruments play and giving them a place is defining your mix, a foundation to build your mix on. This planning is called stage depth because almost any mix has some relations to what the human ear likes to visualize in our brains. Most likely natural placement is the way to go and is most common. So you can be creative and come up with any kind of planning or setup. Remember it is likely for instruments that need a bottom end, to stay more center (especially the fundamentals). All other instruments that do not need a lower bottom end (not fundamentals) can be placed more to left or right (apart from the dead centered and upfront main vocals). Decide what your fundamental instruments are, then setup panorama and depth (distance) accordingly.
3D - Three Dimensional Mixing.
Strangely creating togetherness means separating more than overlapping each other, it means you will have to separate first. What most beginners do not know about is the masking effect, where two instruments that play in the same range are masking each other. Try have two guitars in mono mode, then drop one guitars level with -15 db or more. You cannot hear this guitar anymore do you ? Well now pan this guitar to the left, you can hear it again, even now its -15 db lower than the other guitar. Basically when playing every instrument just leaving centered (no panorama) it is getting quite crowed in center position and is quite boring (and enhances the masking effect). Masking is so common in mixing, we are in a constant struggle to avoid it. With avoiding masking, we can have more dynamics, or to say it the other war "we have more room for each instrument to play and be heard, with less volume level needed, therefore leaving more room for others to be heard. Therefore every instrument will get its own place inside the three dimensions. Below is an example of the three dimensions.
The Three dimensions.
1. Width (Left Center Right), Panorama, Panning, Widening and Expanding.
2. Height, Frequency, Level, EQ, Compression (Gate, mute, etc).
3. Depth (Front to Back Space), Reverb & Delay, EQ ing Reverb & Delay.
Dimension 1 - Panorama.
Panorama is mostly achieved by setting Pan or Balance for each instrument on each independent single track. Basically setting the panning to the left, the sound will play from the left speaker. Setting to the right will play the sound from the right speaker. Setting it to center will play the sound from both speakers. Think of dimension 1 as Left, Center and Right. Three spectral places in dimension 1, Panorama. When it’s more crucial to you, you can also use 5 places for naming panorama when mixing or planning stage depth, 9:00 (Nine O' clock), 10:30 (Ten Thirty), 12:00 (Twelve O'clock), 1:30 (One Thirty), 3:00 (three O' clock). Panorama is most a underestimated effect in mixing (masking effect). Just because turning a simple pan or balance knob is easy to setup. Panorama in fact is a most important design tool (option) and the first start of defining a mix (apart from the fader level). Use Panning first before setting the fader level, apply the panning law and the relative volume of a signal changes when it is planned. Even when you’re fully on your way with a mix, turning all effects off (bypass) and listening to the panorama is often used for checking a mix is placed correctly.
There is a mixing solution for deciding what instruments stay centered and what instruments go outside of center. Instruments that are crucial or fundamental to your mix, like Base drum, Snare, Bass and Vocals are all in the center (fundamentals). Any other instruments (not fundamentals) will be more or less panned left or right. The most common place for Basedrum and Bass are center because two speakers playing at the same time at center position will play lower frequency signals better. Panning or balancing lower fundamental instruments left or right, is not recommended therefore at all. Even the effects alike delay or stereo delay can move instruments more left or right in time, so watch out to use these kinds of effects on fundamental instruments. And as automation is not a part of the static mix, we do not use it. The main pathway is dead center, so even when using a stereo delay, the main information should be dead centered for fundamental instruments. The Snare and Vocals are just as important, because the snare combines with the Basedrum rhythmically and vocals must be heard clearly always (so we also place them all dead center upfront). By having the Basedrum, Snare, Bass and Vocals in the center (fundamentals), there is not much center panorama and spectral room (Dimension 1 and 2) left over for other instruments to play in the center. or more widening the stereo sound (outside left and outside right) a Stereo Expander or Widening effect (delay, etc) make the stereo field more than 180 degrees and will widen the panorama even more, giving some more space inside dimension 1 and more room to spread the not fundamentals around. Be courageous!
Do take into account that correlation (signals cancelling each other out in mono mode) will be more when you widen or pan more, so check for mono compatibility. Use a correlation meter to check or goniometer. Maybe you have to reduce the stereo field to prevent a mono mix from cancelling out instruments. Also Basedrum and Bass can have signals that need to be reduced that fill the spectrum left or right, cutting this will keep them centered more (in time) and keeps them from swaying around. As a general rule lower frequency range instruments or tracks are placed at center, while higher frequency range instruments or tracks a panned more outwards. There are basically two ways op perceiving the dimensions. Fist panning from left to right in front of you, alike a stage. And second the ambient effect. This is to move any panning sounds right around your body, rather than just from left-to-right in front of you. Meaning you are in center of the sound, meaning ambient sound or surround sound. This is apart from the stage planning, the listeners position. We like the listeners position to be mostly straight in the middle of two speakers, hearing an equal divided sound on both speakers overall (RMS, Left Center Right, LCR spectrums).
Dimension 2 - Frequency Spectrum.
Frequency Range 0 – 30 Hz, Sub Bass, Remove.
Frequency Range 30 – 120 Hz, Bass Range, Bass and Basedrum.
Frequency Range 120 – 350 Hz, Lower Mid-Range, Warmth, Misery Area.
Frequency Range 350 – 2 KHz Hz, Mid-Range, Nasal.
Frequency Range 2 KHz – 8 KHz, Upper Mid-Range, Speech, Vocals.
Frequency Range 8 KHz – 12 KHz, High Range, Trebles.
Frequency Range 12 KHz – 22 KHz, Upper Trebles, Air.
The frequency spectrum or frequency distribution of a single instrument or whole mix is the second dimension. It is understood that a Bass is a low frequency instrument will sound most in the lower frequency range 30 Hz to 120 Hz (bottom end). Cut all other instruments out of this range with a very steep filter. The frequency spectrum of a mix is specially crowded in the lower 'misery' range 120 Hz to 350 Hz (500 Hz) or 2nd bottom end, where almost all instruments play somehow. From 1 KHz to 4 KHz we find most nasal sounds and tend to find harmonics starting to build up. The 4 KHz to 8 KHz can contain some crispiness, can sound more clear when boosted, but also unnatural. A HI hat will play mostly in the higher frequency range 8 KHz to 16 KHz (trebles). So giving each instrument a place in the second dimension where it belongs is important filling up a frequency spectrum. We tend to talk in frequency ranges, so words alike low, Mids or highs are common in the mixing department. Also words alike, bottom end, lows, misery area, trebles, Mids are only indications where to find the main frequency range. The main tools for working with the frequency spectrum and making the sound of an instrument fit inside a mix are EQ, Compression and Level. Also tools like gating and limiting can prevent unwanted events to pass. There are two purposes for these tools. First to affect quality, thus boosting or cutting frequencies that lie inside the frequency range of the instrument. Second to reduce unwanted frequencies, mostly lie outside the instrumental frequency range, thus cutting what is not needed to play. Most instruments alike Basedrum for its bottom and skin, have two frequency ranges that are important. The bass drum must convey its rhythmic qualities for instance. A bass instrument plays a note it will have its own main frequency, its harmonics and instrument sounds around it, alike body and string attack sounds. This is the frequency range the instrument is playing in, it's main sound. For bass this does mean a lot, we expect that the range 0 Hz to 30 Hz can be cut, while leaving 30 Hz to 120 Hz (180 Hz) intact (first fundamental range of the bass). Higher frequencies can be cutout or shelved out. Because this will separate the bass and give it place (space, headroom) to leave dynamic sound to rest of instruments. By doing this using EQ on the bass to make the sound more beautiful (quality) and to leave some room for other instruments to play by cutting out what is not needed (reduction), is leaving headroom and will separate instruments. As you can see we basically boost or cut when doing quality purposed mixing. And we mostly cut when we are reducing. As a result we are likely to cut more and are likely to boost less. We tend to cut with a steep EQ filter and to boost with a wide EQ filter. The bass has now got a clear pathway from 30 Hz to 120 Hz (180 Hz), maybe the Basedrum is in the bass range (60 - 100 Hz), but we try to keep all other instruments away from the bass range (0 - 120 Hz). The range 30 to 120 Hz (180 Hz) is mainly for Basedrum and Bass (especially in the center spectrum). As this frequency spectrum is easily filled up, it is better to cut what is not needed on all other instruments. You might think it is not necessary to cut the lows out of the HI hat, but it is best to know that the HI hat will play in the higher frequency range, to remove all lower range frequencies, you could use a low cut with EQ over here also. So now you have separated the Bass and the HI hat from each other and have given each a place inside the whole spectrum (tunneling, separation). The same will apply for all other instruments that combine the mix, even effects used. Knowing where the ranges are of each instrument and having planned the panorama and frequency spectrums will help to understand how separation works when mixing and this is building the basis start of a mix, the foundation of a house (reference or static mix).
The Spectrum of a finished mix could look like the figure on the left (we have shown this before), you can see a good loud 30 Hz -120 Hz section, that is the range the Basedrum and Bass play with each other. And the roll down to 22 KHz. Though sub bass 0 Hz to 30 Hz is still quite loud in this spectrum, still this is quite a bit lower than the 30-120 Hz range. On the figure on the left you can visualize the range of instruments and their frequencies, refer to it whenever you need to decide the instrumental frequency range and what to cut out (reduction) and what to leave intact (quality). We have discussed these subjects before. Dimension 1 and 2 are most important for creating a starter towards static reference mix, so do not overlook these dimensions. Return to these dimensions when your mix is not correctly placed, sounds muddy or fuzzy (masking). The Volume Fader, Balance or Pan Knobs must be your best friend in mixing and first starting and referring points. Then refer to EQ or compression as a second measure (gate or limiter also allowed). Knowing where instruments must be placed according to plan, works out best in dimensions 1 and 2. Dimension 2 frequency spectrum can be also working a bit inside dimension 3, as we perceive depth when trebles (high frequencies) are loud and upfront, but perceived backward in depth when trebles are less loud. Use an enhancer to brighten dull sounds to keep them upfront. Always when working with trebles > 8 KHz, be sure to use quality/oversampling EQ and effects.
Separating instruments in dimension 2, frequency range.
EQ can do a good job by cutting out the bottom end of all the instruments that are panned left or right (not fundamental) and instruments panned dead center (fundamental). That is why we will discuss some effects alike EQ now, even though we have an EQ section explained later on. Basically the low bottom cut for Basedrum is a decision you can make when you are combining Basedrum and bass together. It is most likely a 0 Hz to 30 Hz cut can be applied to all instruments and tracks, even bass drum and bass. You can start off using a low bottom cut around 0 Hz to about 30 Hz, this is most common.
The cutoff figure shown above would be a good cut for the most fundamental instruments alike Base drum and Bass, but really applies for all fundamental or not fundamental instruments or tracks. Cutting from 0 Hz to about 30 Hz (50 Hz) can remove some sub bass range as well as pops, low clicks and lower rumble for every instrument. Anyway the range 0 Hz to 30 Hz is really sub bass levels, so you actually do not hear much of them at all and is more of a feeling kind then hearing. If you need sub bass frequencies in you music, you must know that most speakers do not even play them. When for instance a bass drum is believed by beginners to make more power and raise the whole 30 - 120 Hz range with EQ, please do not. So you can't hear them in the first place, even with a big bottom speaker this is not heard much (filling up your headroom without even hearing it correctly). Even in a club or live event the bass drum will have effect around 60 - 90 Hz. In general most household stereo systems do not play bottom end frequencies < 50 Hz or even < 100 Hz at all (depending on the quality of the system and speaker set). Thinking sub bass (0 - 30 Hz) will enhance your mix by boosting or leaving unaffected is a beginner’s mistake. Leaving it intact for instruments that are not fundamental is also mistake. Do not hesitate to cut the 0 Hz to 30 Hz range of frequencies out of all fundamental or not fundamental instruments. We now have removed some really low frequencies out of all instruments or tracks with a steep low cut EQ filter and therefore removed some unwanted loudness, leaving some precious headroom and will un muddy your mix (masking), making your mix more clear (dynamical, rhythmical).
The above figure shows a bottom cut and a highs cut, for a more distantly placed instrument.
We need our Bass to play, and not be overcrowded. As well as we need the Basedrum to play, keeping 30 Hz to about 120 Hz (150 Hz) free for bass drum and bass only. This means we are creating a clear dead center blast of lower frequencies (L R = C power) free for playing only Basedrum and bass. Even fundamental instruments alike snare and vocals will give problems with headroom and are playing somehow inside the base drum and bass range, cut them all.

A low bottom cut for all other fundamental instruments (snare and main vocals) is shown in the above chart. The snare and main vocals are playing somehow in the lower end of the frequency spectrum, but do not actually play in the bottom end range (where bass and bass drum are already playing in). So maybe we can do some more cutting from 0 Hz to 120 Hz (180 Hz). Second, the bottom end 0 Hz to 30 Hz range is filled with mostly rumble, pops and other unwanted events for the most part. So cutting with an EQ steep filter is quite understandable to be sure to remove these elements or events. To keep the lower fundamentals bass drum and bass free in their own 30 - 120 Hz range.
To avoid overcrowding we can cut out the bottom end of all other not fundamental instruments, leaving more space (headroom) for the fundamental instruments to shine and separate, avoiding muddiness and overcrowding (masking). Don't be afraid to cut more out of a Synth or Guitar, anywhere from 100 Hz to even 250 Hz is quite understandable. This is where most beginners will hesitate. It is better to do a bottom end cut on all other instruments, just to un-muddy the lower frequencies and make a clear path for the base drum and bass to play unaffected. For not fundamental (all other) instruments, you can cut some more or less lower frequencies with a steep low-cut filter or some good cutting EQ. We can avoid pops, low clicks or rumble out of our mix and keep the lower frequency range free. If there is any information at all over in the sub bass range, it would be Bass. Bass is the only instrument that can reach this low. So therefore we don't cutoff the bass, we do cut-off the rest of all instruments playing. Well normally that is, sometimes a piano can reach this low but really still does not contain a relevant sub bass range. Do not hesitate to use quite a lot EQ cutoff shelving on all instruments, better to do more cutting then less.
Apart from Basedrum and Bass, a good roll off at 120 - 150 Hz is a good starting point, setting higher until you affect the main frequency range of the instrument. You can always adjust the cutoff frequency range later on for better results once you have placed it. Un fundamental instruments can be cut anywhere from 0 Hz to 180 Hz, basically they almost never play the C1 note range (octave). In order to find the lowest note played by an instrument, listen solo throughout the whole mix. Find the lowest note and its frequency. You can decide where the cutoff frequency lies, but remember the Basedrum and Bass need room to shine, so their main range is from 30 Hz up to about 120 Hz (180 Hz). Any other instruments that play in this range will crowd it and is better to avoid (muddiness and masking). So leaving the lower frequencies for Basedrum and Bass will have you deciding to make cutoff's or roll-offs on all other interfering instruments.
The cutoff figure shown above would be a good cut for the not fundamental instruments like Keyboards, Synths, Guitars, Organ, Vocals, etc. Depending on the low cut by dynamical intent, depending distance by controlling highs. By listening to each instrument you can decide where the cutoff frequencies are exactly. This can only be done if you understand what the frequency range is of the playing instrument and decide what is needed and what is not needed to heard. Most drums (all drums that are in the drum set) have two main frequency ranges, as well as most instruments. Remember in our stage planning, we now have to decide how our separation plans must work out in each different instrument or track. Use more cutoffs on not fundamental instruments. Subs (0 Hz to 30 Hz) can mostly be removed. The lower frequency range (30 Hz to 120 Hz, 180Hz) is mainly for Base drum and Bass. The frequency range between 180 Hz to 500 Hz is overcrowded anyway by most instruments playing over here, you can make a difference over here paying attention and spending time to get it correct sounding. The loudness that comes from the lower frequency range from 30 Hz to 500 Hz upwards 1000 Hz is basically generating the most loudness out of your whole mix and will show up on the Vu-Meter. Especially the lower frequencies of the Basedrum and Bass are fundamental for rhythmic content, power, clearness and are generating the most loudness, keeping them separated by giving them a free frequency range 0 Hz to 120 Hz. Remember the lower the frequency to more power, you can save headroom (power) by cutting out all unwanted frequency ranges.
Quality and Reduction.
Basically we for a good starter mix we will try to achieve quality as well as reduction of unwanted events. Quality involves boosting with EQ (wide) and cutting with EQ (small), likely inside the main range of frequencies sounding from the instrument playing a range of notes or main frequencies. Quality can be boosted, but counteracting cuts can avoid boosting (better). Quality relies on how good an instrument is sounding. Reduction means mostly cutting some lower frequencies (0 Hz to 250 Hz depending on the instrument) and cutting high trebles for distance. Where the cutoff frequency is placed relies on the instrument and mix decision (stage plan). But apart from this, it can mean also a cutoff in higher frequencies for instance on bass or base drum just to separate. By using reduction methods we try to separate instruments and give them each headroom to play inside the frequency spectrum. Compression alike EQ has quality and reduction features. Compression can raise transients (quality) or sustain (quality), but can reduce peaks as well (reduction). For reduction a gate keeps out unwanted events or we can use manual muting. Maybe a limiter can scrape off some peaks (or a peak compressor, reduction). Anyway these two purposes (quality and reduction) are the main tools for a starter mix.
Separation.
Making separation and headroom. In dimension 1, as we explained panorama separates instruments and spreads them from left, center, right. In dimension 2, we can adjust the frequency spectrum. Both combined are the basics of a good starter mix and can take up to four hours of time to accomplish a mix that is dry and according to your planned stage and still have some headroom for furthermore mixing purposes. As if you’re not fully trained and experienced, then spend a great deal of time inside dimension 1 and 2. Stepping too fast into dimension 3 might set you up for some troubles you could not fix otherwise. Understanding what is going on inside each dimension and where to place instruments according to human natural hearing (your stage plan), is the key to successful mixing. Swapping for instance left and right is off course ok. As long as you understand that placing a high frequency range instrument (HI hat) on the right will affect the total balance of the mix, to compensate we have added the another high frequency instrument (shaker) to the left. This kind of thinking goes for the Mids and lows also. As long as you counteract your actions, you are doing fine. Counteracting is a most common many methods of mixing. Again how you’re planning of the dimensions will unpack; the final mix will have to be balanced (meaning the combined sound of your mix must be centered over two speakers). We as human's dislike when the left speaker plays louder than the right speaker or otherwise. It is artistic rights and being creative that defies the rules, but still can have a good outcome. Generally fundamental instruments are centered, and lesser fundamentals are placed more left and more right.
Dimension 3 - Depth.
The Spatial Depth is a more perceptive sound, giving space and room to each instrument, single track or mix. The most common tools are Reverb and Delay. Reverberation is a common depth (dimension 3) tool. When a note or sound is played at the first time, the transients are an important factor (from the original sound event). The transients make our brain understand what sound is played and for recognizing the instrument. This we will call the dry signal. From the dry signal a room will present reverberation after some time in milliseconds, mostly the early reflections will make our hearing understand distance and placement. The pre-delay of first reverberations/early reflection is making our brain understand depth or distance. Mostly when pre-delay and reverberation is naturally understandable to our brains, we perceive depth, because a Reverb (and Delay in a lesser fashion) will muddy up the mix (masking), careful attention must be applied over here. With Reverb or Delay it is common to cut the lower bottom frequencies because this will clear up the mix and wipe away some muddiness (separates the reverb from the fundamentals alike Base drum and Bass). Also when you apply the rules of Dimension 1 and 2 correctly, the panorama and spectrum of each instrument will create a place or stage for each instrument. For that we can cutoff or raise the trebles of the reverb to be closed upfront or more distanced. Now that reverberation is making our brain believe there is some distance, dimension 3 is a fact. Separation is the key to successful mixing, balancing not fundamental instruments more left or right and not over pumping the frequency spectrum as a whole. Basically the lower frequency range of a mix is the place where all instruments will play their main ranges, so filling this with Reverb or Delay will only add to muddiness or add unclear (fuzzy) sounds and enhance the masking effect. Especially Base drum and Bass are instruments you want to hear straightforward, so must be separated at all time from the rest by controlling all lower frequencies that play in their range (use an ambient, drum booth, small room). Instead depth can be interesting when applied on clear and dry starter mixes, making them sound more natural and less fabricated. Also Reverb and Delay are not the only factors for depth. Instruments will not play all the time; it would be boring to hear them all throughout the whole mix. It is likely you have some kind of composition going on and the timed events of instruments can create more depth also. The level (volume or amplitude) of the played note will create depth by itself. As we perceive louder sounds as closer and softer sounds as further away. Also we perceive close sounds when the higher frequencies are more present, the further away in the background the less high frequencies can be heard (dimension 2). These are good starting points to address when mixing (in dimensions 1 and 2) before adding any delay or reverb (in dimension 3). Therefore when you need background vocals to be heard as if they have some distance, you can roll off some higher frequencies in dimension two first, before you add some delay or reverb to make some kind of depth or distance inside dimension 3. Even when adding delay or reverb, you can decide by rolling off (or cutting) some high frequencies from the effect output or input what the distance or depth they will be perceived as. A good parameter to set depth or distance is the pre-delay of any delay or reverb (or any effect). Reverb can only do a good job when it's a really good quality and setup correctly. Mostly for fundamental instruments alike Basedrum, Bass, Vocals we can use an ambient room or drum booth reverb type, these will have more early reflections and have less reverb tail, therefore less fuzzy and more upfront. On the vocals use no trebles cutoff for keeping upfront of the stage. Basedrum and Bass inherently have lesser trebles so they automatically fall behind the vocals with an ambient small room drum booth reverb. For not fundamental instruments that are placed at the back of the stage we can use way more reverb, alike a hall or large room, and cutoff their trebles more to set distance. For achieving our stage plan to be true, we can prepare the dry signal and/or adjust the reverb accordingly. Delay can do a good job, but with percussive instruments (Drums, Percussion) the rhythmic can be influenced, timing the delay to the beat or notes can be of importance. Especially a stereo delay with its movements can avoid masking. So for drums and percussive elements we try to stay in tempo and setting almost no pre-delay. For Vocals delay can give more depth and placement inside a mix, without moving backwards and keeping them upfront. Reverb is a good tool for creating depth, but can be processor hungry for digital systems. A good reverb does not get muddy fast and stays inside the mix and does not have to be loud to be perceived as depth. Depth is the last dimension, so working first our starter mix in dimension 1 (panorama) and dimension 2 (frequency range) before working on dimension 3 (depth) is recommended. The static mix contains dimensions 1,2 and 3. Use a brighter reverb ambient small room or drum booth for upfront sounds and a duller larger reverb for distanced sounds. A short pre-delay or no pre-delay can help prevent the reverb from pushing the sound back into the mix. Give the reverb a wide spread for upfront sounds. Use narrow panned or even mono reverbs for distanced sounds with longer reverb times.
The three dimensions together make up any static reference mix.
For Stereo Mixing the three dimensions are Panorama (1), Frequency Spectrum (2) and Depth (3). Basically Panorama is controlled by Pan or Balance mostly and sometimes using a stereo expander or widener. The Frequency Spectrum is controlled by amplitude, level, volume, EQ (Compression, limiter, gate) of the sound. Depth is perceptive and can be controlled by High Frequencies (trebles), delay (pre-delay), Reverberation or Reverb. There are quite some other effects that generate some kind of reverberation or can be perceived as depth or distance to human hearing, we will not discuss them all. A sense of direction for each individual instrument can be found in all dimensions. Also the three dimensions can influence each other, by rolling of some highs for instance in the frequency spectrum (dimension 2) of a single instrument, track or group, you can affect depth (dimension 3). Coexistence and placing instruments inside the three dimensions can be a fiddly job and maybe you would like to rush this. Pre-planning is a better idea. Also we cannot use a lot of reverbs on processor hungry systems, so we choose a few and use them on groups mostly. Off course mixing is creative. Bypassing the dimensions without some thoughts and planning and throwing in effects and mixing uncared, will soon give muddy unclear fuzzy results (masking, correlation, etc). Maybe you have ended up in this situation before? Then it is time to get some understanding about the three dimensions, quality, reduction, overcrowding, making headroom, masking, separation and togetherness. Re-start with a clean slate setting all levels to 0 db and panning to center, remove all plugins, re-start with the dry mono mix.
The chart above shows how the three dimensions can be adjusted using common mixing tools. For summing up, dimension 1 is controlled by the Panorama (Pan or Balance and maybe some widening/expanding), dimension 2 is controlled by the Frequency Spectrum (EQ, Compression, mutes, gates and limiters), dimension 3 is controlled by dimensions 1 and 2 as well as using reverberation/early reflection effects (Reverb, Delay, Etc). Making use of the 3D visualization or 2D stage visualization can help improve your mixing skills. Some like to write down a plan (stage plan) or some just like to remember and visualize in their head (the experienced). The easiest dimension is dimension 1, setting pan and we hear left, center or right (but easily underestimated). Next dimension 2 is more complicated, because we are working inside the frequency spectrum of each instrument to create a whole spectrum for the mix. Composition wise muting, level, amplitude, transients and balance are good tools to start with then reverting to EQ. Compression can be a hassle to master, mostly when we hear compression, we know we have gone too far. Rather use a more even amount of compression, when compressing only peaks very hard we achieve pumping. Dimension 3 is all about quality reverberation and needs skill and very good ears, as well as understanding how human hearing reacts. As we can say the difficulty of mixing progresses with the dimensions in place, so we start with dimension 1 and progress towards dimension 3. When we need to adjust an event, we first resort to dimension 1 and progress towards dimension 2 and 3. Hunting for quality and reduction (boost wide, cut small). Changing an event or instrument in one dimension means a change in the other dimensions also. So careful planning and preparation is a must, it is better to know what you’re doing while mixing. Knowing what you want out of a mix beforehand can make mixing easy and keep you from struggling towards the end. Understanding the three dimensions is crucial and do not hesitate to apply, it is a common way of mixing and very much accepted generally. At least to our natural hearing ears, to keep it all acceptable to our brains, we apply the natural rules and laws mostly.
3D Mixing.
Mixing, as if the listener is listening to a stage is common practice, it seems more natural. The more natural a mix sounds, the more natural the human brain can receive the 3D Spatial Information. Unnatural placement can make a listener feel unpleasant, so only use this when you need it. Most likely Basedrum, Snare, Bass and Main Vocals are more centered and fundamental. And all other instruments are placed more outward of the center field, more left or more right. Lower frequency not fundamental instruments are more or less centered, as not fundamental instruments playing a higher frequency range are more placed outwards. The main vocals are up-front and drums more in the back. Sometimes a choir would stand behind the drummer even further backwards. Just experiment with a mix and play with the dimensions, make some different plans to where you are placing the instruments.
Experimenting with 3D Mixing.
Do some mix setups and learn from the differences, learn from your mistakes and remember when having progression to keep notice of what you did correctly. A good start of a mix can take hours to accomplish towards a completed static reference mix. Maybe your ears do not listen very well when mixing this long. So returning later or have some fresh ears can do wonders. Also visualizing things is better, especially when working on the whole frequency spectrum or planning your staged mix. So any metering you can do over here with a spectrum analyzer is visualizing what you hear. Also use a correlation meter for avoiding the masking effect and check for mono compatibility. Use a goniometer to keep unwanted events from the left or right side that correlate. For listening to a whole mix you can visualize mostly, but remember that listening without all of these tools is of importance. After all listening/hearing a mix is the end result what you’re trying to accomplish. So what you can see by your eyes is interfering with your hearing. Sit down and relax and only listen (do not look at any metering). For the listening experience to be true for a normal listener of your music, maybe close your eyes. Do listen on multiple speakers, home audio sets, in your car, Walkman, almost anywhere possible to get a good view of what your mix is doing.
Stereo and Mono.
Mono is a single speaker system. Stereo is Left and Right Speakers only (still the most common way of playing music authentically). A mono speaker setup alike TV’s and small Radio's is quite common still. As we explain mixing in stereo, mono compatibility can still be an issue. Below we have a common stereo speaker setup. Even having the availability of surround sound with multiple speakers, humans now days are quite known with the stereo sound. We have been listening for so long in stereo, it is kind of baked in our DNA. It is so common that adding more speakers (directions) might influence the way it is been perceived.
The most direct sound is a single mono speaker and the more speakers you add, the more you can control the dimensions (3D Spatial Information). Adding more speakers can widen dimensions or separate frequencies more, still stereo is closest to human hearing. With Stereo there is a lesser degree of dimensions (compared to surround sound systems), still it listens close to what we will hear or perceive as natural. Our brain is not so much confused with dimensions as with Surround Sound. Multiple speaker setups are more difficult to perceive straightforward, especially when an each room is filled differently with the placement of the speakers. You can imagine a household surround system being placed differently each time. As each living room is setup differently. With only two speakers for stereo, many households know where to place them to get a good sound. Depending on where a user can place the multiple speakers, is affecting the way your music is perceived in the dimensions. Off course they all should be setup the same way theoretically and according to the operation manuals instruction, in real life every user or listener will have their own setup's for speaker placement.

As we explain stereo mixing over here, surround sound does apply almost the same rules for mixing. Although with more speakers it will be giving more opportunities for 3D Spatial Placement, therefore more room for instruments to play and be clearly heard. Above is a figure containing surround with more than two speakers. For this kind of mixing a different set of rules will apply to the amount of dimensions and we do not explain this any further. We concentrate on conventional stereo mixing (and check mono compatibility). When we are mixing in Stereo we try to accomplish a sound that compares to natural human hearing, a try accomplish our stage plan, so the mix will transmit 3D Spatial Information very well. As for Stereo Mixing we might be more persuasive and throw the 3D Spatial Information upon the ears of the listener. Sometimes this means you might use a little bit more force than naturally is perceived, to get the listener to hear as it would be naturally be perceived.
Preparing a Mix, Starter to Static mix.
You can set all faders to 0 dB and all Pan or Balance to Center position. Set all EQ to its defaults. Basically no effects are used; else turn all effects to off (dry, bypass) even better to remove them. As a start of mixing it is best to clean up all single tracks by listening solo and removing all that is not needed (unwanted). Do this by listening every track in solo mode and listen trough all parts until the end, removing anything not needed to hear. Functions you can use are, audio track or sample based editing or midi event editing. This is more a recording thing, composition wise, but removing clicks, pops and any other unwanted material is crucial and can be done now. Listen every track or instrument from start to end, they all should sound clear and unaffected before going any further in mixing. This can be a tedious job, removing all unwanted material, but you would not like it when you hear it in the mix (and cannot figure out where it is coming from). Any listener easily hears clicks, so take care of this problem first and foremost. Maybe using a gate or just delete all unwanted audio parts. Sometimes at vocal level any breaths or 'sss' and 'tss' sounds are taken care of (removed), using a de-esser or just simple audio cutting / muting. Remove background noise while an event is not playing (manual edit or gates). You cannot overlook anything here, check, re-check when you need to. All tracks and instruments must be clean and only play what you need to be played. The rest can be cut out. Time-consuming it is, it is better to work on this beforehand, before you actually start mixing. Noise is difficult to remove once recorded. We would like to remove noise, but really we cannot do this process really effective, so when recorded already we try to cut, delete and mute. Maybe a steep cut in EQ can help or some noise reduction tools, but they will mud or fuzz and even do not remove all noise. So noise should be avoided and therefore each recording of a track needs to be noise free or almost noise free. White or Pink Noise and Humming Sounds are to be avoided at all time. When you need EQ to remove background noise use quality EQ or oversampling EQ, especially working in the higher treble ranges, cut with a small steep filter. Clear up, before going any further in mixing. Make sure the audio files and samples you are using are at a decent level, so that the levels don't have to be boosted and therefore the noise floor does not rise.
Starting to Mix.
Provided you have prepared a mix (see above), you have labeled all tracks from left to right, you have cleaned them up and are ready for mixing. Again you can set all faders to 0 dB and all Pan or Balance to Centre position and set all EQ to its defaults. Set the faders and pots so they are around unity. Zero everything on your onboard and outboard equipment, mixing desk, etc. Basically no effects are used, else turn all effects to off (dry, bypass) or remove them. Even when you are not mixing your own material, when you have received a mix for mixing or re-mixing purposes, we can re-set to defaults. We are starting default keeping it basic. This is a good saving point on digital systems, if you save your project now, you can always return to the default starter mix.
Starting a Mix (Example).
Only by example we can try to explain what we are after. Provided that you have recorded drums, the base drum will be the loudest of them all (fundamentally the loudest). So a good start is to listen to the track you have recorded the Basedrum on. Solo listen the Basedrum track solo and adjust the fader until the VU-Meter shows levels of about -6 dB to -10 dB. Basically you are soloing the Basedrum now, so the track Vu-Meter or Master Vu-Meter should look the same. Somewhere in the range of -6 dB to -10 dB is a good start. Basically you are now creating headroom for the other instruments to fit (when added later on) while not going over 0 dB. So by setting the Basedrum at the VU-Meter is giving back some headroom for other tracks to play. It is a good thing to hear the Base drum solo and adjust EQ, Faders and Balance. Looking for quality and reduction. Do some lower frequency cutoff 0 Hz to 30 / 50 Hz or so. Roll off some highs, drums are behind the main vocals and bass. Just remember to set the level of the Basedrum back to -6dB to -10dB afterwards, this will have changed because you have used EQ, Reverb, Delay or anything you did to make the Basedrum sound better. When the Base drum is a sampled instrument maybe you could work on the Basedrum sound beforehand. You have to reposition the track fader level again each time you adjust the Basedrum sound. Keep the balance straight in the middle, do not let the bass drum sway out of the middle center position. Overall when using send effects or an effect group that show up on sends or another track, keep doing the same thing, keep the base drum level steady at the master VU-Meter, advised between -6 dB to -10 dB and in center all the time. When you do not have a Basedrum recorded or no Drums, you can seek the nearest loudest (fundamental) recorded track as reference starting point (solo it), specially choose an instrument that is playing center and has got lots of lower frequencies and has a good part throughout the whole composition (rhythmically). When you adjust this Basedrum or Loudest Track at any time when mixing, you must repeat the same rules and seek the Master Vu-Meter again. Solo the Basedrum and set it back to -6dB to -10dB. This Basedrum (or loudest) track is your starting reference track (most fundamental track) for headroom purposes and it is the main focus of your mix. It is way better to be happy the way the Basedrum is sounding and really make it sound good (beforehand), you will be happy with a finished drum kit before starting with other instruments. Because each time you adjust the Basedrum (or your reference instrument) later on inside the mix, you can adjust the whole mix again accordingly (repeat the operation with the master vu-meter). Because you are now using the Basedrum as static reference, it is better not to change it once you set it at start. Set it at start and be satisfied with the Basedrum sound, then leave it alone. At least until you have setup all tracks, maybe you need some adjustments, still keeping your Reference Headroom (Basedrum) start track steady is best.
So you have adjusted the Basedrum and you’re happy with the sound and Vu-Meter's levels? Let’s go to the Snare. Keep listening to the Basedrum and turn on the Snare, listen both Basedrum and snare together. Now adjust the snare fader level until you are satisfied with the combined Base drum Snare sound and levels. Do not touch the Basedrum fader, only adjust the snare fader until it sounds correct together (using fader, pan, balance, EQ, etc). Whenever you need to EQ or use compression, do this while listening only the snare solo and combined base drum snare. It is wise to cutoff the snare in its lower frequency range below 120 Hz, not interfering with the Base drum. Whenever your applying effects or change the snare (quality or reduction, separation), you need to check the levels again and recreate the togetherness. So it is best to not apply any furthermore effects at this time, and leave this adding into the mix for later purposes. For the bass drum we should have used an ambience reverb or small room booth (that is on the drum set group), for the snare we can use a larger reverb (to convey) and send it back into the ambience reverb of the drum set group to give it the same properties (coherence, ambient). Only touch the snare fader at this time, do not touch anything from the Basedrum track. When you’re happy with the combination of the Base drum and Snare sounding together, in center, the same will apply. Do not change these faders anymore when mixing further more. If you have to change these later on, you must go back to start and re-check all your work. So it is again better once set, to leave it alone and go to the next instrument or next drum kit item. This might sound a bit tedious, but remember we are building the fundamentals of the mix over here (starting a mix), when you lose attention over here, you might lose the mix. We will progress with finishing off the drum set/drum kit.
So at this point you could work on the HI hat and mix this together with the Basedrum and Snare. Remember that the HI hat can use quite a good low and heavy EQ cut (reduction) to make some headroom for other instruments. Finish off the rest of the drum set by adding each single drum track (un-mute). Panned more to the right as it is more not fundamental (but rhythmically inclined). Take into consideration placement in the dimensions, quality and reduction. Maybe when finished assign all single drum tracks to group track for later purpose mixing (we have the ambient reverb on the send/group anyway). At this point you can do a lot off stage planning on the drum set, keeping snare and Basedrum in center and pan the rest of the drum set more outwards. We explain each instrument later on and give exact instructions for each instrument. We finish off the drum kit first, with the available tools in dimension 1, 2 and 3. Now turn on the Bass track. With the bass track you can apply a low cut to < 30 Hz and roll off some highs. According to your stage plan, place bass in center, behind the vocals, rolling off the highs will make it more distanced but bass does not have a lot of highs anyway. Maybe for quality boosting some 30 Hz to 120 Hz frequencies. Solo the Basedrum and Bass, adjust the bass until they sound good together (do not adjust the bass drum). Turn on the rest of the drum set and compare. Keep adjusting the bass until it sounds correct. Start introducing new tracks or instruments each time looking for quality and reduction, separation and togetherness. Basically working from left to right on your mixer is building the mix, you set the faders and effects and then move on to the next nearest track and repeat the same. This goes for all other tracks you have on your mixer until you have finished all tracks and are on the right side of your mixer. Anyway when you start with Drums and Bass sounding well together, this is a good starting point for a mix. Basically placing them dead center. Then work with snare and main vocals also dead centered. Then introduce the HI hat and rest of the drum kit. Then introduce bass. Then the rest of all not fundamental instruments placing them more left or right, keeping them out of the already crowded center Once you have worked on all tracks and are satisfied, try not to adjust too much afterwards. Listen to it for a while, save your mixer settings (or save the song on a computer or digital system). Once you have the starter mix running, like Drums, Bass, Guitar and Keyboards sounding well together, this routine becomes more free. You can adjust faders like Guitar, Keyboard, Vocals, etc more freely now, add some more EQ, compression, delay or reverb, any effect will do. What you can feel while working is that you have created some headroom for doing things and still have a good level on the Master VU-Meter (output) and you have some headroom to work before hitting 0 dB. This is a good start and makes mixing possibilities for furthermore mixing possible (freedom) without having to adjust every time for making headroom. Stay in the boundaries of dimension 1 and 2, applying fader, balance, EQ and compression (gate, limiter) but not adding effects. Then workout dimension 3.
Digital Distortion.
Remember to keep track of the master VU-Meter; if this goes over 0 dB on a digital system you will get distortion in the signal as additional unwanted effect. Depending on the bit rate your digital system is running on internally, internal distortion is not easy to spot. When you going over 0 dB, do not adjust the master fader for loudness, adjust all other faders in accordance with the same amount of gain. So each track fader can be set -1 dB lower (or the amount you think is needed to lower the Master Vu-meter under 0 dB). This can be a hassle and you must be precise with this job. Anyway it is better to lower all faders the same amount and keep the master fader at 0 dB at all times. Some digital mixers have options to do this job more easily by grabbing all faders and correct them all with the same amount of gain. You will be tempted to touch the master fader anyway because it the easiest solution, but it will not work for your mixing purposes. Keeping the signal internally good is adjusting single track faders. That is why you need to create some headroom from start. Even for 32 Bit Float or higher (64 bit) digital systems that can address the 0 dB problem better and can handle > 0 dB signals, it is better to stay below 0 dB. For Integer 32/24 and 16 Bit digital systems, do not go over 0 dB at any time, this will surely add distortion and add unwanted artifacts. Sometimes as a feature we add a little distortion, but most likely when starting a mix towards a static mix, we do not need it. We tend to keep away any distortion for now. Limiters are good to just scrape the peaks whenever the threshold is set at -0.3 dB or setting for peak reduction levels -1 dB to -2 dB, thus affecting only signals that would otherwise jump shortly over 0 dB. Tough limiters are not a first solution, limiters are to be avoided but sometimes needed. For mixing only use a Brickwall limiter on the master fader (for starters, but even try to avoid this). When your mix goes over 0 dB, be sure the metering your watching is fast enough to intercept (spot) peaks that go over 0 dB. Else the limiter on the master track will tell you when this is happing by showing the reduced amount in dB or with its warming (red) lights. Sometimes with a Brickwall limiter or digital mixing console two red lights (left and right signal) will tell you when you’re passing over 0 dB. Try to lower your group tracks or individual tracks by the same amount to get back some headroom, keeping the master fader at that same 0 dB position. Sometimes an instrument or track is unbalanced, even a whole mix can sound unbalanced, this can cause left or right signal to be of uneven levels and sway around.
Staturation is the new Black, Distorting for Clarity and Puch.
Yes, saturation is a pleasing mix colouring tool, but its real genius is its ability to craft texturally interesting sounds that grab the listener. All of those tubes and transformers in the signal path, not to mention the tape itself, had pronounced effects on the sounds that passed through their circuits. In particular, the transients those superfast bursts of energy at the start of every dynamic envelope in a sound. Read about it in Basic Mixing III.

Single Track Mixing.
Adjusting individual instruments is commonly done with level, balance, EQ, Compression, muting, gating and limiting. Within the three dimensions some planning can be done before or while you mix further, stage planning. Most single or multitrack mixers do have some EQ bands and some even have compression settings per track. By Single Track Mixing we mean the Fader, Level, Gain, Balance and all other buttons, knobs on this single track. Also for all effects we apply to single tracks or instruments, we are talking single track or instrument effects.
On digital systems we can add effects as inserts. For this refer to your mixer manual how a track is build up technically, some insert effects can be placed before the track fader and panning (pre-fader). This will affect the signal with the effect first, before track EQ, Fader and Panning is applied. Some insert effects can be added after the track fader (post-fader) and will first process Level, Panning, EQ and track Compression before going to trough the effect inserts. Thus deciding where to place an effect insert (pre-fader or post-fader) can rely on the equipment you are using or the decisions you make while mixing. In general we place effects like EQ, Compression, gating and limiting in front of the fader (pre-fader), just because we like to adjust the sound before it goes through the mixer furthermore. Reverb and delay we place post-fader or on sends and groups, as a second in line feature. Anyway what happens on single tracks are the individual instruments, so whenever you need to change something that applies to a single instrument, do this on the single track instrument only. Fist fiddling with level, balance, EQ, compression, gate, mute or limiter. First look for reduction, keeping the balance panorama planned, use EQ cuts for separation and dynamic headroom. Control level or transients with a compressor. Composition and reduction/separation wise use manual editing or the mute button cuts and limits. Then enhance quality of the instruments in dimension 2 and 3. The group tracks explained below are for combining tracks as a group and therefore control the ' layer' of combined instruments together.
Group Track Mixing.
Routing single tracks to a group will give you more flexibility in handling the mix as a whole, for this you can route all drum tracks (Basedrum, snare, HI hat, drum set, etc) to a single group track. Now you can control each single track individually and at the same time control all single tracks with the group track (as a general we place an ambient room or drum booth reverb on a group or send anyway for the complete drum set to convey). It is common to add all drum sounds to one group track. This group could include also the Bass; this is a matter of mixing purposes or decision. The single bass instrument or track could also be routed to its own group (but mostly we like to use the ambient reverb on the drum set group or send anyway). If you have the availability of multiple groups (like a digital mixing system can handle) you can create layers of groups. By combining the Drums Group and the Bass Group and route it to a new Group, you can control both drums and bass with this group. By combining into groups this is called welding and forms a layer. By welding instruments together we tend to get some togetherness, so grouping towards the master mix is layering (summing). Building layers of instruments that combine together as a group (welding), will give control to the different sound sets of a mix. By having group tracks on a digital system that has different mixer setups, thus can show a mixer that has only the group tracks and the master left over. With the group track mixer you can more easily control the layering of your mix and therefore adjust the welding process and your planning of the three dimensions for each layer. For digital summing (emulate analog summing), we can even add some tube amp or analog tape deck simulator, to get some of that analog summing feeling. Therefore when mixing, we tend to use single tracks for adjusting each instrument (separation). And we use the group tracks to combine instruments (together). When you need to affect a single instrument use its single track, when you need to adjust a whole layer of instruments use the group, you can decide. So now we know where to adjust level and balance, muting or manual editing, place EQ, Compression, gating and limiting or place delay or reverberation effects and can decide to use it on groups or single tracks, depending on what we need to adjust.
Each group track combines single tracks together, for this we can call a group track a layer. With the Drums Group for instance you have combined all drum sounds together (layer) and can control them as one with the group. For instance when you have a guitar on the left and one on the right, this combined coexistence in a group guitar track does add another layer to your mix. When you have combined already the drums group with the bass group, you can now control the Drums, Bass and Guitars with only two group tracks. When you have for instance an Organ and a Piano, group them when they coexist within the three dimensions of your planned mix. Decisions when ever to make a group of combined single tracks is a matter of taste, planning and creative mind. It is likely that if tracks coexist and form togetherness as a layer for your mix, you can combine them into a group. The last step is to combine all groups to be routed towards the master track (the output of your mixer).
This is figure above shows how final grouping could look like; you now have three kinds of ways to adjust the mix. At single track level you can control all individual instruments separately. The welding groups contains the groups of individual tracks and therefore controls the first layer of your mix (some togetherness). The second layer and the master control the final mix for further more welding and layering, summing to emulate analog feeling (some more togetherness). Depending on instruments at hand, pre-planning and labeling all tracks and groups can help you get a whole picture of your mix design. Mostly a DAW has got label and some even have a notepad per track, keeping track of things for the old days when we do not remember anymore what we did to achieve. How you arrange is a matter of coexistence and creative mind, but mostly follow the rules of our hearing and the laws for the dimensions, starter and static mix. For most cases starting a mix design will start off from the left side of the mixer, adding the most fundamental instruments first. Building up as a stage separating instruments as single tracks. Also we start with fundamental centered instruments, then not fundamental lower instruments, then at the right hand side the higher not fundamental instruments. As you progress with adding groups, look at your dimensional planning as you combine, looking for instruments that coexist (counteract) in your planning can make decisions easier. This layering and welding is common, but artistic and creative matters will be furthermore discussed later on, for now we are designing and planning the staged mix.
Layering and Welding.
Using compression on groups can weld instruments or tracks together, making a more coexisting sound. Even placing an EQ to correct the sound can have welding purposes. Each group that combines individual instruments or tracks together as one is called a layer. (Summing up into the later groups before entering the master bus, we can do some analog summing by placing a tube amp or analog tape based effect to create that analog together feeling. Summing up analog style affects all settings we did before, so we do not tend to use while mixing. You can decide to use analog summing on a digital system or not. right now we do not recommend this at all, it will affect our mix we so time staking-ly have been trying to put together).
Design.
The most of the togetherness of a mix can be found in a well setup design for dimensions and layering together. Ending up at the master bus of your mixing console. The togetherness of your mix is all combined instruments sounding together, through each single track and grouped towards the master bus fader (output). As far as planning your mix and starting off, first adjust individual instruments and tracks, then weld them together with groups that coexist towards the master track. When you have to control the mix or having an idea to change it, you must know where at what level you can do this best. Resorting to single tracks first. Remembering the dimensions. Placing some cutting EQ or Compressor will affect the behavior of the layers or single instruments. Place effects only when and where they are needed. Deciding what you need and where you will place it, is understanding where elements are adjusted at what level. This searching for separation as well as for togetherness, as we search for a nice clean starter mix toward a static mix is the only way to make more headroom and leave some space for designing purposes and issues later on. By being scarse with adding (effects, reverberation), it is better to remove what is not needed first (quality and reduction), cleaning up the mix as well as individual instruments and sounds. Design a stage plan, deciding where all instruments have their space or location. After finding some balanced mix with Level, Panorama, Frequency Spectrum and Depth with the faders, balance, pan, EQ or compression (gate and limiter). Only then you can add some more depth in the last dimension 3. This kind of mixing is quite common, but dimension 1 is most overlooked in ways of setting up, dimension 2 is at least as important and can be difficult to hear or understand. Combining dimension 1 with dimension 2 and then dimension 3, will be the best progression for clearness and you will not have fight and return to correct as much later on. When you start with adding a Reverb before finishing off dimension 1 and 2, you might end up with a muddy or fuzzy sound (masking, correlation) , mostly EQ ing and compensating for the Reverb over blowing the other instruments or mix. So first the instruments, then the layers, then the mix, then the master. First dimension 1, then 2. Then 3!
Effect Tracks or Send Effects.
Common effects can be used on Send Tracks and this will make the effect available to use on all tracks/instruments when placed on groups. On a DAW we can use send or groups depending on the way we want to sum up levels towards the master bus fader. The normal way of a mixer is to route send effects toward the master bus. But routing sends to groups can also be done. Most likely the default configuration for a send track is to end up at the master bus. Sometimes a send track can be routed otherwise. So if you need routing on special an effect Group, create some new groups and place insert effects on these groups. Now you’re able to route anything to the effect groups.
Send Effects that end up directly to the master bus are for adjusting the final mix as a whole (summing). But remember you have the Group Tracks to place effects on also as well as single tracks and sends, so maybe you can be a bit more scarse using effect sends and the use of effect on single tracks. It is likely to place Send Tracks (send effect tracks) on the far right of the mixer. So drums start left on the mixer and the send effects are last right on the mixer after the last vocals. Then you have last, the master track. Remember you can assign the outputs of the send effects to return to any track or group, to be creative. Some mixers in the digital domain do not allow you to return to previous tracks because of feedback reasons, and therefore only assigning to higher tracks or groups. By default send effect tracks are routed to the master bus. It is up to you to assign differently according to your needs. Also if you’re using a send effect, think of groups and instead place an insert effect inside the group, this can be clearer for the overview of your mix and can have better sound mixing results. The fewer send effect tracks the better, the more controlled and adjustable your mix will be for later use.

Frequency Masking
Frequency masking affects our perception of sound whenever we hear several instruments playing together at once. If one instrument in your mix has lots of energy in a certain frequency region, then your perception will be desensitized to that frequency region of the other instruments. Those other instruments will effectively be masked in that frequency range by the stronger signal. For example, if you have a constant cymbal pattern filling up the frequency spectrum above 5kHz, you will perceive this frequency range a lot less well in the lead vocal part. The cymbals will be masking the vocal above 5kHz. Remember, the vocal might sound bright and amazing on its own. But the moment the cymbals are added to the mix the vocal will suddenly appear dull. To retain the same apparent vocal sound against the cymbals, we would need to either reduce the level of the cymbal frequencies above 5kHz, or exaggerate those frequencies in the vocal sound. This is where EQ comes in. Of course masking will occur at any frequency range in the spectrum, not just the high frequencies, where two or more sounds overlap.
Masking and Unmasking.
EQ or Equalization is referred to as a dynamic processing tool, not an effect. EQ is mostly used to eliminate frequency conflicts between instruments. It is connected to non-linearity human hearing, namely affects musical masking. When two sources with overlapped spectrums are situated in one space (center for instance), and one of them is playing at much lower levels ( -15 db) than the other, we stop to hear the sound that is more silent, they are disturbing each other (masking). When we pan both instruments left and right, we can hear both signals again (unmasking). All instruments sound perfect in single mode when mixing, but together in the mix it can be soap. This is a result of acoustical binaural phenomenon called masking. Avoid possible conflict with correct composition and arrangement. EQ and compression are used on almost every instrument (95 %) inside a mix. With EQ we mostly are looking to unmask and avoid masking. There is no universal equalizer. Each EQ will sound different, having different functions, but at extreme raising or lowering (adjustments), the difference can be critical. EQ works best while we are cutting frequencies, not raising them. Mostly beginners will raise what they feels and sounds good, but we can do the same by cutting those frequencies not needed. An EQ will surely produce artifacts when it is raised strongly. So we try to cut first, then raise. In the bottom end range we use a small width EQ band (Q factor), in the high range a big width EQ band (Q Factor). Almost any change in one band will affect the sound in other bands. Acoustical masking is a binaural phenomenon, pan as a first measure can solve frequency conflicts, then resort to EQ as a second (but much needed) tool for unmasking. Many producers will push the button called mono at the start of mixing, but the goniometer (as a visual) can do a good job at the end of mixing as well as the correlation meter. It is easier to solve the frequency conflicts on instruments groups.
EQ or Equalization.
The equalizer comes in all forms and shapes and works in the vertical dimension 2. The frequency range mostly goes from 0 Hz to about 22 KHz. All EQ is caused by a filter or some kind of filtering. But for adjusting how an instrument will sound, EQ is the best starting point (quality or reduction). Probably the most important tools in the mastering engineer’s toolbox are equalizers. When we cut we do this with a small and steep filter, when we boost we do this with a wide filter. We tend to cut more then we boost. We tend to use fader level, panning, before using any EQ. Then use EQ. Secondly compression, limiting or gating. Don't hasty overlook the fader level and balance or panorama as a first dimension tool. Most beginners will understand what EQ equalizing is; they know it from home stereo systems or have some experience already. Most will understand when they adjust lower frequencies the sound of a bass will be more heavy or less. And when they adjust the higher frequency range of a HI hat it will sound brighter or less bright (trebles). Mostly we talk about cutting or boosting, lowering or raising the EQ amount. The most common are Parametric EQ and Graphic EQ. Remember that pushing the EQ frequency levels (raise, boost) upwards will give more level and this can affect in the result ending up with less headroom or going over 0 dB on the master VU-Meter. Cutting more than boosting, that is a fact. So lowering levels with EQ is better than pumping or boost the levels upwards. Anyway it is better to take away then to add while doing EQ ing (for quality and reduction). Giving each instrument a place in the frequency spectrum is what you’re looking for (quality, reduction, dimensions). Almost all instruments will play in the range of 120 Hz to 350 Hz, 500 Hz (misery range) and are represented here, this range can be crowded and most be well looked after.
Art of Equalization
Get serious about EQ - Explore the technique of subtractive EQ. An informed approach to Q is one of the biggest steps you can take towards a professional sounding recording. We have a good visual explanation of subtractive EQ in our video.
Low-frequency roll offs - In almost all cases you will want to use EQ to remove bass frequencies from all tracks that are not bass instrument tracks. To remove bass frequencies, you may want to cut around 175Hz and below, then adjust the frequency and the slope of the EQ Curve (the Q) while listening to the mix.
Try to avoid adding too much "air" - Many times, so much extra high frequency, sometimes called "air", is added to hi-hats and vocals that the mix becomes like sandpaper. Adding excessive high-frequencies by boosting an EQ can tie the mastering engineer's hands because the really sweet mastering EQs cannot be used to add the needed high-frequency sparkle because so much has already been added. You should always be very careful when adding high frequencies. If there is a problem, then the real problem is normally that subtractive EQ is not being considered.
Subtractive EQ - Taking frequencies away from a recording, rather than boosting them, is the most basic description of Subtractive EQ. To boost highs, take away mids, to boost bass, take away mids or highs. Also, to increase the overall fidelit y of your recording, you can remove the less important frequencies of an instrument to reduce frequency overlap in the mix. We have a wonderful visual explanation of this concept in our video "How to Prepare Your Audio for Mastering" which is available by clicking here.
EQ is not always necessary - Like any effect, EQ can be overused and sometimes it may not be necessary.
EQ Before Compression - Most engineers agree that audio should run through the EQ before the compression unless you are using the EQ as an effect.
So whenever you can, make a plan and make way for other instruments to have a place in the field (stage). When two instruments are playing in the same frequency range (masking), like two guitars playing, it is likely that you will not cutout frequencies with any of them, so balancing one left and one right can solve this problem at first hand (of overcrowding), this is the first solution in dimension 1 panorama. Most place them off center anyway keeping a clear path for fundamental instruments. You must decide what sounds best and when to use EQ, but leaving space in the frequency spectrum from Left, Center and Right, by cutting out frequencies of instruments you do not need is more common EQ style and recommended. Instead of raising the Bass because you think it's not been heard, you could check if other instruments do muddy up in the lower frequency range of your mix or just lower all of them instead (cutting all lower 0 - 120 Hz frequencies out of not fundamentals). Boosting frequencies can mean you enter a zone of another instrument or track its main frequencies and the sound of them playing together combines. This can muddy up or fuzz your mix and with a low quality EQ produce artifacts (use quality EQ or oversampling EQ). However, there is a twist. It does not mean that all two sounds in the same frequency range cannot sound together, that is just how you listen to it and that is called mixing. Yes we have some mixing freedom. Remember by applying balancing can separate instruments and must be done first (dimension 1), so with two guitars sound just the same balancing guitar 1 to the left and guitar 2 to the right might solve the problem. Most of the time the frequency range from 30 Hz to 22 KHz is filled with all instruments layered, sounding together as one mix. Also a second rule is the that lower frequency fundamental instruments will stay more centered, as higher frequency not fundamental instruments are panned more outwards, more left or more right. Just remember cutting is better and spreading is better. Make room and plan the frequency range. Place instruments inside the frequency range, spreading them, balancing them. Do use EQ only where needed. First use EQ on a single instrument track can help creating a better instrument sound (quality and composition wise/rhythmical intent). Second by cutting out frequencies, you will leave open space for other instruments (reduction) to play clearly. For lower frequency range instruments you can use a high cut also control the distance. All instruments can use some kind of low-cut. By doing this we can be sure that no rumble or high noise is entering the mix and as well leave headroom in the whole frequency spectrum. Remember you almost always need a steep cut EQ from 0 Hz to 30 Hz on all instruments except the maybe Bass. This way more or less all instruments need EQ on their own single track (quality and reduction), just to make these kind of corrections to make every instrument sound clear and at its defined placement inside the three dimensions. When using sampling, maybe you could process the EQ offline. Or use the EQ offline inside digital sequencers (digital audio tracks), be sure you can always revert back to the original file (without EQ). Some digital systems have unlimited undo functions. Processing instead all in real-time, you can more easily adjust the mix without re-loading or undo (timesaver). This means you can always adjust the EQ settings. Off course the more you process online, the more computing power you need, but keeps it adjustable for later purposes. Latency can be a problem when processor computing speed is low, you might hear clicks or unwanted audio signals inside your mix when this happens. Use oversampling EQ, for high frequency instruments and working > 8 KHz ranger, at least you should know your EQ does not produce artifacts in any range, especially the high ranges. First remove, then add. Removing/lowering can be done with a small Q band filter, while adding/raising with a wide filter. Remember L C R and panning laws. Know sweet spots frequencies of different instruments. First lower then raise. Lower steeply, raise broadband. Almost any change in one band will affect the sound in other bands. Remember level and panning concepts, clear and logical panorama mixing, balanced frequency distribution Left Center Right, frequency ranges, each instrument can fulfill its role inside the mix. Many instruments are have two main frequency spots, others only operate within a single frequency band. A mix requires at least the same number of low-cut filters as there are tracks. A frequency component between 0 and 1Hz is called DC offset and must be eliminated, use a the DC removal tool for this purpose. The misery area between 120 and 350 Hz is the second pillar for the warmth in a song after 0-120 Hz, but potential to be unpleasant when distributed unevenly (L C R, panning laws). You should pay attention to these range, because almost all instruments will be present over here on a dynamic level. Cut all frequencies lower than 100 Hz - 150 Hz from all instruments except bass and bass drum. It allows to get rid of all sub-bass artifacts 100% with a good cut.
Equalization Strategies
We want to make sure that everything that needs to be heard, can be heard. Much of this type of EQ is concerned with cutting away unimportant areas of the frequency spectrum from individual recorded parts, so that important frequencies in other parts can be heard. This can be as simple as using a high-pass or low-pass filter on specific tracks to remove any unwanted noise or hum, or it may require subtle cutting and boosting on every channel. The ease with which this can be done will often depend on how well the track has been arranged, as well as how well recorded or chosen were the original individual sounds and instruments. Fixing Purely Technical Problems, Deficiencies Removing sub-sonic rumble, electrical hum and buzz. High- and Low-Pass Filtering, Initial Balance, Bringing Out The Characteristics Of Feature Instruments, Diminishing Others.
Fitting Sounds Into A Mix
High-Pass & Low-Pass Everything You Can Many instruments which are not known as ‘bass’ instruments nevertheless have a lot of low frequency content. This content, while not being particularly audible and therefore not very musically useful will still consume your available headroom, taking up valuable space in the frequency spectrum that could be more effectively used by another instrument. With this in mind, it can be a really good idea to prepare for your initial mix by cutting down, or out entirely, those frequencies which are not useful and don’t enhance the sound of each instrument.
Is It Better To Cut Or Boost?
In traditional recording and mixing, the generally accepted wisdom is that it’s better to cut than to boost. The thinking here is that the less EQ boost you use, the less obtrusive the processing and the more natural the final sound will be. The human ear is far more tolerant of EQ cut than it is of boost, so, rather than adding lots of top to vulnerable sounds such as vocals in order to get them to sit at the front of the mix, try applying high-end cut to other sounds in the mix that are conflicting with the vocal.
EQing Bass Instruments
High-Pass All Non-Bass Instruments I’ve mentioned this earlier, but it bears repeating because it’s pretty simply to do but can have a significant impact on the overall clarity of your mixes. Simply high-pass filter out the bass element of instruments which are not meant to specifically be ‘bass instruments’; it’s amazing how much unwanted junk there is lurking relatively unheard in your individual tracks, which nevertheless saps away at your available headroom.
Boost, But Not Where You Think… Bass instruments can be especially tricky to EQ for small-studio producers, who don’t generally have large enough speakers to hear all of what’s going on at a sub-bass level. However, one big misconception is that all the important EQ adjustments for bass instruments are at the low end. You will often find that your bass part will sound perfectly bright when solo’s, but once it’s slotted into the mix it all but disappears beneath the other instruments. The trick here is to bring out some of the higher-frequency components of the bass sound with EQ. You don’t need to be shy here either: it can be surprising just how much top end you need/can get away with to make the bass cut through in a busy mix. The extra advantage of using more of the higher frequencies to help define the bass parts is that they will come through much better on small speaker systems. The same principle applies to kick drums just make sure you’re highlighting different higher frequencies for the different bass parts.
Bass Range 80-250Hz Covering about one and a half octaves, from 80 Hz to 250 Hz, this range of frequencies helps bring nice fatness and fullness to a sound or mix. This is partly because the fundamental of bass parts usually sits here.
Lower Mid-Range 250-500Hz This could also be considered the Bass Presence Range. Covering about one octave from 250Hz to 500Hz, this range accents the ambience of the studio in recorded parts and adds clarity to the bass and other lower-string instruments. You can gain clarity and between the kick and bass by both reducing the kick and increasing the bass in this range, at the same frequency. This range is often reduced on overhead drum mics and cymbals to increase clarity and presence on these instruments. Too much boost can make higher-frequency instruments sound muffled and give low frequency drums like kick and toms a ‘cardboard box’ quality. Within this range, EQ is most often applied between 300 Hz and 400 Hz. Boosting between 250-350Hz can increase vocal distinction and fullness, especially for female singers.
To properly set the amount of low bass in your mix or in your instrument sound, you must listen both loud and soft, and ideally on large and small speaker systems (see the explanation of the Fletcher-Munson Effect in the Advanced Technique section). Too much energy in this range will make the mix sound muddy on large speakers played loud, but still sound good on small speakers played at a medium volume. You want the mix or instrument to sound larger and more powerful over large speakers without sounding muddy. In dance music, individual instruments – the bass or kick – can be boosted below 80 Hz, but keep it to just these one or two instruments for clarity rather than mud. Having many sources of sub-bass end up cancelling each other out, as bass frequencies are very susceptible to phase problems. For example, if your bass drum disappears now and again in the mix, it’s probably because another sound is also hitting exactly the same frequency. It’s because of this that adding more bass to multiple things can often lead to a bass loss in your mix.
Sub-Bass Range 20-80Hz This region brings the sense of weight and power to the mix. The lowest possible pitch of a bass guitar or string bass is around 41Hz. Rumble below 40Hz can be removed with a high-pass filter for a tight sub-bass sound. For club music (to be played primarily on a large sound-system) you’ll want to aim for the slightly narrower 4060Hz range for your main sub-bass frequency.
If you’ve been clear up to this point about which instruments are the most important and which take precedence over others in the track, and have then balanced these key instruments in descending order, you’re in the best possible position to move forward with fitting the remaining instruments in between.
Graphic Equalizer.
A common type of equalizer is the Graphic Equalizer, which consists of a bank of sliders for boosting and cutting, different bands (or frequencies ranges) progress upwards in frequency. Normally, these bands are tight enough to give at least 3 dB or 6 dB maximum effect for neighboring bands, and cover the range from 20 Hz to 20 KHz (the full frequency spectrum). A typical equalizer for sound reinforcement might have as many as 24 or 31 bands. A typical 31-band equalizer is also called a 1/3-octave equalizer because the center frequencies of sliders are spaced one third of an octave apart. Any graphic EQ will be more adjustable with more EQ Bands.
A graphic equalizer uses a predetermined Q-factor and each frequency band is equally spaced according to the musical intervals, such as the octave (12-band graphic EQ) or one third of an octave (31-band graphic EQ). These frequency bands can each boost or cut. This type of EQ is often used for live applications, such as concerts because they are simple and fast to setup. For mixing the Graphic EQ is not precise because the EQ bands do crossover each other’s next range and affect them. Also mostly using a single type of filter. But however a > 20 band Graphic EQ can do a good job, because it is fast and easy. As a whole the more EQ bands the more precise the graphic EQ becomes. For overall setting of a track and with instruments just needed to correct a bit, the Graphic EQ is best when you need to setup fast and be less accurate. Also because the Graphic EQ is defined, the Graphic EQ will give you a feel of understanding and commitment. Once you know what you can do with Graphic EQ as you get more experienced, you might not need so much peaking EQ or parametric EQ. Also the more EQ bands the better, like 30 > or more EQ bands. Because ranging from 0 Hz to 22 KHz it can also give a view to the spectrum once you look at the whole EQ banding picture. Working with the same brand or manufactured Graphic EQ, maybe will give a steadier outcome each time, compared to Peaking EQ. For quality and reduction purposes the Graphic EQ is a good all-rounder. For removal of frequency ranges, use a parametric filter with a high q-factor and strong raise, sweep towards the problem area, and then lower them, mostly we use parametric EQ for this more exact and precise job.
Parametric EQ or Peaking EQ.
A parametric equalizer or peaking EQ uses independent parameters for Q, frequency, boost or cut. Any frequency or range of frequencies can be selected and then processed. This is the most powerful EQ because it allows full control over all three variables. This parametric or shelving EQ is predominantly used in recording and mixing. You can hear easily when raising or lowering the frequency band, what is going on. You can hunt down and find where the nasty and good parts are, finding out what to cut and what to boost. Very precise EQ ing can be done using a small range steep filter. Like a scalpel you can cut or boost certain adjustable frequency ranges and be a sound doctor in EQ ing. Just remember more cuts then boosts are the main key to get doors open. Cut what is not needed. Boost only when necessary. Watch out for using small band frequency ranges for EQ, depending to the quality and natural behavior of EQ filters, there can be nasty side effects (alike a harsh sound, artifacts). Also when we boost high frequencies (use oversampling quality EQ) we can create a harsh sound and artifacts. Generally with most EQ ing we try to use medium or large frequency bands for EQ boosting. This means we will use low q-factors more than high q-factors. For cutting we use steep low cuts and steep filters just to remove what we need. For quality and reduction purposes parametric EQ can be an outstanding tool. But however depending on the features (brand, manufacturer), they need to be very flexible to setup. Some are outstanding for bass drum and bass, while others have their focus on vocals, strings, highs, etc.
F - Frequency, all equalizers are built on peaking filters using a Bell Curve which allows the equalizer to operate smoothly across a range of frequencies. The center frequency occurs at the top of the bell curve and is the frequency most affected by equalization. It is often notated as fc and is measured in Hz. When using a cut-off filter the frequency will be cut before or after this frequency.
Q - This is a variable Quality Factor which refers to the width of the bell curve or the affected frequency range. The higher the Q, the narrower the bandwidth or frequency range, the more scalpel-like (removing, cutting, lowering). A high Q means that only a few frequencies are affected, whereas a low Q affects many frequencies (boosting, raising, be gentle). Staying with a low Q guarantees the EQ quality, as with a higher Q most equalizers do not perform as well. As well as the higher the frequencies we need to EQ, we tend to use more quality EQ or oversampling EQ. The quality of the equalizer is of importance, specially using a high Q, so use the best and leave the rest.
G - Gain (Level, amplitude). This determines how much of the selected frequencies should be present. A boost means that those frequencies will be louder after being equalized, whereas a cut will soften them. The amount of boost or cut (gain) is measured in Decibels, such as 3 dB or -6 dB. A boost or gain of 10 dB generally amounts to the sound being twice as loud after equalization. Boosting above 6 dB can create some nasty sounds, so use a quality EQ. Generally for boosting we tend to use less and be wide, so anywhere up to -3 dB (-5dB max) is great. When boosting more, nasty side effects tend to enter to the sound, we use a wide filter and quality EQ.
Shelving EQ.
Shelving filters boost or cut from a determined frequency until they reach a preset level which is applied to the rest of the frequency spectrum. This kind of EQ filter is usually found on the trebles and bass controls of home audio units EQ mixers. High pass and low pass filters boost or cut frequencies above or below a selected frequency, called the cutoff frequency. A high pass filter allows only frequencies above the cutoff frequency to pass through unaffected.
In this chart two shelving EQ's are used, one to cut lower frequencies and the second for raising the highs. With shelving frequencies below the cutoff frequency, are attenuated (boost or cut) at a constant rate per octave. Low pass filters will cut off all frequencies below the cutoff frequency. All higher frequencies are allowed to pass through unaffected. High pass filters will cut off all frequencies above the cutoff frequency and all lower frequencies are allowed to pass through unaffected. Common attenuation rates are 6 dB, 12 dB, and 18 dB per octave. These filters are used to reduce noise and hiss, eliminate pops, and remove rumble (reduction). It is common to use a high pass filter (at about 60 to 80 Hz) when recording vocals to eliminate rumble. Best used as a reduction or separation tool, shelving EQ is used to separate instruments, to give each a place in the spectral dimension (2).
EQ and dimension 2.
The Base drum and Bass will be most common in the lower frequency range 30 Hz to 120 Hz (180 Hz). Keeping the lower frequencies and lowering or cutting the higher frequencies is making headroom for all other instruments to sound clearly. You are trying to give each instrument a place in the frequency spectrum (instrument ranges) and give them an open pathway (unmasking). The HI hat is working and showing (sounding) better when other instruments are not in the same frequency range, so the bass or Basedrum will not affect the HI hat with its higher frequencies when they are cutoff in the higher frequency range. How much you cut out or adjust is a creative factor, but keeping Bass and Basedrum separated (as dominating the lower frequency range 30 Hz to 120 Hz) and keeping other instruments or tracks away from this range is common. This will give a clear path for the fundamental instruments to play in the lower range of frequencies and stay at center, where speakers do their best job on producing low level events, without other instruments or tracks playing in this range or center position. Also all instruments who have a similar panorama settings, alike the Basedrum, Snare, Bass and Main Vocals (at dead center), these can be set in distance by using EQ to roll of the trebles for setting distance. Thus for all being played at center position, you can still adjust their perceived depth (dimension 3) to separate them a bit. Ok you can make adjustments to make the bass sound better (quality, boosting), remember when other instruments play in the same range, this added combined sound is the result of a muddy bass range 30 - 120 Hz. You are aiming that each sound or instrument to be heard. Heard the way you want it, leaving open space (headroom) for all instruments is better than to just layer all instruments on top of each other (muddy, fuzzy mix). Especially when you’re running a clean mix without effects the placement of instruments is best heard. So keeping away effects as long as you can, while mixing dry is best to sort out some placements. For quality often two frequency ranges are applied for boosting, for reduction mostly a low steep cutoff filter on single tracks, groups, etc. For distance we tend to cutoff more high trebles.
EQ Example.
Every instrument must be clearly heard, progress from the fundamental instruments towards the not fundamental instruments. Using EQ cuts on lower or higher frequencies can free up space (headroom) for other instruments to play and make clear pathways. Muddiness of a mix will happen very fast when not paying attention to the mix (separation, reduction) or do not align according to your stage plan. Specially the misery range 120 Hz to 350 Hz (500 Hz) is the second range we need to pay attention to (quality), you can make some difference over here while EQ ing. Adding a reverb will clutter up very fast. So it is better to start listening to a clean mix and concentrate on this for a while (dimension 1 and 2). Be scarse with adding effects until you are quite sure your clean mix (starter mix toward static reference mix) is running well and can be heard well. Again anything you add or raise will muddy up, anything you cut or lower will unmuddy the mix. But still you cannot prevent muddiness altogether (masking), so don't get stuck with it, setting up a mix must be a bit of routine (planning the dimensions and having a stage plan readymade). Starting clean is best and can work fast as a routine, later on you can work more freely and add more. A good clean start according to these rules means better end results. Even when adding effects we tend to use EQ to control the signals to keep everything according to stage planning (dimensions, quality, reduction, headroom, etc.). EQ is the first effect or tool to reach for, after fader levels and balances in the panorama are setup. So you can be sure (almost) that on each track you will use some EQ and is most common, especially use as many low cuts as there are single tracks. Again how your instrument will sound is adjusting EQ and be happy with the sound. Remember there are two ways we can use EQ ing as a tool, quality and reduction. A guitar can sound thin when played in solo mode, it can be sounding very well inside a mix. When a sound is recorded badly and unattractive, it is likely you cannot change a lot when using EQ or when correcting it in any other way. So it is better to record the best sound you can. EQ can bring out any instruments quality. But also with the same EQ you can make headroom inside a mix by cutting out what is not needed and at the same time make the fundamental sound ranges heard more clearly. The less muddy and clearer your mix will sound (in the lower frequency range) is started by separating what you really need to hear and cutout what you do not need. The lower frequencies will give more power and is really the focus of the mix, the lower frequencies most be in center all the time, so when using a stereo EQ watch out for swaying more left or right. The higher frequencies are also important to watch, but are not really adding to the overall power of your mix, they mainly adjust for rhythmical compositional intent and is a good measure for the distance of individual instruments. Another thing is being fitted with good sounding speakers or monitors while adjusting EQ. Even headphones need to be of pure quality. Remember when you do play on monitors a frequency range 0 Hz to 50 Hz will not be heard at all. This will mean you will not hear them as loud as your mix is really putting out, only because you do not hear them through your speakers. Not hearing lower frequencies correctly out of your speakers can mean you will counteract this failure by pumping up the lower frequencies. When listening on good speakers that play the lower frequencies well, you might avoid this mistake without adding more then you need. The bigger base speaker you can get or a better frequency range from your speakers will improve your mixing and hearing correctly what is being played. Also monitor speakers tend to be more natural when their whole frequency range is linear. Also the room you listen in is of importance. For monitor speakers to really shine, they need to have a flat frequency spectrum. You can't EQ when you do not hear it correctly played. Get good monitor speakers or when you listen on headphones get a good one. This can be costly, but the best equipment is needed. Headphones are cheaper and for EQ ing they have a better frequency range. Tough headphones can be less effective playing reverberation sound as they are close distanced to our ears and do not include the room reverberation sound, they can be a good tool for EQ and Compression, unmasking, correlation and balance, dimension 1 and 2. I prefer to wear a winter hat over my head and especially over the ears and then put on the headphone over hat. Most headphones your ears will get moisture and i also like some barrier of cloth or any woven material in between my ears and the headphone. For me a simple winter hat that is not fat or thick, as long as there is a fe millemeters of cloth between. Listening to good speakers is important, when you listen on a home stereo set you are missing out on hearing the correct amount of frequencies played. Get good monitor speakers instead. Good equipment starts with good monitor speakers that represent frequencies well from low to high and are as flat as can be. EQ ing is almost impossible when you can't hear what you’re doing. Invest in speakers and a good soundcard or mixer is helping you hear what is being played. Invest in noise free and quality equipment, will help you to hear what you mix is about, without interference. Only then you can hear what you are doing, thus using quality or reduction without compromise.
Common Frequency Ranges.
Frequency Range 0 – 30 Hz, Sub Bass, Remove.
Frequency Range 30 – 120 Hz, Bass Range, Bass and Basedrum.
Frequency Range 120 – 350 Hz, Lower Mid-Range, Warmth, Misery Area.
Frequency Range 350 – 2 KHz Hz, Mid-Range, Nasal.
Frequency Range 2 KHz – 8 KHz, Upper Mid-Range, Speech, Vocals.
Frequency Range 8 KHz – 12 KHz, High Range, Trebles.
Frequency Range 12 KHz – 22 KHz, Upper Trebles, Air.
Brilliance, > 6 KHz.
Presence, 3.5 KHz < > 6 KHz.
Upper Mids, 1.5 KHz < > 3.5 KHz.
Lower Mids, 250 Hz < > 1.5 KHz.
Bass, 60 Hz < > 250 Hz.
Sub Bass, 0 Hz < > 60 Hz.
Mastering EQ (Low Cuts).
Low Cut is very important tool, but the importance of a tool is nothing without proper knowledge how to use it. I will not present Low Cut filter as a coloring tool, but only as corrective, with other words, to erase what doesn’t exist. To use this tool properly we should know from which frequency our music element starts, what is the frequency response of the mic. Lower frequencies are bigger frequencies. They took so much from the headroom and in todays music era we need a lot of headroom. Proper usage of Low Cut filter is the best way to achieve more loudness without alien frequencies in the spectre. With Low Cut you mustn’t cut audible frequency, it is invented as filter for the rumble, room, air conditioner sounds, for frequencies that are not a real part of the music element.
REMEMBER THIS : Good Low Cut is the inaudible, unnoticeable Low Cut.
Bass – 40 Hz (clean electric bass guitar)
Bass – 20 Hz (The Bass Amp generates lower octaves, lower than the E1 note of the bass which is 41 Hz. The lowest tone possible will be 20 Hz as first lower octave from 41 Hz )
Kick – 30 Hz (it is known that the sine wave frequency triggered on kick drum was 32 Hz, lower octave from the foundation frequency. )
Organ – 20 Hz (If the organ plays solo performance with all tones included. The reason is simple it has E0 tone which is 20 Hz)
Organ -100 Hz (If the organ is in combination with other instruments. You must do this especially if there are kick and bass)
Brass – 25 Hz (In orchestral performance and if there is Tuba or Bassoon which last note is B0 29Hz)
Brass – 80 Hz (in combination with other instruments and contemporary music )
Toms – 60 Hz (Floor Tom)
Toms – 120 Hz (Rack Tom)
Guitar – 80 Hz (the lowest tone is E2 which is 82 Hz)
Snare – 100 Hz (When I mix a Fat Snare, I cut everything under 100Hz and I am adding a lot of 100 Hz in the same time.)
Snare – 80 Hz (Standard snare)
Cymbals – 200 Hz
Vocal – 80 Hz (Male Vocals)
Vocal – 100 Hz (Female Vocals)
Mastering – 20 Hz (There is no information at all under 20 Hz)
Even if we don’t hear this musical information, in our digital era is still a digital information which takes a part from your headroom, and it gives a hard time to every compressor.
Use Low Cut Filter properly and your ending product will be cleaner, wide open and louder.

Compression.
Supporting Transients, Sustain, increasing level of quieter sections. Compression is referred to as a dynamic processing tool, not an effect. A compressor reduces the dynamic range of an audio signal if amplitude exceeds the threshold. The amount of gain reduction is determined by Attack, Delay, Threshold and Ratio settings. The Compressor works the like an automatic volume fader, any signal going above the threshold is affected. It is better to compress frequently and gently rather than rarely and hard. Compression is a very important tool in mixing on compressing Room Mics, controlling Guitar Dynamics, compressing Reverb And Delay, making The Toms Punch or make your Drum Overheads sound amazing.
A compressor is a good tool to reduce instruments peaks and give some more dynamics (headroom) back to the mix (reduction). The major issue with a compressor is pumping (quality). We as humans like our music to pump, just as we like our hearts to continue pumping and beating. Just as we like to pump it loud. Pumping can be achieved by single band or even multiband compressors to decent effect. The only way we actually hear a compressor at work is when it is hitting hard at its threshold levels. Most likely you have gone too far and must be more subtle. Anyway the compressor is a subtle effect and only really good heard when pumping starts to sound. We tend to compress more evenly with a low ratio level, and with a lesser degree scraping of peak with a limiter (as this a compressor with higher settings on ratio, etc).

The setting of the Threshold level is of importance, this will set the level for anything that goes over the threshold is to be reduced by a certain amount of level. This reduction is progressive and will be more when the level of the sound inputted goes further over the threshold level. By setting Attack and Delay times for the compressor, you can play around with how fast the compressor will act in reducing the amount and releasing this reduction after the signal goes below the threshold level. By setting attack and delay we can affect transients or sustaining sounds. By setting ratio we can adjust the amount of compression.
This is simple ADSR volume compression. Sometimes an envelope effect can work out greatly for instruments, so refer to your instruments settings first. With the envelope from the instruments ADSR we can achieve a good sound before even using compression. A peak compressor with an Threshold of -10 dB and Attack time set at 10 ms and release at 100 ms, will reduce any signal that goes over -10 dB and is longer than 10 ms, after the signal goes below -10 dB the reduction will gradually reduce for 100 ms. The same procedure will follow when the threshold level is reached again.
Most compressors have the following controls, though they may be labeled slightly differently. Mostly used on a general instrument RMS level, a general compressor setting is being subtle and just try to remove some hard signals and making some headroom again for other instruments. Even adjusting transients or sustain of the original sound, the RMS level, or peaks.
Threshold - This is the level at which gain reduction begins to happen. Usually measured in dB. Lower threshold values increase the amount of compression, a lesser signal is required for gain reduction to occur.
Ratio - This is the ratio of change between input level and output level once the threshold is reached. For example, a ratio of 4:1 means that an input level increase of 4 db would only result in an output level increase of 1 db. The compression result is a reduction of -3 dB. The Ratio is the amount of reduction. When ratio is set at 1:1 there will be no reduction when the threshold is passed, the compressor is bypassed. But with 2:1, each 1 dB of more signal over threshold is reduced by halve, and will be compressed to 0.5 dB and so on. The more amount of Ratio the more compression and reduction will be done. A limiter is a compressor that has high ratio settings, alike 10:1 to 50:1 or infinite. Like from a Brickwall limiter you would expect everything that goes over the threshold level will be reduced to the threshold level, as the amount of ratio is so much, it will be close to the threshold level. A compressor with ratios between 1:1 and 5:1 are being more subtle then a limiter.
Attack Time - The amount of time it takes for gain reduction to take place once the threshold is reached. The ratio is not applied instantaneously but over a period of time (the attack time) usually measured in microseconds or milliseconds. Use longer attack times when you want more of the transient information to pass through without being reduced (for example, allowing the initial attack of a snare drum). Specially for keeping the transients the attack can be set > 10 ms or even more. This can enhance rhythmic and compositional intent, enhance the quality of our stage plan.
Release Time - The amount of time it takes for gain to return to normal when the signal drops below the threshold. Usually measured in microseconds or milliseconds. With a fast attack and a fast release, the more you will sustain the end part of a note (sustaining a bass note or baseline, to bring out longer standing bass notes). Thus reducing the transients therefore boosting the parts sounding after the transients (sustain).
Makeup Gain - Brings the level of the whole signal back up to a decent level after it has been reduced by the compressor. This also has the effect making quiet parts (that are not being compressed) louder (see Release). For mixing purposes when compression has reduced the original level, we can boost with make-up-gain to get the signal up to its original level again. Sometimes a compressor has automatic make-up gain. For mastering purposes we tend to stay away from using make-up-gain.
Hard knee and Soft Knee is the way reduction takes place above and around the threshold. Soft knee is more curved and hard knee is at a certain angle. Soft knee tends to be more natural/analog and hard knee tends to be more aggressive/digital.
Opto or RMS : Opto behavior is more digital and straightforward and for percussive instruments and drums (fast). RMS for the rest (slower).
Dynamics Processing
Using Compression - Compression should not be used all the time. It's good to use compression when something varies in volume too much, or if you want the change in tone that compression can provide (such as added warmth and more sustain). Overusing compression can destroy the dynamics that makes a vivid recording. There are many professional engineers who use very little or no compression.
Parallel Compression - Parallel Compression should be used when you want the tonal benefit of compression but you don't want to lose any punch. Engineers most often find it useful on drum buses (or on a bounced down mixdown of all of the drum tracks).
Don't overdo compression - Compression can reduce the overall vibrancy of the music, so it must be used carefully. Always error on the side of too little, or no compression, rather than over-compressing a recording. You can tell when something is becoming over-compressed because it sounds more lifeless and dull.
Using analog / analog-emulation compressors - Analog compressors and digital models of analog compressors usually color the sound more than limiters and transparent digital compressors. Many engineers use compressors with color on vocals, guitars and basses. For instance, many engineers find the sound of an LA-2A compressor (or the UAD-1 Digital Plug-in emulation of it) on bass guitars, because of the way it can round a bass-guitar sound.
Digital limiters - Use a digital limiter to raise the sound in a mix, without the color that compression can add. This is used very often on keyboard sounds or software synthesizers.
Side chain compressors.
Side chain compression can solve mixing problems when two sounds are played together on two different tracks inside a mix (masking, when a bass note and bass drum are sounding together in the same frequency range). Split-mode side chain compression is most scalpel-like dynamic shaping tool to ever exist. Compressing dynamically according to a key input as you can choose which frequency range you want compressed by your keying value. On Vocals for instance compression can reduce some difference between loud and soft parts, correcting sudden louder parts of the vocals that jump out. Maybe you need to compress the acoustic guitar part only when the vocalist sings ? To create some headroom and unmasking you would like when a part goes over a set loudness level, that the loudness is reduced for that short instance of time. Sometimes a Bass note and the Basedrum do appear at the same moment, thus the bass note is overcrowding the Basedrum for a short while. A nice trick is reducing the Bass only when the base drum and bass play at the same time moment, this makes the Base drum more clear and will not affect the baseline as much. This can be done manually by editing, muting or cutting out bass notes, or with a side chain compressor trick. For this instance we could use a side chain compressor to correct the problem by reducing the bass note when the Basedrum goes over a certain threshold, thus temporally reducing the bass note. This will keep the boom of your Basedrum to hear unaffected, as this is the fundamental reference sound (frequency wise and rhythmically) that can be crucial to your mix.
Multiband Compressors.
This compressor is mainly used at the mastering stage but also can come in handy while mixing. Most multiband compressors do have 4 Multibands. Each multiband has got its own frequency range and the reduction of each multiband can be setup separately. For instance controlling the bass drum or bass, we can adjust low, mid, and high with different compression setting.
Normal Multiband Default settings.
Band 1, 0 - 120 Hz, Power.
Band 2, 120 Hz - 2 KHz, Warmth.
Band 3, 2 KHz - 10 KHz, Treble, Upper Harmonics.
Band 4, 10 KHz - 20 KHz, Air.
Adjust the bands when needed, for instance.
Band 1, 0 - 120 Hz, Power, first low band.
Band 2, 120 - 350 Hz, Misery range, second low band.
Band 3, 350 - 8 KHz, Mid-range.
Band 4, 8 - 20 KHz, Air, Trebles
Each band will be the same acting as a single band compressor or normal compressor, just that the spectrum can be adjusted in multiband ranges. Now you can control the Bottom End and not affect the higher frequencies while compressing. Each multiband crosses over in the next multiband. You can understand with vocals that can be expected to be handled carefully, maybe only the Mids can be compressed a bit, without harming the crispy highs or lows. For mixing purposes the multiband compressor could become handy, but however setting up a 4 multiband compressor can be a fiddly job. Even with 4 compressors running at the same time, you might not hear as good what you’re doing. Because of this complexity, multiband compressors are most likely only used for mastering purposes and scarcely used for mixing purposes, but can become a handy tool when resorting for a trick to solve problems. Especially when you need spilt signals to be controlled, but you do not like to have copied instruments, a multiband compressor can help solve things for you in the mix. For use on single instruments try to avoid, only as a last resort. For use on groups use only when they have the desired effect without much fiddling around. Multiband compressors tend to show less pumping, but this soly depends on what frequency band or instruments you’re working on. To control pumping better use a single band compressor instead, controlling 4 multibands can be a hassle.
Compressing.
Compressors on individual instruments or tracks are almost always used as an insert effect (pre-fader) and (almost) never used as a send effect, because the main function is to change the signal directly. Compressors can be inserted at single instrument track level or as an insert on groups or sends. What we try to achieve is a cleaned and better sound (better transient, sustain, RMS levels then before), so making sure what goes into the compressor needs to be as clean as can be. Prior to compression we can place an EQ for cleaning purposes. Use manual editing. Popping sounds and air noises are best rolled off with a low cut 0 Hz - 35/50 Hz to 120 Hz for not fundamentals. A gate can also help clear up the input signal as well as automated or manual muting. When recording you can use compression just to scrape some peaks, the real compression can be done later in inside the mix. Maybe you already placed an EQ for cleaning up (quality, reduction), and then place the compressor behind the EQ (all pre-fader). If for instance you’re working on a digital system then you would have more places to insert an effect on a track or instrument, send or a group. When you place a compressor as insert effect, do this in effect slot 2, so effect slot 1 stays free for EQ (all pre-fader). Compression is highly dependent on the source material, and as such, there is no preset amount of compression that will work for any given material. Some compressors do have presets for certain types of audio, and these can be a good starting point for the inexperienced, but remember that you will still have to adjust the input and threshold for it to work properly. Because every recording is done with different headroom and dynamics, every compressor will also their own sound and main purpose. The main purpose of the compressor in mixing is give some structure and dynamics to the sound that is passing through the compressor.
Compression is done by controlling the dynamics (level) of the input by compressing the output. Basically there are some good reasons to use a compressor. For controlling the Transients (start of each note 0 ms -25 ms) and controlling the Sustain (30 ms >) a compressor can do a good job to make certain instruments more clear and work them into the dimensions you need (quality). Also by compressing a loud part, will give softer parts more volume (level). This is why we need to clean the input signal of unwanted noise; else the compressor will only make them louder. Pops and clicks in the lower frequencies can make the compressor react, while you do not want it to react. So better be sure your delivering a signal input into the compressor that is good, else try to remove with EQ ing upfront, gate or even edit the audio manually (removing pops, clicks, etc). The ratio setting for individual instruments is about from 4:1 to 10:1, don't be shy. Setting the ratio lower will make you use the threshold more. Setting the ratio too high, the compressor almost starts to act as a limiter. By chance the only limiter that is used in a mix is on the master bus (for scraping some peaks a Brickwall limiter), so ratios like this are out of order on group tracks and individual tracks or instruments. We can use general RMS compression on a group track to join or weld the individual tracks together even more (also use some compression on the sends) as well as we can use summing. With a ratio setting from 1:1 to 4:1 (that is lesser then when working on individual instrument tracks), the more subtle the compressor will be and weld (blend) the group into a layer. For mastering purposes a ratio from 1.5:1 to 3:1 is commonly used.
Very Short release times emphasize the quieter sounds, after the transients have passed. This is handy with Bass, Guitar or any other instrument that does not hold its sustain very well. You can get each note sound straight until end doing this (sustain). Set the decay time for rhythmical content to tempo, a measure or beat.
When you reduce the peaks of a signal and then add the same relative amount of makeup gain, you are raising not only the instrument by x amount of dB, but raising the Noise Floor as well. This is why we need cleaned up material. While usually not an issue in quality recordings, it can become apparent when compressing quiet acoustic recordings or recording with a low Signal to Noise ratio. That computer running in the background while recording suddenly becomes more apparent or you forgot to turn off the ventilator in your living room. Unheard sounds could become from being unnoticeable to being an annoying hum if you compress and raise the makeup gain. Even when using EQ. That is why the input must be as clean as possible and cleared of unwanted sounds.
The pumping sound you might hear occurs when the compressor initiates but then has too fast of release and the rest of the mix comes up to fast after the hit (lesser transients and more sustain). To fix this have a slower release, lower ratio, slower attack or higher threshold. They all have a different effect so listen and decide what sounds best and gives you what you are trying to achieve. When pumping is noticeable, after a while this becomes apparent. When pumping occurs, it is likely we have gone too far. If you train your ear pretty much all radio signals have a certain "acceptable" amount of pumping. When the compressor is set previously, do not affect the input signal, because this will affect the threshold placement and needs to be set again. This is why we first make use of level, balance, EQ before adding a compressor. Hunt down and up for hearing the correct setting of a compressor. Listen and go extreme before backing down to a good sound, it is the only way to really hear the reduction good while setting up a compressor. Do not fiddle around -5 dB change of threshold, go extreme and go way lower or way higher, or crank or lower the ratio and listen to the difference (pumping or not). A good rule is when you hear a compressor start to work, you have gone too far. Experiment. Generally you will get better results by learning to use compression, and understanding how the controls affect the audio signal. Experiment, listen and visualize, then apply. When compression is not working to adjust levels, use event fader level or balance automation (unmasking). Even after the compressor. Also automation of level (the fader) is a kind of compression that can be done manually, maybe the first choice in line when overall compression does not seem to workout. Using the mute button for instance. Compression is easily available, but the original audio must have some good even sound before entering the compressor. In most cases midi notes can be raised or lowered in volume / level by manually editing. Samples can be manually adjusted. Also audio on a track can be edited and maybe you might take the time to do this note by note, level by level. The more even of level or controlled the original is audio enters the compressor (RMS, Peaks, noise, artifacts, etc), the less work the compressor has to do (less artifacts and pumping), the better the result.
Compressing Room Mics
Compressing the room mics can make your rooms sound huge and add a lot to your mix. Some heavy compression can sound quite interesting as long as your not making it too noticeable. Combining this compression to some moderate saturation can make your mixes jump out. Also, some long decaying reverb can sound interesting. Ultimately it makes the room sound bigger and more acoustically pleasing.
Controlling Guitar Dynamics
When recording lead guitar there are always a few notes here and there really jumping out a lot louder than the rest of the guitar track. Usually compress with a ratio of about 5:1, then turn the threshold down until you can hear the audio being squeezed a bit. Then set the attack time so the transients are shining through unaffected and the rest of the signal is getting compressed, ultimately making the audio more consistent dynamically. Try the release settings until it fits the song.
Compressing Reverb And Delay
Using a compressor on a reverb bus can really tighten up the mix, if the reverb tends to be getting too loud and out of control dynamically. Some heavy compression can sound quite nice but be careful not to over do it and remove the life. The same goes for delay busses, compression can really tame the sound and stop anything from going too out of control. Also, using EQ on a reverb or delay bus is a great tool for removing any potential muddiness that may be happening.
Making The Toms Punch
Compression on toms can create some amazing results. Using heavy enough compression along with a gate can make your tom drums seriously punchy. Even if you don't have individual tom mics and just an overhead pair, or just a single overhead mic, compression can really make the toms punch out. Think of songs like Shine On You Crazy Diamond by Pink Floyd. The compression on the toms make them really punchy and beefy, really adding to the mix.
Make Your Drum Overheads Sound Amazing
Compressing the drum overheads is a great way to make your drums pop. You can tame any unwanted transients with the attack and release times. U can really smooth out and make the drums more consistent and make your drums sound a lot better. If your going for a heavier drum sound, you can really brick wall compress the drum overheads and get a really juicy sounding drum sound. Really harsh ratio and threshold setting can make the cymbals ring out for ages combined with a long release time. Sidechaining the overheads to the kick drum can really make the drums pump and breath, giving your mix a lot of life and energy.
Compression Myths (Understanding and Misunderstadings)!
Most have a solid understanding of what they do, when and how to use them and how to get what we need from them.
Attack is the time it takes a compressor to begin compressing once a signal crosses over the threshold ?
The only problem is that it’s completely, utterly incorrect.
Attack is the length of time it takes a compressor to apply roughly two-thirds of the targeted amount of gain reduction. I say ‘roughly two-thirds’ because there is no agreed-upon, industry-accepted standard for what this spec actually is. Yes, you read that right: no two compressor designers will agree on exactly how to define, and therefore measure, attack. My definition above is within the ballpark of most thinking, so I’m running with it. To understand this definition of attack better, you need to get some basics of compression established first. Let’s say your compressor is set with a threshold of -10dB and a ratio of 3:1. If you feed this compressor a signal at -11dB, nothing happens because the signal is lower than the -10dB threshold. But if that signal jumps to -1dB things get interesting. Most notably, the instant the signal reaches -10dB the compressor begins attacking it. There is no delay whatsoever in this response, which belies the myth that attack is the time it takes a compressor to respond once a signal crosses threshold. With a -1dB signal and a -10dB threshold, the signal is 9dB over threshold. Our 3:1 ratio means that for every 3dB coming in over threshold, the comp wants to allow 1dB out the backside. Since our example has a signal 9dB over threshold, our hypothetical 3:1 comp wants to compress those incoming 9dB into 3dB at the output, which would require 6dB of gain reduction. Given that attack is the time it takes a compressor to apply roughly 2/3 of the targeted gain reduction, the attack in this case indicates how fast the comp will apply the first 4dB of the target 6dB of reduction. If you don’t follow the math of this illustration, don’t worry. For now it’s enough to know that the compressor starts applying gain reduction as soon as the signal crosses the threshold. Which means that attack is not a delay before action, nor is it even a measurement of time per se; instead, it is a rate, a measurement of the speed at which the process of gain reduction is occurring.
Release is the time it takes a crompressor to release compression afther the signal drops below threshold ?
Without going into detail, let me just say that the above definition is not only incorrect it would actually be an impossible thing to assign a single value to. The correct definition of release will come as no surprise given what you’ve read above: Release is the time it takes a compressor to restore two-thirds of the reduced gain to the compressed signal. ‘Restoring reduced gain’ is a very carefully chosen set of words. I characterized release in those terms because it’s useful to think of compression as a two-way street. When a compressor attacks, it is applying gain reduction – it is lowering the signal level. But gain reduction is only half the picture, because for every dB of gain a compressor takes away, at some point it has to put it back. And that process – let’s call it ‘gain restoration’ – is the business of release. The faster your release, the faster the compressor restores the gain it took away when attacking. So what do we know now, at least in a purely academic way? Attack is the length of time it takes a compressor to apply roughly two-thirds of the targeted gain reduction. Release is the length of time it takes a compressor to restore roughly two-thirds of that reduced gain. This gives us a good grounding to tackle more compression myths.
A compressor won't release until the signal drops below the threshold ?
If you’ve been paying attention, it should already be obvious why this statement is false.
The explanation lies in the fact that aside from generating ancillary effects like distortion and coloration from transformers and tubes, attacking and releasing a signal are the only two things a compressor can do. Put a little differently: any time the gain reduction meter on a compressor is moving, it is either attacking or releasing the signal. Any time the gain reduction meter is increasing (i.e., the comp is reducing the gain of the signal), the compressor is attacking. Any time the gain reduction meter is decreasing (i.e., the comp is restoring the gain of the signal), the compressor is releasing. So while the well-intentioned myth-spreaders out there would have you believe that attack and release are only relevant when a signal crosses the threshold attack on the way up and release on the way down what I am telling you is that nothing could be further from the truth. Instead, once a signal is over the threshold, both attack and release are constantly at play. There’s a simple way to confirm this. Feed a drum loop into a compressor and set it up so that the signal is always over threshold and the gain reduction meter is dancing between say 6 and 12dB of reduction. In this instance the compressor is constantly attacking and releasing the signal, as indicated by the dance of the meter. If the myths were true – if attack only happened when a signal crosses above threshold, and release only happened when a signal drops below threshold – adjusting the attack and release knobs in the above scenario wouldn’t make any difference because the signal is perpetually over the threshold … but turn the attack and release knobs and you will very clearly hear the sound of the continuous compression changing. Give it a try. I think most people who use compressors on a regular basis already understand the above on an intuitive level, but some never make the connection that the behaviors they’re hearing (and seeing on the meters) don’t comport with the conventional – and flawed – wisdom.
Compression reduces Dynamic Range ?
How many times have you read this particular nugget of wisdom? And sometimes it’s true. But not always. Indeed sometimes it’s important that it’s not true. Imagine a mix in which kick, snare, and cymbals/overheads feed a drum bus. The intuitive thinking goes something like this: if I slap a compressor on this bus and compress it, by definition I’m going to be pushing down the loudest stuff and as a result the dynamic range will be reduced. That’s what compression does, right? Yes, and no. Yes, a compressor can and does push down on the loudest stuff. But no, that doesn’t mean the dynamic range is automatically reduced, and here’s why: if your attack is slow enough, the bulk of the transients will still come screaming through even though the detector is simultaneously screaming at the gain circuit to ‘TURN IT DOWN!’ Then, if your threshold is low enough and your ratio is high enough, what does get pushed down gets pushed down so far that the resulting signal is much quieter than it would have been if you hadn’t compressed it at all. The result of those two factors, the loud stuff is just as loud (albeit for a shorter time) and the quiet stuff is quieter. Which is to say that your dynamic range is now increased as a result of the way you applied the compression. Engineers exploit this reality every day on their drum buses; the classic trick is to take a comp set to a medium or high ratio, slowest attack, fastest release and dig in hard. With a deft set of hands and ears, the result is a track that, on its own, is an unusable series of fast, dead-sounding thumps and pops that herald each drum hit in a highly exaggerated but uniformly level manner. This track is then blended in parallel, usually quite subtly, and the result is a palpable increase in the perceived impact, punch, warmth, and consistency of the drum sound. So yes, compression generally does reduce the dynamic range, but it doesn’t have to, and sometimes it does exactly the opposite to wonderful effect.

Compression makes Sound Bigger ?
This final myth is very personal to me. I had the pleasure of attending an early Mix With the Masters seminar hosted by one of the acknowledged masters of mixing and, in particular, artful compression, Michael Brauer. At one point the group was talking about compression, and someone asked Michael what he’s listening for when dialing in one of his elaborate compression schemes (if you haven’t read up on his multi-bus and five-compressors-as-one-vocal-comp techniques, you should; even if you never try them your brain will appreciate the novel approach). This is my interpretation of what he said (and I’m OK repeating it here because I’ve since read it in interviews he’s done): pushing a sound into a compressor is like pushing an object into a stretched rubber band. The harder you push the object, the more the rubber band pushes back. Michael listens for the point where there’s a musical push-pull movement and the comp feels springy and flexible. Not pushing enough results in too little resistance – no interesting movement. But push too far and the rubber band loses its elasticity and becomes stiff the sound loses its life. What’s more, when you push too hard into a compressor the sound becomes small. When he said that last bit, I remember jolting upright in my seat because I’d never previously felt like I had a masterful grasp of when to stop laying in with a compressor. I had become pretty adept at using ratio and release to control the transparency or audibility of the effect, and I was starting to feel confident in knowing what kind of attack served the sound in the mix. But where to park that threshold was still a mystery to me and had been for a long time. This nugget of insight felt like the key to solving that puzzle. When I got back to my room in the States I immediately laid into my compressors and started listening not just for snap and swing but also for size. I became obsessed with running every track I had – every sound and bus, even my FX – through the different comps in my rack and plugin folder. I relentlessly tweaked them in all kinds of ways aggressively, musically, invisibly, whatever constantly level matching and bypassing the comps to listen for one thing and one thing only: how big or small the sound became in the context of the full mix. What I heard was a revelation. I realized I had been confounding ‘density’ with ‘size’. That seemingly small syntactic error had huge ramifications, both on my productions and on my experience of creating them. This mistake explained why I never knew when to stop digging in with a compressor. Here’s what that mistake looked like: if I was squeezing a sound and it got thicker, I thought that was the same as making it bigger. I was enamored with the ‘grr’, the ‘hair’ and the urgency that compression added to my sounds. When I bypassed and that density went away, I was resolute that the compressor was improving things.
Wrong. The problem with making density your primary compression benchmark is that you can keep going as far as the comp will let you; if urgency is a drug, compressors are the dealers of the stuff. And they have no conscience; they’re happy to dose you up as often and as hard as you’re willing to go. But mixing is a game of balances. Of relentless tradeoffs and compromises. Ultimately you don’t want every sound to be as dense as possible; instead, you want it to be as dense as necessary to transmit the emotion… and no denser. That means attuning your ears to the proportionate spaces around each tone like the curves and twists of the pieces in a jigsaw puzzle, filling up the spectrum where necessary while preserving enough dynamics to allow the sounds, and with them the entirety of your mix, to breathe – to have air around the elements such that you feel the impact when those spaces contract and the sounds collide. Everything in a mix must be shaped with complete awareness and respect for every other piece in the puzzle or it won’t fit. It won’t assemble into the vivid picture that the song wants to be a gripping story the listener wants to surrender to from start to finish.
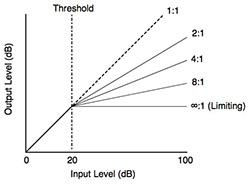
Limiter.
A Limiter is nothing more than an automated volume fader. Commonly a limiter will top (scrape off) the signals. Unlike its big brother the compressor, the limiter has fewer buttons and knobs to play with, in comparison to a compressor a limiter has got a ratio setting that is high on value, therefore compressing power is high. Limiters work good on a whole mix on the master track. A good between version is the peak compressor, combining functions of a compressor and limiter together. A limiter is basically reducing all signals that do come over the set threshold. Mostly used to scrape off some peaks while on the master track. Uncommonly used on groups or single tracks, but for the same purpose used on the master bus fader preventing overs on the main mix. For scraping the peaks set the threshold to -0.3 dB or a reduction amount of 1 dB to 2 dB and does not hurt the transients. Limiters can have artistic and creative purposes that are uncommon. The audio limiter is a very similar tool to the audio compressor in that it reduces the dynamic range of a signal that passes through it. A compressor gradually reduces the signal level above a certain threshold, but a limiter completely prevents a signal from going over a specified setting - a limit that nothing can go over. The ratio setting on an audio limiter (also known as a sound limiter) is usually set at 20:1 or higher, going up to infinity:1 (∞:1). This is the biggest difference you'll find between a compressor and a limiter. As I described earlier, an audio limiter can be used in many different situations in your home studio, but mainly as a way to prevent any of your recordings or mixes from potentially clipping and distorting. It's vital you avoid this if you want your music productions to sound clean, crisp, and professional. Limiters are mainly found to be the last process in the master chain, as once you have used a limiter to full effect, the audio's condition is such that any further processing will not blend as well as when applying the same process earlier in the chain. In fact, further processing after a limiter can either harm the mix or un-do some of the earlier processing.
Dynamic range compression (DRC).
Simply compression is a signal processing operation that reduces the volume of loud sounds or amplifies quiet sounds by narrowing or compressing an audio signal's dynamic range. Audio compression reduces loud sounds above a certain threshold while leaving quiet sounds unaffected. Compression is commonly used in sound recording and reproduction, broadcasting,live sound reinforcement and in some instrument amplifiers. A dedicated electronic hardware unit or audio software that applies compression is called a compressor. In the 2000s, compressors became available as software plugins that run in digital audio workstation software. In recorded and live music, compression parameters may be adjusted to change the way they effect sounds. Compression and limiting are identical in process but different in degree and perceived effect. A limiter is a compressor with a high ratio and, generally, a fast attack time. Dynamic range describes the ratio of the softest sound to the loudest sound in a musical instrument or piece of electronic equipment. This ratio is measured in decibels (abbreviated as dB) units. Dynamic range measurements are used in audio equipment to indicate a component's maximum output signal and to rate a system's noise floor. As a reference point, the dynamic range of human hearing, the difference between the softest sound we can perceive and the loudest, is about 120 dB. Compressors, expanders, and noise gates are processing devices that are used in audio to alter the dynamic range of a given signal. This is done to achieve a more consistent sound when recording or as a special effect (by radically altering the dynamics of a sound, thereby creating a sound not possible from the original source).
Maximizer.
The maximizer's purpose is to increase loudness. They have various methods for accomplishing this and some even claim not to effect dynamics at all. Some maximizers may introduce a little "sizzle" to your sound or warmth etc. (as will some compressors) to achieve their goal. Increases the perceived loudness and density for maximum sonic impact. No typical compressor artefacts, such as pumping and sound coloration, is to raise the perceived loudness of the audio above the actual maximum amplitude. That is, you can take music material that is already normalized (the loudest sections already use up the available headroom) and still make it sound louder, with an absolute minimum of timbral changes.Increasing the density of the audio material. Limiting transients and simultaneously raising the general level.
Gate.
A gate is basically cutting all signals that do come over the set threshold. A gate can be compared to a compressor, instead of using reduction by measuring the signal; the gate cuts all signals to inaudible. For removing unwanted material (cleaning and reduction) a gate can make a difference. For rhythmical sound content (drum set, percussion, etc) a gate could cutoff the reverb or any other effect, according to tempo. A gate could cutoff sustaining sounds. For instance when a pre-recorded snare has got room sounds or sustaining sounds recorded, a gate could clean or clear the reverberation sounds or sustaining sounds, by only passing the first transient sound. Then after the gate you will have a more dry snare, you could now create the room by adding a reverb that fits the dry snare signal. Endless creative quality and reduction possibilities over here. Delay's and gates are often synced to tempo of the track. Use the mute button for composition wise intent or manual gating.

Finishing a first starter mix.
For now we have discussed all features for starting a mix towards a static reference mix. Once you get the hang of starting a mix, this will be a good basic setup. Mixing is just more than setting up all faders and knobs, but for starting/static a mix we can only give some guidelines and proven togetherness. Starting a mix we like to stay in dimension 1 and 2 and use the common tools available. We try to avoid dimension 3 for now. Keep on mixing with the tools for dimension 1 and 2, until satisfied. Then we will discuss dimension 3, as we need depth also to make our stage plan true.
The Static Mix Reference.
But most likely you want the best out of your mix and you will be adding more effects later on. Do anything to make the whole sound better. Using EQ, Compression, Delay, Reverb (discussed later on), Limiter or any other device or effect will change the way your mix will sound (the three dimensions, your stage plan). Remember when you know to add something to your mix, you are changing the levels. So check, adjust and re-check whenever you can. It is quite ok to mix freely and set faders and knobs as you want, setup however you like. As long as it sounds good, it must be good. But keeping headroom (open space for adding) and keeping the Vu-Meter below 0 dB is important. Also it is general for most beginning mixer to pump all levels as loud as can be; this is not what you’re looking for. Loudness can seem to be better, it is actually the same and we will pay attention to overall loudness while mastering. So keeping the total levels (summing) on the master fader VU-Meter is keeping you ready for mixing purposes applied for later use. If you are happy with the togetherness of your sounding mix, maybe you can raise all track faders so that the VU-Meter is more on the upper side closer to 0 dB, still remember doing this is not changing sound but the level only (and will produce more artifact when raising too high, you will just lose some headroom instead. Keeping headroom anywhere from -4 db to -14db is allowed and good accepted in mixing. Because in the mastering stage there is plenty of power for loudness to get your mix to sound as loud as can be, care less about loudness levels when mixing, care about how your mix sounds as a whole. Using quality and reduction first (apply the dimensions in order). Care about how your stage planning is perceived. So once again to hammer it down, your mixing now, so separation as well as togetherness is important only. Loudness we wait for as we have finished the mix and go for mastering. As a rule for a good starter mix, we tend to stay inside dimension 1 and 2 more. We only add dimension 3, when we are satisfied finishing off all earlier dimensions (the static mix). Resorting first to panning, level, EQ, compression, gates, mutes, limiters, reverb, delay, overall effect and the correct order.
Review of our start.
At least in mixing an EQ and Compressor, Limiter and Gate are good tools to adjust the mix, before throwing in more effects and more sounds. Together with Fader level and Balance, EQ and Compression are the most used carving tools for a mix (starter mix towards a static reference mix). Basically EQ will do a good job on just reducing or gaining frequencies overall on the whole part or frequency spectrum. Compression, limiting and gating will give you something an EQ can't do, that is to affect only certain signals when they are passing a defined border. Thus controlling transients and sustain. Taken in account that for overall level use the level faders first, manual editing and muting, panning the panorama first (separation). Use EQ when you need to cut (separation) or raise overall instrumental frequency ranges (quality). Use Compression when some parts of instruments at certain times peak and need to be lowered or reduced to give more dynamic range back, keeping things tidy and together (headroom). Use a compressor for transients and sustain (quality). Use a gate to really cut unwanted events. Use a limiter to scrape off some peaks. Use manual editing for removing pops, clicks etc (sometimes breathing noises on vocals). A Good start is giving each track or instrument a place in the spectrum available (stage planning). These are good tools to get some headroom back, thus reducing or scraping peaks. Try to imagine what the whole mix can sound like, and after some repeated times you have setup a mix, you will get the hang of it. Remember to get some separation/togetherness out of your mix, reduce frequencies that are not needed per instrument. Try to be natural and close to the original sounds, but keep what is needed and wipe away what is not to be heard (wipe away more, raise less). Try to transmit natural signals towards the listener, so our brain does not get confused (dimensions, 3d spatial information, stage planning). This will mean sometimes using EQ and just cutoff outside ranges of an instrument with shelving low or high cuts (reduction). Sometimes the internal range of the instrument needs to be sounding better (quality), use EQ for overall editing of the sound, while using Compression (Gating or Limiting also) for more time and loudness related peaks that you need to correct (transients, sustain). Not forgetting to balance the instrument from left to right and to keep track of the Vu-Meter, correlation meter, goniometer, spectrum analyzer. Do some checks and rechecks on your reference tracks alike Basedrum or any track you choose as reference loudest track. Soloing as well as listen trough a mix summing up towards the master bus fader, towards the last output.
Take in account that mixing is always debated and can be explained in different ways, because mixing is a creative thing. But having some guidelines and working by it will increase effectiveness. Specially knowing panning laws, stage planning, where and what to cut, masking and unmasking, dimensions and 3d spatial informational hearing, the more natural the better. Understanding how to do things will take time and is repeated learning process, it is pure experience in the end that makes the speed and time needed for mixing towards a starter, static and dynamic mix. This will mean you will mix good or bad, but you will continue to learn from it when doing so. Also the human brain needs time to take all information by learning and processing information, ordering this into something you can understand later on. We will get tired when hearing for longer times to loud music. Getting to much information and working just too hard is not getting you there any faster. Take some time off and give it a rest, give your fatigue ears a good rest, this will help you find your mix on another day sounding different than before. Making better decisions. Each time you will learn for a while and then some realization will set in afterwards. Then you will understand the whole picture.
What your aiming for is separation and still have some togetherness.
So we have explained Notes, Frequencies, Dimensional Mixing, Starting a Mix, Left, Middle, Right, EQ and Compression! Remember it is better to reduce then to add, and cut away what is not needed, the headroom that you create with it will be rewarded when you need to add things to the mix later on. Getting things to sound louder each time you mix is not important, that we do later on while mastering. Relatively we have now worked more on dimensions 1 and 2. And have avoided dimension 3 until now, although we have discussed it we did not apply dimension 3 really as an example. Here we introduce dimension 3 and some more effects and being less restricted and more creative with the mix (Static Mixing).

Welcome to the infomation page about Mixing Music part 2
The fine art of mixing single audio tracks together as a whole is difficult, specially when you do not have some guidelines. First rule for explaining tthe name 'mixing' is that it stands for mixing it al up together, to make a whole overall sound. This means adjusting overal sound levels and making use of Fader Levels, Panning, EQ, Compression, Reverb, Delay or any kind of effect towards a good balanced track. Several issues come up while mixing, technique and equipment. Also offcourse like in composing, improvisation and goofing around might help you more to understand the difficult task to mix. Important is that the overal mix should be sounding tight and together as one. This Mixing page will try to explain some things about mixing, where to start and how to finish the mixing stage with good results. Remeber that time and understading is the way to go, knowing how to mix is a good thing before starting one. Take a good look around and read the information you find on our mixing information page.
Basic Mixing II

Mixing a Starter Mix and Static Mix.
In Basic Mixing I, we have explained the starter mix and progression towards a static mix. Basically we have covered dimension 1 and 2 more than dimension 3. We actually did not apply any effects or added anything (that was not there before). The starter mix is aiming for some togetherness and cleaning up what is not needed. Keeping what is needed, with the help of the Level Fader, Balance, EQ and Compression, Gate, Limiter. Without adding effects that work overall on the mix, we try to have all instruments sound best and clear (starter mix), so all can be heard in their range. Together sounding as one mix. To get some headroom back you may have to switch back to the starter mix again. Change one thing can lead to affect the rest of the mix. Keeping track of the mix and dimensions is part of checking and re-rechecking. And should be at constant attention. When a mix starts to be muddy, when two instruments overlap in each other’s frequency range (masking), you will need to correct this by using separation. Remember all instruments are placed inside the frequency spectrum and it is better to spread them out and create some headroom for them to be heard. Actually there are quite some tools for separation. Just as in human talking, as long as only one person is talking to you, you will understand and hear well. When a crowd is talking, it is difficult to understand what is going on. It is a mixing fact that crowding up the mix with more and more sounds is not a good thing. So we actually cut out what is not needed. Making all instruments sound good in their own range is way better (dimensions). Constantly think about how the spectrum will change according to what you add or remove, giving placement in the frequency range for each instrument to shine, but not intrude. Cutting out what is not needed, may clear the way for other instruments to come more upfront. Instead of just boosting, try cutting (other instruments) and make some space. Basic Mixing part I will explain the starter mix, so read this before you go on.

Introducing Dimension 3 (depth).
Basically with applying dimension 3, we will progress with the static mix. (starter mix dimension 3). Here we will go further into adding effects and making the overall sound of the mix, static reference mix. Adding reverb or delay (or any other effect) will add more frequencies and level so is costing some headroom. Effects can affect placement, maybe a stereo delay will get your instrument to move out of its natural position. There are quite a few effects that affect the dimensions and are the tools for basic mixing. Still we separate Fader, Level, Balance, EQ, Compression, Gate and Limiter from the rest, because these are tools that are commonly used. Read basic mixing I for more info on those tools. Also we call the finishing of the dimensions, the finishing of the static mix. Basically the static mix is called by the fact that knobs, faders and settings apply to the whole mix. So we do not automate or place events inside the timeline of the mix, but we just set knobs and faders for the whole mix.

Effects.
Now, the most interesting, versatile and creative part of mixing, adding effects. Endless effects are provided to create sounds or adjust it. Available are hardware or software effects. We cannot even discuss them all over here, so we only focus on the most used and common ones. Also at first we will focus at effects that work in dimension 3 (depth). Effects are often a welcome addition to a mix, a bit of reverb can do a good job and distortion on a guitar can make it rock. Remember that each time you add an effect; it will change the range and whole frequency spectrum of the mix, possibly gaining frequencies. Therefore filling up headroom more and more. A reverb may add a nice roomy sound, it can also muddy up the mix as a whole. Cutting some lower frequencies out of the reverb signal can help clear up again, especially the 0 Hz to 120 Hz (180 Hz) range. So knowing effects and what they do to the signal is important, keeping in mind what the effect is doing with the three dimensions, quality and reduction, headroom, etc. Just adding effects in a row may sound good at first, maybe later on when your ears are not fatigue, you might think different. Do not rush into adding effects; think what is needed for the mix to get better. Also for most effects we like to cut the lower frequencies, just because they might influence the bass range from 0 Hz to 120 Hz. Be gentle with effects, muddiness and fatigue ears are just around the corner. Because there is a vast amount of effects available, there is no general solution for mixing. We all try to do our best, but we enter the creative field and really are on our own. You can pick up tricks and learn from others, there is a good deal and straightforward information on the net. It can be debated, it can be funny, and it can be good or bad. Everything will stand by how much experience you have with mixing and how much you understand it. Time and learning are again factors of success. Whenever you are tired of not getting what you need out of your mix, be gentle and maybe do a re-check or just stay away for a while and return back later on. Do you really need all those effect to have a good sound? Remember, Less Is More! The more basic approach will work often better and is faster and cleaner. Crowding up the spectrum with effects is never a good idea. The more natural effects are to our ears, the better we can use them to affect the dimensions of the mix.
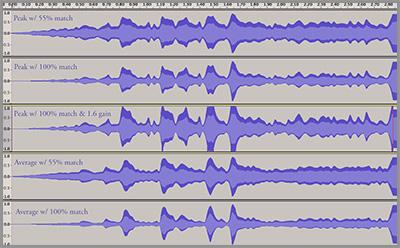
Track Effects.
Whenever you need a single track or instrument to sound different, you can add a track effect to it. This is common for all kinds of effects. But for single instrumental track effects, fader, level, EQ, Compression, Gating and limiter, are most commonly used for mixing purposes. Keep everything adjustable per instrument or track; this can help even when adjusting the final mix. Track Effects are most common on computers and digital systems, you can place many. But processing power will drop also, it can be rewarding to separate things and keep effects to a minimum. Less is more.
Send Effects.
On analogue mixers Send Effects might be all that you have; digital systems do have send effects also. Whenever you need an effect that works overall on several instruments, you can use the send effect and send the signal to the Send Effect. Most likely the Return of the effect will come up on the Master Fader. For send effects you can be efficient with processing power, because using only one instance of the effect for multiple instruments or tracks. Also it can be fun routing send effects and be creative with sound and effects, trying effects after each other before deciding what works best. Send effects are effective as a collective on all instruments. Having two or more send effect channels can help layer the mix, but we try to stay away from send effects when we could use groups instead.
Group Effects.
As we did layer instruments and grouped them, we gave each layer of our mix a separate group track. A compressor for welding purposes or an EQ could be placed on a group track. As opposite to a group track, send effects can be uneasy to keep track of. Thus meaning the routing of the send effects can be inputted from different tracks or instruments, sometimes this can work confusing. Place effects on group tracks, when you can. Else use a Send Effect track. Especially when you apply each time the same effect on separated group tracks (repeated instances of the same reverb), you could choose to just use one instance on a send track.
Pre-Fader and Post-Fader.
The option to place effects pre-fader or post-fader is a matter of purpose. Any effect placed pre-fader as an insert is affecting the track signal before the fader level, balance, etc is applied. For track compression on vocal for instance, we mainly use a pre-fader compressor. This way the threshold setting of the compressor is not affected by the fader setting of the track. We can now adjust the level of the vocals with the same kind amount of compression. If we place the compressor post-fader, the threshold is affected by the setting of our track fader (even balance, etc), so the amount of reduction is influenced. For vocal we choose pre-fader compression, this way the amount of reduction stays the same when we adjust the single track. But the same kind of system is applied to all other effects we place inside the mix. Placing pre-fader means, the signal will first be affected by the effects in place, second by the track mixer settings (fader, balance, pan, gain, etc). Placing post-fader means, first the track settings and then the effects. Post fader effects are for instance reverb, delay, echo and all other sound manipulation effects alike chorus, phasing, modulation, etc.
Our Stage Plan according to dimension 3 (depth).
We have discussed and applied the first dimension (panorama) and second dimension (frequency spectrum) for getting a good starter mix. Now as we would like to finish off all dimensions according to our stage plan, we can apply some depth in dimension 3. Mixing all dimensions is called a static mix. Mostly we are talking reverberation sounds that influence our hearing in perceiving depth, as we have finished dimension 1 and 2 (2D), dimension 3 should be our first concern. In dimension 1, we have set panorama. In dimension 2 we have set frequency range. By rolling off some trebles or highs, we could affect distance for dimension 3. But however dimension 3 is mainly a reverberation effect that will make our ears believe there is some room or distance. Suddenly the field becomes 3D with all dimensions in place.

Depth.
Our hearing can calculate or guess the distance (depth) by hearing the dry signal and its reverberations. Especially the pre-delay between dry signal and first reverberation makes us perceive depth. Reverberations occur when a dry sound is hitting solid objects alike walls or any other objects placed into a room. Even outside objects like water, mountains, valleys, tunnels, ambience, etc, somehow cause reverberation to be transmitted back to us (echo). Specially calculation of the time between the dry signal (0 ms) and the first reverberation signals ( > 0 ms) come across (returning to our ears a bit later) is making our brains understand depth or perceive distance. Pre-delay is an important factor for any delay or reverb effect to be taken in account while we are aiming for depth or distance inside dimension 3. Because the first transients of any sound will make our brains react to recognize and understand, this goes for the dry sound as well as for the reverberation sounds (any sound). The most used effects for perceiving depth or distance are reverb and delay. We also explained before that dimension 2 (frequency range) by rolling off trebles or higher frequencies we can perceive the dry-signal to be distanced. Depth means distance. When we are using dimension 1 (panorama), when we placed a dry signal more to the left, the left speaker will play more than the right speaker does. But with reverberation in dimension 3, for perceiving depth as a room, we must transmit the 3D Spatial Information to the listener. We could place this at the opposite side on the right. When a dry signal is playing a note from start, the reverberations returning from the room slightly later in time (specially the first pre-delay), make our brains understand and calculate some kind of distance (depth). In combination with panorama (dimension 1), we can use dimension 3 (and 2) for applying our stage plan. Apart from using treble roll off or high frequency roll off in dimension 2 to perceive depth, common used effects for dimension 3 are Reverb and Delay. Apart from creative aspects we will discuss later on, we will use reverb or delay to represent the dry instrument (transients, Sustain) in our stage plan, tracks or mix with some more natural perceived acoustics. This is called 3D Spatial Information, the information needed to make our hearing and brains believe in depth or distance.
Delay.
You get very different results from your filtering depending on where you put the filter in the signal chain. To introduce some real movement into delay lines, for example, place sweeping low-pass filters before the delay. You then get the movement of the dry sound contrasting with the movement in the delay line. If both the filter sweep and the delay lines are tempo-sync'd, you can create interesting effects where the filter appears to be moving up and down at the same time. Filters are also great for use on drum loops. One trick I like is to send the drums to a modulated resonant filter set up as a send effect, with a narrow band-pass EQ beforehand. This creates a rather bizarre metallic melody that accompanies your drums. It can get fatiguing if over-used, but brought in at a low level in some sections of a song, it can create plenty of interest, particularly if followed by a modulated delay. Delay is a most simple effect and will repeat the dry input signal after a certain delay time. Basically delay is a kind of reverberation, although less overcrowding then a reverb, using lesser reflections. A delay does not often represent a room, but simply delays the dry signal until the first delay is reflected (repeated). The delayed signal may either be played back multiple times, or fed back in to the input signal (feedback), to create the sound of a repeating, decaying echo. The first delay effects were achieved using tape loops. With some feedback the delay effect can be more exiting. In Reggae the echo effect or delay is used in various ways but feedback is important for creating that 'dub' effect. Delay's and gates are often synced to tempo of the track.
Mostly the delay signal will have some kind of ADSR time settings, so the delay signal will fade out in time. A delay becomes interesting at a faster tempo and will prevent usage of a reverb instead. A delay is less muddy and fuzzy compared to a reverb, so mostly a delay will likely keep instruments upfront. In these modern times the delay can be in sync with the tempo on beats and bars. An early version is the Multi Tap Delay, see below.
Sometimes the delay has a step-sequencer or matrix, nice settings are 3/16 and 8/16. Delays will come in various shapes and sizes, discussing them all would be a hassle. But in general mixing and for improving sound on separate instruments, delay is a common used effect. Most times a delay is used as a creative tool, but can also be used for perceiving depth. As a start it is better to use a delay, instead of using a reverb. Sometimes you can create a clearer reverb effect using a delay and some creative settings. Remember that a delay (specially the delayed return of the dry signal) can be perceived as depth or distance (dimension 3). Delay will leave more headroom then reverb and will sound more open. A Ping-Pong delay is a crossed over delay and combines left and right signals, see below.
A Ping-Pong delay or stereo delay can affect the panorama, this can affect the dimensions. Watch out for these kinds of stereo effects and only use when you need it. A Ping-Pong delay or stereo delay can be creative, but however also can avoid masking. Temporarily unmasking by swaying the automated stereo delay. The trick with mixing delay is setting up inside a mix, most likely to adjust the delay to the point you don't really hear it, but it is there. For main vocals that must stay upfront, we could use a delay, keeping original main vocals ear able and still have the ambient early reflections. Use a gate to control what is passed into the delay or goes out from the delay, this will separate the delay effect even more and will not be a mix filler. To prevent muddiness use EQ to cut the lower bottom end from 0 Hz to 120 Hz (180 Hz). Delay is common used as send effect and less as track effect. So the ultimate place would be on a send or group. Remember for perceiving depth or distance we need the dry signal to be heard unaffected, on top of the dry signal will sound the delay. We can roll of some highs to make some more distance or depth. When you need an instrument to sound upfront, you keep the high trebles in place and use no pre-delay or little. When you need an instrument to sound distanced, roll of some high trebles and use more pre-delay. Conflicting signals inside the 3D Spatial Information mean our brains will be confused. Rolling off highs for distance and then set no pre-delay is sending conflicting information. The natural world sound our hearing likes so much, is sometimes uneasy to recreate while mixing.
Tempo Delay: Most plug-in and hardware delays now allow you to automatically sync delay times to MIDI clock and then specify the interval of the repeats in terms of note values rather than milliseconds. A trick here is to use two simultaneous tempo-based delays with, say, a triplet delay setting, panned hard left, and a straight-note delay panned hard right. Things can get more interesting still if you apply this technique using ping-pong delays, so that alternate repeats bounce from one side of the stereo spectrum to the other. To create a true 3D effect, play around with the amount of original signal left in the middle. Depending on the intervals between your repeats, you can turn simple guitar and synth lines into complex, arpeggiator-like patterns or totally spaced out ambient pieces. Stephen Bennett
Ostentatious Delays: If you're making very rhythmic music of any kind, it makes sense to use tempo-sync'd delays, to avoid undermining the main pulse. However, simple tempo-sync'ed delays tend to be masked by the main rhythmic stresses, so they sink into the background of the mix unless mixed very high in level, which makes it difficult to create ostentatious delay effects in rhythmic music without swamping your mix. One solution to this problem, very common in trance music, is to set a delay to a three-16th-note duration, which means that although the delay repeats never step outside the 16th-note grid, they'll often miss the main beats and therefore remain clearly audible.
Keep It Reel: Perhaps because a humble tape echo was the first effect I ever owned, delay has always been my primary effect. Whether to liven up repetitive loops or add apparent complexity to simple solos, it's worth getting to grips with delay the old-fashioned way. This means daring to switch off MIDI sync and manually setting delay time, driving feedback to the brink of madness, or routing the pure delay output through equalisers, filters and so on. Many of today's digital delays allow you to darken the delay iterations, but there's no reason not to find your own method to achieve this: adding alternative colours and discovering your own favourite processes. I find precise, perfect digital delays can be rather generic and characterless — so the more I delve into additional treatments, the more interesting and organic the results are.
Softer Delays: I'll usually have at least a couple of delays as auxiliary effects in a rock or pop mix, but I often find that bringing the general level of the delay as high as I want it makes any transients stand out too much. When I'm sending single notes on a clean electric guitar to a delay line, say, I tend to want to hear a wash of sound, not the rhythmic 'CHA-Cha-cha-cha-cha' of a repeated note attack. For this reason, I'll often put a gate or expander before a delay, with an attack time set to 10ms or so. This is enough to 'chop off' any abrupt transients, and makes the delay sound much smoother. Sam Inglis
Non-sync'd Delay: We are so used to perfectly sync'd delays that it's easy to forget that manual sync and a pair of ears has a charm all of its own. Even delay times that bear no obvious relationship to the tempo can add dynamic movement and feel to a track: check out some early King Tubby if you need reminding of this.
Subtlety: You don't always have to make longer echo or delay effects obvious in the mix for them to be effective. Once you've set up the delay times and panned them to suit your song, try dropping the delay levels until you scarcely notice them during most of the mix (listening on headphones often helps set the most suitable level). This generally results in intriguing little ripples of repeats that you notice at the end of verses or during pauses, that add interest and low-level detail to the mix.
Calculating Delay to tempo.
Delay mainly affects tempo. Thus percussive instruments (drums) that need their existence to be heard rhythmically, need to be in sync with the tempo. You can fiddle around until you find a good setting, but also calculation of the delay time will give you a hint where to start. Tempo Delay, calculate 60 ÷ BPM = the delay time of one bar in seconds. Divide this by four to give the delay time per crotchet. Divide this by 1000 to convert seconds to milliseconds. When you know the BPM of a mix we can calculate the delay time with:
60000 / BPM = delay time in ms.
Or for any kind of note:
(60 / tempo in BPM) * 1000 ms * 0,75 (dotted quaver)
(60 / tempo in BPM) * 1000 ms * 2 (half note)
(60 / tempo in BPM) * 1000 ms * 0,666 (crotched triplet)
It is good to have some control when mixing, so a separate controller could help to live mix the delay or any effect (this we will discuss in Dynamic Mixing). Long delay times can be recognized by the brain as echo. Short delay times can be recognized as ambient or psycho acoustic (small room reverb, ambient) and can affect the spread of the sound (depth or distance). Reverse delay or backwards echo, is a reversed sample played backwards with an added delay. Then reversed again. For Reggae Dub Delay, use a single delay return. Feedback the delay output to itself. The aux send can be used real-time (or with automation, dynamic mixing) to dub over the original sound. (Boost some EQ around 3Khz and roll of some highs and lows for Dub).
The most familiar use of delay processors is by guitarists in popular music, employing delay as a means to produce densely overlaid textures in rhythms complementary to the tempo/sync of the overall piece (this is a creative aspect). Electronic musicians (synth, sampling) use delay for similar effects, and less frequently, vocalists and other instrumentalists use it to add a dense or ethereal quality to their playing (without pushing them back rows on the stage, keeping it more upfront compared to reverb. Extremely long delays > 10 seconds or more are often used to create loops of a whole musical phrase. Sometimes unsynced to tempo delay is used for a solo instrument (playing a solo for a while and then return to normal song/static mix reference level).
Echoplex is a term often applied to the use of multiple echoes which recur in approximate synchronization with a musical rhythm, so that the notes played combine and recombine in interesting ways. On computers or digital systems this can be achieved by a step sequencer or matrix.
Doubling echo is produced by adding a short range delay to a recorded sound. Delays of 30 ms to 50 ms milliseconds are the most common. Longer delay times become slap back echo, sync them to tempo. Mixing the original and delayed sounds creates an effect similar to double tracking or unison performance.
Slap back echo uses a longer delay time (75 ms to 250 ms), with little or no feedback. The effect is characteristic of vocals on 1950 Rock and Roll records, particularly those issued by Sun Studio. It is also sometimes used on instruments, particularly Drums and Percussion. Slap back was often produced by re-feeding the output signal from the playback head of a tape recorder to its record head, the physical space between heads, the speed of the tape, and the chosen volume being the main controlling factors. Analog and later digital delay machines are also easily producing the effect. Slap back delay between 20 to 80ms, no feedback. Sync to tempo to make rhythmical correct.
Flanging, Chorus and Reverberation are all delay-based sound effects. With flanging and chorus, the delay time is very short and usually modulated. With reverberation there are multiple delays and feedback so that individual echoes are blurred together, recreating the sound of an acoustic space.
In audio reinforcement a very short delay often of only a few milliseconds, is used to compensate for the relatively slow passage of sound across a large venue. The unmodified signal is not played, and the delayed signal is set to leave the speakers at the same time or slightly later than the sounds passing from the stage. This technique allows audio engineers to use additional speaker systems placed away from the stage, but give the illusion that all sound originated from the stage. The purpose is to deliver sufficient sound volume to the back of the venue without resorting to excessive sound volumes of a large sound system placed near the stage exclusively.
A delay tail on the front vocals, make the vocals appear with more warmth and appear fuller. Without putting the frontal placement into jeopardy. The more the delay is appearing in the mix, the more it will cover the vocals, using ducking on the first part of the vocals can free up fuzziness. Delays should only be used as a creative event but can give certain distance. Certainly even artistic is a Band Echo combined with a Spring Reverb, this is called dub. It is also common to give the main vocals a bit of ambient reverb (small room, drum booth) after the delay, to have some more togetherness with the rest of the mix).
Delays generate space, tempo synched. Divide 60000 ms (one minute) by the song tempo (quarter notes per minute) = ms. Variations in delay time drive (shorter) or drag (longer) the rhythmic feeling, we could use automation but that will be after we finish the static mix. Avoid phasing < 10 ms. Single delays 10 and 30 ms long thicken up sound, while the original sound is localized (upfront), perceived single delays as direct sound events (early reflections). Stereo delays are suited for rich sound with a low level room / ambience effect. Delays between 30 and 60 ms are called doubling effects (Beatles). Delays between 60 and 100 ms are slap echo (Elvis). Stereo delays < 100 ms are acoustic space. > 100 ms is echo distance and space. The longer the delay time, the more sound appears to be indirect. Delay tends to blur sound less than reverb. To discretely create space, delay should be very subtly used, so that you miss the muted FX channel, but don’t really perceive the delay when turned back on. Echo, longer than > 100ms which is not tempo synced is good for creating an effect that is clearly heard as such in the mix (solo’s).
Echo.
To simulate the effect of reverberation in a large hall or cavern, one or several delayed signals are added to the original signal. To be perceived as echo, the pre-delay has to be > 50 ms. Short of actually playing a sound in the desired environment, the effect of echo can be implemented using either digital or analog methods. Analog echo effects are implemented using Tape Delays (Band Echo) or Spring Reverb. When large numbers of delayed signals are mixed over several seconds, the resulting sound has the effect of being presented in a large room, and it is more commonly called reverberation or reverb for short. Reverse Echo is a swelling effect created by reversing an audio signal and recording echo or delay whilst the signal runs in reverse. When played back forwards again the last echoes are heard before the effected sound creating a rush like swell preceding and during playback. Jimmy Page of Led Zeppelin claims to be the inventor of this effect which can be heard in the bridge of Whole Lotta Love. An echo is a reflection of sound, arriving at the listener some times after the direct sound (early reflections). Typical examples are the echo produced by the bottom of a well, by a building, or by the walls of an enclosed room. A true echo is a single reflection of the sound source (dry signal). The delay time is the extra distance divided by the speed of sound (pre-delay). If so many reflections arrive at a listener that they are unable to distinguish between them, the proper term is reverberation. An echo can be explained as a wave that has been reflected by a discontinuity in the propagation medium, and returns with sufficient magnitude and delay to be perceived. Echoes are reflected back from walls or hard surfaces like mountains. When dealing with audible frequencies, the human ear cannot distinguish an echo from the original sound if the delay is less than 1/20 of a second (50 ms >). Thus, since the velocity of sound is approximately 343 m/s at a normal room temperature of about 20°C, the reflecting object must be more than 16.2 meters away from the sound source for an echo to be heard by a person. Signals that return before < 50 ms are perceived as more ambient. Between 100 ms to 300 ms with some feedback.
Echo and Delay.
Echo and delay are created by copying the original signal in some way, then replaying it a short time later. There's no exact natural counterpart, though the strong reflections sometimes heard in valleys or tunnels appear as reasonably distinct echoes. Early echo units were based on tape loops, before analogue charge-coupled devices eliminated the need for moving parts. Today, most delay units are digital, but they often include controls to help them emulate the characteristics of the early tape units, including distortion and low-pass filtering in the delay path and pitch modulation to emulate the wow and flutter of a well-used tape transport. While pure digital delay produces perfect echoes, an analogue emulation can be more musically useful, as each successive echo becomes less distinct, creating a sense of distance and perspective. Hi-fi echoes tend to confuse the original sound, while the human hearing system seems better able to separate lo-fi echoes from the original clean sound. The feedback control regulates the number of echoes by feeding some of the output back to the input. If you apply too much feedback the delay unit will self-oscillate — an effect often used in dub music. Delay normally relates to a setting with no feedback whereas echo uses feedback to produce a series of diminishing repeats. You don't have to use long, distinct delays: short delays up to 120ms can be used to create vocal doubling effects, normally set with little or no feedback. Nor do you have to dedicate a delay to a single sound: you can configure it via an aux send so that several tracks can be treated with different amounts of the same delay or echo treatment, which not only saves on processing power (or buying separate units!), but can help to make elements of your mix work better together. You can often use a tap-tempo or tempo sync facility to get your echoes exactly in time with the song if that's the effect you need, but many echo/delay plug-ins can be locked to your sequencer's master tempo, enabling you to create precise, rhythmic delay effects.
Modulated Delay
Though modulated delays are essentially effects, the need to balance the dry and delayed sounds as a means of regulating the effect strength means that using these devices via insert points makes them much more controllable than trying to use them in an effects send/return loop. If you do use them as a send effect, you can achieve this balance by automating the send level.
Reverb.
Reverb stands for Reverberation or reflections of sound hitting an object. The normal objects are Walls, Floor and Ceiling. But all objects that reflect the dry signal back to the listener are reverb signals. A Reverb does often represent a room, hall, booth, cavern, cathedral or is ambient. A reverb can transmit more reflections then a delay. Therefore a reverb can be easily overcrowding the mix. Deep sounds have more energy than high sounds. High frequencies loose more levels then lower frequencies over the same distance. There are three areas of reverb perception. Firstly, there's the whole issue of an appealing (a good natural reverb sound). Second, the sense of distance (depth, pre-delay), which is influenced by the dry signal (direct sound energy, transients) and the start of the early reflections from the reverb (or room). Reflections in nearly any time frame will cause a feeling that you are at some distance from the originating sound. This distance effect will be made up of original direct sound and its relationship to duplicate delays. The direction of the echo or early reflections is also important and must be placed naturally accepted to our ears (dimension 3). We could use a nice roll off on the trebles to set some more distance (dimension 2). Reverberation. Cut high frequencies before using reverb. Use true stereo reverb for placement, expansion of panorama. Use pre-fader or post-fader.
think it's fair to say that we all have a pretty good idea of what reverb is, though there are several ways of emulating it in the studio. Early reverb chambers, plates and springs have now given way to digital solutions, which fall into two main camps: synthetic and convolution. Synthetic reverbs take an algorithmic approach, setting up multiple delays, filters and feedback paths to create a dense reverberation effect similar to what you might hear in a large room. Though these often sound a bit 'larger than life', they've been used on so many hit records that we now tend to accept their sound as being the 'correct' one for pop music production. Most can approximate the sound of rooms, halls, plates and chambers, but in comparison with a real reverberant environment, the early reflections often seem to be too pronounced. The advantage of a synthetic reverb is that the designer can give the user plenty of controls for altering the apparent room size, brightness, decay time and so on. In recent years, convolution reverbs have become both affordable and commonplace. These differ from synthetic reverbs insomuch as they work from impulse responses (or IRs), recorded in real spaces to faithfully recreate the ambience at the microphone's position when the IR was made. Sometimes these are referred to as sampling reverbs but there's no sampling involved as such, even though the process seems akin to sampling the sonic signature of a room, hall or other space. Because IRs can be recorded in virtually any space, convolution reverbs generally come with a library of IRs ranging from small live rooms to famous venues, top studio rooms, forests, canyons, railway stations and just about anything else you can think of. They sound very convincing, and there's plenty of variety to be had, but once the IR is loaded, there's only a limited amount of editing you can do without spoiling the natural sound. Usually you can apply EQ and also change the envelope of the reverb decay to make it shorter, and adding pre-delay is not a problem, but after that you pretty much have to take what you get. Some companies, such as Waves, have managed to create additional controls but, as a rule, the further you move from the original IR, the less natural the end result. Ironically, the sound of certain synthetic reverbs is now such an established part of music history that most convolution reverbs come with some IRs taken from existing hardware reverb units or from old mechanical reverb plates. Also, if you have a convolution reverb, it is worth checking the manufacturer's site, as additional IRs are frequently available for download. All serious reverb units have a stereo output to emulate the way sound behaves in a real space and, in the case of convolution models, the IRs are often recorded in stereo, using two microphones. Some surround reverbs are also available. Reverb creates a sense of space, but it also increases the perception of distance. If you need something to appear at the front of a mix, a short, bright reverb may be more appropriate than a long, warm reverb, which will have the effect of pushing the sound into the background. If you need to make the reverb sound 'bigger', a pre-delay (a gap between the dry and wet signals) of up to 120ms can help to do this without pushing the sound too far back, or obscuring it. Though reverb increases the sense of stereo width, it dilutes the sense of stereo position. If you want to pinpoint the placement of something in a mix, you should consider using a mono rather than a stereo reverb, and panning this to the same place as the dry sound. Most synthetic reverbs allow you to balance the level of the early reflections and the later, more dense reverb tail. If you want to keep the sense of space but without the reverb tail taking up too much space in your mix, you can increase the early reflection level and reduce the tail level. As a rule, you don't add much, if any, reverb to low-frequency sounds, such as bass guitar or kick drums. Where you need to add reverb to these sources, short ambient space emulations usually work better than big washy reverbs, which tend to make things sound muddy. Taking this a step further, you can also make a mix sound less congested by EQ'ing some low end out of your reverbs.
Quality of reverberation.
Go through your available reverbs, examine them all. A reverb may sound good while playing solo; it might be bad sounding when you hear the whole mix. If bad reverbs have weak stage depth in the final mix result, they will sound fuzzy or muddy. Bad reverbs need a lot of reverberation power inside the mix to transmit the 3D Spatial Information to our listening ears.
Good reverb can be perceived as depth to a listener (stage depth). A bad reverb is less effective in perceiving depth and have to be set louder, thus can muddy or fuzz our mix faster the a good reverb. Test your reverbs with a drum booth preset (ambient) and a dry drum track. Sort your reverbs out which ones are best. If you have a reverb that sound naturally good and when switched of is making the drums flat again. Then you have a good reverb! Write down for later use, because when you need 3D Spatial Information inside your mix, you would not like to go through all reverbs to find a good one (or just have a bad decision made by planning a bad reverb). It is a timesaver when you already know what reverbs will sound best and can be used in other mixes as well. It is likely that on digital systems now days Impulse Response Reverbs are a good way of transferring 3D Spatial Information. With a good deal of naturally sampled rooms and ambiences the impulse response reverb is most naturally sounding and gives depth in most cases without adding too much mud or fuzziness. Combined in the mix with an algorithmic reverb (based on calculations only) can be a good solution for balancing processing power and quality of sound distribution. But however you must never stay in the mix with a dull sounding reverb that does not add anything and does not transfer the 3D Spatial Information that you need. It is crucial to know what reverb is about, so this can take quite some time to accomplish. Overdoing the reverb is a common beginner’s problem; try setting the reverb level as you think it should be, and then reducing the reverb level by 4 to 5 dB. The masking effect applies to effects as well as the original signal, unmasking a reverb path can make you need less reverb level and have a cleared pathway and leave more headroom / dynamics. If confused, write down the delay or reverb (depth) pathways into your stage plan or pre-plan this whole subject. Masking is always there, but as much as we can reduce it from happening, is a better goal then just boosting and raising levels.
On a digital system, there is need for processing power for a good reverb to shine. The calculations needed for a good reverb are immense. So do checkout all your reverbs in the mix, a good reverb pays off in the stage depth and can be heard at lower levels. They can transmit the 3D Spatial Information without the need of overpowering the mix and will create more depth or distance, with less power be persuasive. Just add a touch of good reverb and you will notice you will need less power to transmit the 3D Spatial Information with the right kind of reverb. Even a good reverb must be set higher in level then you might naturally want to, just to transfer the acoustics to your ears. The acoustics or 3D Spatial Information contains the information of the dry signal and its reverberations and therefore let us perceive distance and depth (dimension 3). This is only accomplished by forcing the 3d spatial information on to the listener’s ears. When you have a low level reverb setting, then maybe you can't hear the 3d spatial information correctly and falls behind in the mix (masking). Then apply more to perceive and push to reverb to a higher level. With a good quality correctly chosen reverb you are able to have enough reverb to transfer the 3d spatial information and still are not flooding the mix with reverb (fuzz or mud, masking, unmasking). Best is to switch from dry mix to reverb and repeat this a few times (while listening the whole mix), adjust the reverb level until your happy with the combination of dry and with the reverb on top of it. When the reverb is sounding muddy or fuzzy by doing this, either choose another reverb or EQ the reverb or remove some low frequencies (0 Hz -120 Hz, > 180 Hz or even more). Muddiness can be easily avoided by EQ, but maybe you can find good quality presets for different kind of purposes, wisely chosen reverb that will just work better and produce less muddiness or fuzziness.
Reverb is a sound that returns all unlimited reflections of a room (or any object in its path), from all directions and distances at various levels. These reflections can be extremely lower in level (-70 dB to -90 dB) compared to the dry input signal. But nevertheless the listener will perceive the 3d spatial information and can guess some kind of distance or depth. Even if noise is added, the special information is still there. But however we try to keep noise away from the 3d spatial information. Basically the dry signal (specially the transients) must come through unaffected, so the listener can hear the transients and measure distance by hearing the upcoming reverberation (pre-delay). If a delay arrives within < 15 ms of the original source signal it will create imaging or panorama problems for example, if you have a sound panned in center and a delay of 1 ms to 15 ms on the right, what you will hear is the image in the center, shifting to the left. This is caused by the characteristics of human hearing in its relationship to localization. The ear perceives localization because a sound wave will arrive at one ear slightly later than the other ear, as part of length of travel. This is an innate survival mechanism for human behavior. It is otherwise known as the Haas effect. If a delay of 1 ms to 15ms is brought back and panned to the same position as the original you will create phasing effects. Also our hearing can perceive louder signals or softer signals being distanced. If a delay signal arrives later than 15 ms but before 100 ms (approx.) it will create more depth or distance (dimension 3). For what you have done is alerted your psycho-aural response, which tells you that you are listening to the sound in a reflective environment, now our brain can guess the distance better. Whereas if you just heard the original dry sound (transients), only the psycho-aural response (reverberation transients) would create the effect that you are standing in a field (panorama and depth together). Our stage plan is based on dimension 1 and 3 most the most part. But however rolling off some highs for distanced instruments or tracks in dimension 2, can help perceive distance better. Dimension 2 can be used on the dry signal and also on its effects (reverberation's). Where most mixes really are going wrong is a unwisely (according to stage planning, maybe conflicting information) chosen reverb. Also contradictory information, alike using a large reverb with lots of highs.
Most people can imagine a sound in a church ,cathedral, a large hall, etc. Most of that sound is just natural events, originated from nature, what we hear from our own world in real life. When we mix a piece of music together it will soon sound dry, unnatural. Reverb is a tool to add nature and make the listener feel at home. Flat mixes tend to have none of the natural reverb, so we can try to add some reverb (or other effects) to make a more natural sound (ambience). Mostly when people have a reverb in hardware or as a plugin, they will tend to search for a reverb that sounds 'good' . With this method it can be time consuming, but worthwhile to examine your effects, try them out extensively and come up with a good list of presets. You can try to make a dry trumpet sound natural by using a reverb and searching for a suitable sound, better is to keep it all correct to natural hearing laws. Some people can imagine in their head how things will sound in their natural context. Stage planning in the 3 dimensions is important, but when it comes down to creating sounds in that 3d environment, imagination can be a helpful tool. Maybe the trumpet sounds best in the place where you can imagine it to be. Then maybe you can select a suitable preset (alike a large hall preset) faster, maybe fiddle a bit with controls to make the large hall suitable. Anyway some people just hunt down for suitable presets, some think before starting off and imagine how it might sound and make a stage plan, then take the preset most suitable straight away. Reverb or delay can enhance the natural sound of your mix. Every element of the 3 dimensions alike volume, panning, EQ, compression, depth, etc, can be seen as an element to control toward a natural sound. Alike Delay, Reverb is a tool to control depth. Other effects alike flanging and phasing, are more unnatural sounds. Effects are nice, but remember to know what purpose you are using effects for. Mostly I think a natural sound is better than a completely dry sound (so all sound could at least use a small reverb or ambience, depth in the form of natural reverb's or delays / early reflections are what we hear 99% in our daily lives. How minimal in a mix used, natural depth will ease the users mind and is likely to be better. However how easy reverb and delay can be setup, it will always be difficult to mimic the natural world.
Basic Reverb rules.
When using more than one reverb, organize by room size. Reverb tends to blur the mix more than delay. The balance between space and distance can be controlled with the effect level. Reverb length particularly with gated reverbs and snare reverbs should be tempo synced. Snare reverb tends to end on the next full beat. Reverb with very short decay times creates discrete places. The longer the delay time, the earlier distance is created (along with the level). Rich trebles content indicates nearness, lack is distance. The main ambience usually drums ambience should be discretely mixed. The problem selecting presets is that reverb never is to be listened in solo mode, but always must be listened and selected in full mix mode. For instruments that are not fundamental (maybe some fundamental ones) place the original dry signal left and the reverb signal right, or vice versa. Test a good reverb on a whole mix and see if it still stands out, you cannot judge a good reverb solo. Take a dry drum group and setup an Ambience or Small Booth. Switch the reverb on and off, a good reverb does not need to be very loud, but you should miss it when turned off. If the reverb sounds natural. then you have an excellent reverb preset or device.
Reverb Controls.
Pre-delay - The distance in time between the onset of the original sound and the beginning of the reverberation sound expressed in milliseconds (ms). Pre-delay is an important parameter to set the distance or depth (dimension 3). Pre-delay here, is the time span from direct sound to the first reflections added by the reverb. The longer the time spans the greater the distance of the sound source from the listener. Pre-delay with percussive instruments (drums) must be used with great caution. For all percussion instruments including drums and bass, use no pre-delay or up to < 10ms, checking rhythmic (we can use an high trebles roll off for setting distance). High pre-delay for choirs and strings can send them assigned to the back, to the back rows (stage planning). Pre-delay is setting the distance in reverb. High delay times suggest closer, but is more fluttery and less tight. Pre-delay between 50 and 100 ms is sloppy when not synced/, drums and bass should have reverb without delay or very low 0-10ms, if needed longer (don't) and synched to tempo (always). All sounds relating to rhythm, such as drums and bass, should have reverb without almost to none pre-delay. Up to 10ms. Check rhythmic consistency. High pre-delay up to 60ms are good for chorus and strings, to put them in the back of the stage. Pre-delay with very acoustic natural mixes, follow the natural behavior of pre-delay; longer delay times for nearby and shorter for far away. In pop music, use the opposite approach; short delay for nearby and long for far away. With percussive instruments use short delay times or sync to the rhythm/tempo. If reverb muddies up the dry signal, try a higher pre-delay value, sync it. The quality of the early reflections of a reverb is important, only use the best plugins of reverbs and delay/reflections. A reverb may sound good in large hall or big rooms / stadiums, when early reflections or ambience is at hand, the reverb may fail. Good reverb is half the work and means a good start, keep track of reverb presets for later use. Instruments that tend to be close or upfront only use small reverbs or room/booth ambience reverbs, keeping the trebles alive (don't cut), have no fuzziness or blur, so that the early reflections (or the transients of the reverb) are clear to hear. Instruments that are more backward can use larger spaced reverbs and duller ones.
Deep sounds have more energy than high sounds. High frequencies lose more level over the same distance. The greater the distance between the listener and the sound event, the lower proportion of high frequencies in the reverb signal. This is why treble-roll off of the reverb signal is one of the most effective psycho acoustic means of representing distance to a sound source, since our ears intrepid this information subconsciously. Reverb should have more treble for close sounds in front of the mix, away less trebles for the back.
Decay Time - The length of time from the onset of sound after the initial sound has been established until it has dropped in level by 60 db.
Diffusion - If the diffusion is set to high (reflections very close in time) it will make the reverb sound very smooth. If it is low you might start to hear discrete delays that might clutter the sound.
Room size - The larger the number, the bigger the size of the reverb space, the bigger the room is perceived. Some preset programs will introduce more early reflections into the reverb algorithm.
Modulation Rate and Depth - Randomly shifts the time and intensity of the early reflections, creating a more authentic effect. If using a lot of this function you need to be aware of any pitch variances of signals with a lot of harmonic content.
Density -The amount of first reflections, early reflections and the time difference between them. You also have control over the amount of this effect in the reverb mix. Often used for creating good room sounds for drums.
Frequency Controls - All reverb loses high frequency content over time. If you EQ a lot of high-end over the diffused part of the reverb it tends to sound very unrealistic (use quality EQ or oversampling EQ). In most Plate and Hall algorithms the high frequency response gradually tapers off over time. There are also frequency level controls at various low frequencies to keep the reverb from sounding muddy.
Reverb is generally used as a group effect or send effect and sometimes used as an insert effect (this way keeping the dry signal intact). It is likely to place the reverb post fader, or else the fader movements will affect the amount of reverb. By this pathway, when you move the fader the reverb will be the same amount all-time. Set the reverb mix or ratio to 100%, because we already have the dry signal heard (reverb placed as send effect), we do not have to mix the dry signal inside the reverb again. Pre-delay and frequency range of the reverb signal can be perceived as depth. Test your mix at low levels and see if the reverb still is effective, listening reverb or 3d spatial information at high levels can perceive better (but also can fatigue your ears). But your mix must be in place when listened at softer levels also. A well 3D (three dimensional) unmasked mix stands when played at all levels. A good reverb does not need to be so much audible as a bad one, but you will miss it when it is muted from the mix. The treble roll off of a reverb signal is the most powerful way to perceive the distance or depth in the third dimension, but actually for this we adjust dimension 2 (frequency spectrum). Vocals for instance should sound in front with their trebles active, so here we do not roll off. Choirs can be sent to the backstage with lesser trebles, so here we roll off more. For events at the front select rich reverbs. For events to the back select duller reverbs. If needed use an EQ in front or behind the reverb to set the distance or correct the reverb signal. Don't contradict dimension 2 and 3, setting up ambience reverb for close upfront fundamental instruments and do not roll off the high frequency range to keep it all upfront. Think an avoid contradicting 3d spatial information, use a stage plan and act accordingly. Again the Reverb is placed as a send effect or group effect. In this way we can make use of the reverb for one or more instruments together (group tracks). Specially placed on Group Tracks it can give more welding and layering, togetherness. As a send effect the reverb will not affect the dry signal, thus confirms with our natural hearing. The dry signal is crucial to hearing and must be kept (leaving transients intact). On top of the dry signal is the reverbed signal, so our hearing accepts the distance / depth. The dry signal is always present in natural reverberation hearing. As a creative aspect we could use only the reverb signals, but for perceiving depth naturally we need the dry transient signal to be present as well as the reverb signal. To set the reverb as an insert effect is not common and mostly done out of artistic freedom, still then set the reverb post fader and 100% wet, adjust the reverb controls until sound is correct. Sometimes only one instrument needs a reverb especially for itself, so we could insert a reverb and mix the reverb on the instrument track (for instance the snare). Still routing to a Group Track is best, even if this means just one single instrument is routed to this group. Group tracks or Send Tracks are good for reverbs because they can save processing speed and layer or weld the group for more togetherness, summing up towards the master bus fader. For instance a reverb or delay could do some furthermore welding and blending on a group track forming a layer. Each layer could have its own reverb. First resort to EQ and Compression for Groups. Maybe some gating or limiting. Then route to a reverb (delay, echo, effect). Maybe roll off some lows and highs first. How many reverbs you need inside the mix depends on your mixing technique. But generally four or more reverbs on a basic mix are quite common. A good chosen reverb can re-place other badly chosen reverbs. Sometimes there is little need for reverb and the style of music played needs to be dry (just some ambience), sometimes there is room for a lot of reverb and is needed for creating the space (distance, depth). If required you can add a delay after the reverb, by this way you can spread the reverb signal more (stereo delay, watch the correlation meter) and maybe then becomes clearer to transmit the coherent 3d spatial information and avoid masking. Sometimes just timed events of automation is needed to temporarily avoid masking. When the reverb sits behind the mix we call this the Masking Effect, the reverb is masked by the dry signal of the mix. Individual instruments or tracks. Just adding some delay, a bit of panning can help the reverb jump out of its masking partner and be freed again. As a drastic measurement tool you could use some widening or stereo expander (correlation). Automation becomes handy when only a part in the timeline is masked. If reverb could be synced to tempo this would be worth it on longer reverbs or delays.
Gated Reverb - A setting where the reverb stays at one level over time and then suddenly shuts off. Often heard in snare drum sounds in the 80’s. Gated reverbs are good for keeping rhythmical content. Basically a gated reverb is two devices in one. A reverb and a gate. Reverb 70's effect, set reverb to pre fader, lower the original sound level fader, only the reverb signal will stay.
Decay Settings: Choosing the most appropriate reverb treatment for a song can be surprisingly difficult, especially if you have hundreds of presets to choose from. So, instead of regarding reverb like the glue that holds the mix together, try adjusting its parameters (and in particular the decay time) while listening to the reverb return by itself. If the decay time is too long you'll hear a continuous mush of sound; if it's too short you'll scarcely hear it unless its level is turned right up. Somewhere in the middle you should find a setting that adds rhythmic interest to your song, without overpowering it, making the reverb work for its keep. This is also a useful technique when using several reverbs in a song, to make sure they complement each other.
Pre-delay: No pre-delay? No problem! Some reverb plug-ins, from freeware favourites to tasty convolution types, don't offer pre-delay — a user-configurable gap before the onset of a reverb's early reflections and tail. It's useful to have, though, as it can contribute to the clarity and separation of individual voices and instruments in a mix when large amounts of reverb are used. Using most software DAWs it's straightforward to rig up a pre-delay for a reverb (or any other effect) that doesn't have one. All you do is set up your reverb on an aux track or channel, but place a simple delay plug-in in a slot above it. Set both plug-ins' wet/dry mix parameters to 100 percent wet, and feed them some audio using an aux send on your normal audio tracks. Now the delay plug-in operates as a pre-delay for the reverb: easy! This kind of 'modular' pre-delay actually opens up some interesting possibilities. By using a multi-tap delay, or a simple delay with some feedback, your dry signal can be fed to the reverb several times, making for longer, more complex — or plain weird — reverb tails.
Wet Set: If you have a sound that you want to push a long way back in the mix, it can often be better to make your reverb effect pre-fader, and temporarily remove all the dry sound. Then alter the sound's EQ and reverb settings while listening only to the wet reverb sound. Once you've got that sounding good, gradually fade the dry sound back in until you're happy with the wet/dry balance. This approach can often be more effective than simply whacking up the reverb level while you listen to the whole song.
Combining Reverbs: You don't have to generate all of the reverb sound from a single plug-in, and using two different reverbs can also help you to save CPU power. For example, though a nice convolution reverb gives a good, believable sound, long impulse responses tend to eat up CPU. By using the convolution reverb for the early reflections, and then using something like Logic 's Platinumverb or Waves Trueverb to add the reverb tail — which is less critical to our perception of the sound — you should get a convincing but less processor-intensive result.
Group and Send FX using Reverb or Delay.
To make some kind of combination and the fact that on digital systems for processing speed, we cannot just throw in a lot of reverbs and hope for the best. Most likely your digital system can cope only with a few good reverbs in place. In older days recordings where done in rooms separating players and with multiple microphones to capture dry and reverberation signals. Off course it would be great to use a reverb for every instrument but we can't. Anyway it would be a bit complex keeping track what you needed the reverb for in the first place. For dimension three, we need the reverberation. Therefore we must know why we use the reverb. Commonly used for dimension placement and stage planning. Keeping track means some kind of bargain on complexity and amount of reverbs. Anyway more reverbs mean more mud and fuzz, so keeping only a few good reverbs is the way to go. Maybe 4 to 6 reverbs for a full mix to shine is quite good goal.
Delay after the Reverb.
A delay can help avoid masking of the reverb and can help to be added after the reverb signal to make the 3d spatial information more clear. Only do this when masking does not go away. Sometimes a delay can be placed in front of the reverb. Automation can help parts to unmasked events.
Compressing Reverb And Delay
Using a compressor on a reverb bus can really tighten up the mix, if the reverb tends to be getting too loud and out of control dynamically. Some heavy compression can sound quite nice but be careful not to over do it and remove the life. The same goes for delay busses, compression can really tame the sound and stop anything from going too out of control. Also, using EQ on a reverb or delay bus is a great tool for removing any potential muddiness that may be happening.
Delay and Reverb Techniques
Panning - Panning reverb into the opposite channel (2 channel or 5.1) can produce a very classic and depthful effect. For example, in a stereo recording, you can pan the source into the left speaker, and pan the reverb of the source into the right speaker. A plug-in can be used
Pre-delay - Pre-delay can help with temporal un-masking. Basically, you must tweak the pre-delay of a reverb every time you use a reverb, so that the reverb signal and the original signal does not overlap in time. Many engineers will not use a reverb without pre-delay unless they create the same pre-delay effect by other means.
The Haas Effect - Delay time set beteen 12-40ms, or multiple delays set between 12-40ms - The Haas Effect can be noticed when you set a delay but the original signal and the delay blend and the delay does not become and echo. The delay is happening so quickly that it the source and the delay sound like one. This is extremely useful in creating depth in a mix.
Depth and Space - Reverb using pre-delay and Delay/Multiple Delays using the Haas Effect can help create depth and space if they are used correctly.
Creating space - Some of the best mixes make the listener feel as if they are moving into different spaces. Using these techniques, you can create the sensation of moving from space to space as songs or parts change.
Reverse delay and reverb - In almost all DAWs, you can reverse a recording (so that it plays backwards) then apply an effect, and reverse it again. When you think of that odd effect on modern horror movie preview voices, then you are thinking of the reverse delay. If you have never experimented with this technique, then you will likely be very happy to add it to your tools.
Masking.
Masking or the masking effect will hide your reverb behind the dry signal, the 3d spatial information that the reverb (or any other effect) is adding will not be perceived as depth or distance. Masking also occurs when two signals / instruments play in the same frequency range from the same direction. Unmasking is when we correct this and have cleared pathways for instruments signals to shine, saving headroom by a reduced level and still have a good mix. Basically we can maybe hear the reverb somehow; it is masked and therefore hidden behind more louder and sustaining sounds. There are some solutions. The first is questioning the instruments that are sustaining (or the reverbs that are sustaining) and are affecting the transients, if this is not needed maybe a compressor can help to clear up some headroom or reduce the sustaining sound or raise the transient sound (or gating). Second is just raising the level of the reverb (common easy solution). But before our ears will understand the 3d spatial information of the reverb, maybe you will raise too much (creating more fuzz or mud and having less headroom left over). A good quality chosen and clear sounding reverb will solve this problem better. Bad reverbs are causing overblown mixes and lose a lot of headroom, still not be perceived as depth. Preparation in dimension 1 and 2 is crucial before adding dimension 3. Then with a good reverb there is little level necessary for our ears to recognize the 3d spatial information. Dimension 1, 2 and 3 are all needed to perceive depth or the dimensions, and make our ears understand the mix content (stage). Just when reverb is sitting behind an instrument, changing the pan or balance on either the reverb or the instrument of question might do the trick and uncovers the reverb (unmasking), panning it the first choice to grab for, and the level next. Anyway dimension 1 panorama and dimension 2 frequency spectrum are coherent to dimension 3. Maybe you decide to re-place a guitar track and set it more left, and then maybe the reverb (or effects) that are routed for the guitar must be looked after also (more to the right). When you add depth to a mix by adding effects, it is better to have dimension 1 and 2 somehow finished then start with dimension 3. The more completed your mix is towards finished, anything you change will have a cascading effect and requires thinking and maybe re-thinking and more work. Whenever a reverb or delay (or both) is masked by other instruments or just can't be heard enough, try to undo the masking effect by forcing the 3d spatial information onto the listener’s ears. With a good reverb that is in place, you won't have to force too much and avoid to fuzziness and muddiness altogether. A mix can be soon muddy and using EQ to correct this is well accepted, but in the first place the sound of the reverb is of importance and panning/level. So whatever signal you input, you better be sure it is cleaned from unwanted frequencies or material. So remember to sort your reverbs out and know what reverbs you like best, this will give you a head start and will avoid the complexity and saves time and frustration in further mixing. If the result is not mono compatible, try two identical reverb presets from two different devices, panned left and right. Both reverb devices receive opposite send signals so that the left of the panorama is reverbed right and vice versa.

Keeping track of things.
It is good to describe the information on a track why you setup a reverb or delay (or even any other effect) and why its settings are there, why you need it. Take care to describe the 3d spectral dimensional placement (stage plan). Also you can write down all reverbs that you like and keep track of them for later use while mixing. Software and digital mixers sometimes have digital notepads; keep pen and paper at reach. Modern DAW's often provide notepads for a song, track, instrument, mixer, so keep notes and keep track of your info. You might have forgotten the next day, what brilliant solution you had the day before.
Starting a Mix and progression towards a Static Mix, Workflow of a mix.
Until now we have explained how any mix can be started, after recording is done. For a quick overview here is a 'to do' list. Each time we refer to an instrument or track, you can find specific information about this instrument or track below this mixing section. Each instrument referred over here, can be found below. For panorama, frequency spectrum, quality, reduction, compression, reverberation and other specific tools, refer to each instrument's section for details.
0. Recording instruments or tracks must be done in quality before mixing, with quality equipment. Keep the signals noise free by itself, free of humming sounds or continues sounds, do not use a noise reduction plugin or system when recording. Some like to record with the Dolby button on. Try to be careful with placing effects, EQ or compression on recordings in progress. Try to separate and record as much dry. Record in stereo, on digital systems use 32 Bit Float for internal processing purposes. Convert samples / files to 32 bit floating point.
1. When starting a mix, set all Faders at 0 dB, set pan or balance in the middle (center, unity). Remove any EQ or Compression, Effects or Plugins. Set all equipment you are using for mixing to zero, dry, bypass, unity, center, etc. Re-set all on your mixer to the most basic starting position.
2. Sort out your tracks from left to right on your mixer. Placing more fundamental instruments or tracks at the left side. Spreading to the right side. Label every track. The tracks from left to right could look like this, by example, Basedrum, Snare, Claps, HI hat, Overhead, Toms, Crash, Others, Bass, Guitar 1, Guitar 2, Piano, Epiano, Keyboards, Synths, Others, Main Vocals and Background Vocals. Next to the Main Vocals on the far right there is place for each send track then summing all up towards the master bus fader and output. This can be debated, but you are free to setup your mixer anyhow you like. Modern small mixers or controllers have only place for 8 tracks at a time, spreading drums on channels 1 to 8, and the rest on channels 9 to 16, can help for switching back and forth on the mix setup (especially when using mix controllers). Label sort and color code tracks, assign them to group tracks, folders and route them. Use the group solo function to control the routing. Prepare the mixer for a new start (starter mix).
3. Listen trough every track (in solo mode), cutting out any unwanted signals like noise, pops, clicks or rumble. Any unwanted material must be removed, either audio samples or midi, first choose to do this on a manual level (manual editing). This is tedious and some really like this fase or dislike. Some remove breathing noises manually from vocals or some use a de-esser. This manual editing may seem as a bit time consuming, better to remove and be sure you are only hearing what you need. When you are using a sampler, you could clean the samples before using them. How you do this is not of importance, but take some time to clear up and clean up. Once you start mixing and listen to your whole mix or combination of instruments and tracks, unwanted sounds might get hidden inside the mix (masking) and are uneasy to find their location. So clean up while you can, when you can. Check each track, for breathers, editing mistakes, clicks, clean them. Only reduce noise or humming when needed, better to have every recording clean before using any noise reduction system.
4. Define your mixing strategy with a panorama sketch. Draw a sketch of a stage plan and place all fundamental instruments Basedrum, Snare, Bass and Main Vocals first, then the rest of the not fundamental instruments alike the rest of the drum set, guitars, organs, pianos, keyboards, strings, percussion, background vocals, use panning to keep them out of the center, decide the frequency spectrum and depth. Try to be natural and consistent, separation as well as togetherness, use counterweight or counteract.
5. Mute. Mute all folders and tracks, with exception of the drum folder. Start building up the rhythmic backbone, starting with the bass drum, followed by snare, making use of panning, EQ ing, Compression, gates and reverb (delay) until the drums represent a powerful and rounded sound. If the bass is part of the drum group, add it to the mix after editing as required. Your next step is to build up the instruments that provide harmony and warmth. Distribute them according to their complimentary spectral properties to the left or right in the panorama. Create a good lead vocal sound and add it to the center. Balance the group levels of all groups edited so far. Distribute decorations and additions in a spectrally sensible manner around the existing basis. If an event sounds fuzzy, look for a spot within the three dimensions where it can be heard. If you cannot find the spot either with a good panning strategy or with EQ ing or layering, reconsider the reason for having this event at this place in time. Fine tuning of volumes at extremely loud or quit levels.
Do a first check on the whole mix. Set the master fader at 0 dB. Set all balance to center and adjust all faders until you’re a bit satisfied. Do not use EQ, compression or effects. You’re looking for mix that is quite straightforward and that comes from one direction, all from center. By only adjusting each fader until you find some dry mix that works for you. This must be easy to setup and only takes a few moments to do so. Don't worry and fiddle to much, we can be more precise later on. Also you could use some EQ to sort out the bottom end of your mix. Using a low cut from 0 Hz to 30 Hz for Basedrum and Bass. Using a low cut from 0 Hz to 120 Hz (180 Hz) on all other tracks or instruments (including the rest of the drum set). Adjust the starting frequency of the cut, just below the last main frequency. Keeping what is needed and deleting what is not needed, just use some EQ for adjusting the bottom end. At least by doing this we guarantee that Base drum and Bass have a clear path and the mix is cleared from any rumble, pops or click in the bottom end range, as a result we now have more headroom. For some distance and reduction the Base drum and Bass can be rolled off in higher trebles. Setting some distance on other instruments or tracks according to our stage plan, roll off some more highs. Do not pan the mix for now (keep dimension 1 and 3 unaffected). Just apply some reduction, quality, headroom, separation and togetherness.
Listen to your dry mix for a while. Decide by experience how to plan the dimensions. Draw a quick picture; plan the stage inside the three dimensions. Plan the fundamentals alike Basedrum, Snare, Bass and Main Vocals in center. And build the rest of instruments around this (not fundamentals), placing not fundamentals more to left or right, don't be afraid to pan. Anyway do not touch anything right now, just think of it or draw a quick sketch on paper. First we set dimension 1, panorama. Pan first before setting fader level again, apply the panning law and know that relative volume of a signal changes when it is panned. Completely apply all panning first, then adjust all fader settings until are satisfied. Keep adjusting balance (panning) and fader (level) until satisfied with your stage planning for dimension 1 (panorama). Listen to your dry panned mix for a while. Fader and Pan are most important settings to start a mix and mostly overlooked, so we tend to take more time here for listing and adjusting.
6. By having some notion now where to place instruments, it is time to listen and decide what instruments need EQ or compression in order to adjust its frequency range (dimension 2) and coherence to other instruments. Also by doing this we can save some headroom. We can try to adjust for quality and reduction. We have made a separate instrument section below for reference. Anyway we need to adjust every instrument for its spectral content, mostly doing EQ where needed. A steep filter for bottom end cut offs reduction (separation, saving headroom). Headroom in the bottom end (0 - 120 Hz) should be only for Bass and some Lower Basedrum thumb sound (kick), cutting all other instruments in the lower range. For the whole mix and for the Bass and Basedrum (or any other fundamental instrument) is what we are after mainly. For quality each instrument or track can be adjusted until sounding good, keep in mind not to fill the misery area from 120 Hz to 350 Hz. Try to avoid boosting the Mids of all instruments, instead choose a few, leave the rest or cut. Mainly using tools alike EQ, Compression, Gate or any other dynamic tool. Also for distance we could roll off some highs for each instrument or track. Remember when you adjust an instrument or track, to bring the level back into the mix directly afterwards.
7. Now solo the most fundamental instrument (likely it is the Basedrum, but however some start with the main vocals). The Basedrum should be on the left of the mixer side. For example we have chosen the Basedrum as most fundamental instrument here and is most common to do so. Solo play the bass drum and watch the master vu-meter. Keep the level at -6 dB to -10 dB on the vu-meter by setting the base drum fader level accordingly. Next add the Snare or Bass (you decide) and use its fader to set the level. Do not touch the base drum fader; adjust the instrument level you’re working on only. Each time you add a track to your mix, set the corresponding fader level. Until you have worked your away trough the right. Looking for some togetherness and having levels just right for a dry mix is crucial over here. Just keep adding and adjusting until finished. When finished then do a check on the vu-meter level, you must have some headroom left, else set all instrument or track fader back the same amount. Leaving some headroom for later on.
8. Decide how you are going to separate the Basedrum from the Bass. Making them sound well in the lower frequency range. Start off with the Basedrum (listening in solo mode), roll of some subs from 0 Hz to 30 Hz (50 Hz), roll off some of the highs > 8 KHz for some distance according to stage planning (behind main vocals and bass). Creating a good Basedrum sound. For quality and reduction on the Basedrum refer to the instrument section below. Maybe add just a tiny touch of reverb, with little pre-delay (no pre-delay actually for rhythmic content). Only use an ambient reverb or small room/drum booth reverb, we can use for the whole drum set so can be on a group or send. Then aim for a nice -6 dB to -10 dB level at the master Vu-Meter while playing. Remember this is your reference track or most fundamental instrument. This reference fundamental instrument is used to set all other instruments after. Instead of the Basedrum, maybe the Main Vocals or any other instrument could serve as most fundamental. But keep in mind that likely fundamentals are lower frequency instruments or tracks, as we need the center of the speakers to produce the lower bottom end fundamental frequencies (left and right playing together). Accordingly and measured off by this reference (most likely the Basedrum track), keeping always in the center of the panorama. Also it is best not to sway around in center, just keep it dead center or the added signals must refer to center. Left to right time lined events are not recommended at all. Keep your most fundamental (bass drum) instrument in center at all time. So listen through the whole bass drum track solo, adjust it, and just be certain it stays always in center all the time.
9. Next, For the Bass just roll off some very low subs (0 - 30 Hz) and roll of some highs ( > 8 KHz). Solo the bass and create a good sound, refer to the bass instrument section for this instrument specific while mixing. Listen to both Basedrum and Bass together, then only set the Bass fader and listen to the combination of Base drum and Bass (do not touch the Basedrum fader, this is your static reference). Do anything (add EQ, Compression, etc) to correct the bass signal now. Set the level of the Bass until it feels and hears correctly (togetherness). Also keeping the Bass in center always.
10. Then introduce the Snare. For this you can decide to solo the Snare, apply a low cut for separation and create a good sound (see the snare instrument section). Snare usually needs a larger reverb. Do anything you need to correct and enhance the snare signal now. Then in combination with the Basedrum set the Snare fader (solo Basedrum and snare). Introduce the Bass and keep setting the Snare fader furthermore. Maybe you do not find right settings at start, keep fiddling soloing and playing together. Setting only the Snare or Bass faders. Just find some fader settings that workout best, then leave them alone.
11. Introduce the Main Vocals, first in solo mode. They must be upfront, so no trebles cut over here. Just roll off the bottom end to separate from Basedrum and bass. You can always adjust the fine roll off frequency later on, when you unhappy with the vocal sound. Use a stereo EQ filter setting to balance the vocals in center even more. Then try to make a good sounding vocal (see the main vocal section below). This can mean dropping a de-esser in place or delay / ambience room reverb (we already have one in place for the drums and bass. Or use some fine EQ ing to get the vocals really sound correct. Maybe some compression. Then un solo the vocals and again adjust its fader to set the mix. Remember vocals must be heard clearly upfront, when not reconsider now.
12. Then add the HI hat, placing it with balance slightly right, according to position. Roll of a great deal off the lows from the HI hat. See the specific HI hat section below for more details. Add the overheads and give them some distance by rolling of some highs. Maybe a Stereo Expander can widen the overheads, watch the correlation meter for mono compatibility issues.
13. Continue to add each drum set instrument until finished. Adjusting only the newly introduced and stay away from earlier introduced instruments. Workout a good steady sound for drums, spend some time to create and finish off the drums first. Drums are important, they sound so much better inside a mix when first completed as a drum set. Only continue when happy and completely finished all drum set events / instruments.
14. Add Guitars, Keyboards, Synth, Percussion and any other instruments or tracks. Remember when you place something left or right, you need coherence, so counteract. We need to counteract instruments, we can counteract instruments and their reverb signals. Keep away from the center and be creative placing them left or right (be courageous). So placing a guitar left might need the keyboards placed right as an opposite coherence (counterweight). Work out your mix in dimension 1 - panorama, pan, balance and fader level first. Then adjust dimension 2 - frequency spectrum of each instrument by adding EQ or compression as an insert effect on each individual instrument. Cut lows and highs where needed. Also EQ and compression can adjust the internal fundamental frequency range, so making your individual instruments sounding best is off course recommended. According to our stage planning, we try to stay within the dimension 1 and 2 boundaries more and tend to place dimension 3 later on.
15. When you have some choirs you do need them into the back of the stage, so roll of some highs and for keeping them out of the lower frequency range roll off the lows also. Also here on the choir we can use a stereo expander to widen the choir in the background. According to panning laws we spread the background vocals or choirs (lower voices more centered and high voices more outwards). By widening the overheads and choir we keep them away of the already crowded center path.
16. Next, for the rest of the instruments (all instruments) decide where to roll off more bottom end in order to keep the lower frequency range of your mix only available for Basedrum and Bass, to separate and avoid masking, leaving some headroom. Also avoid instruments not needed to play inside the 120 - 350 Hz misery range. Solo first, cut where needed and create a good sound (use your stage plan and the dimensions). This can mean some heavy balancing, EQ ing with some steep filters or compression. Just not to interfere. Repeat until you have finished off all instruments. Remember it is not recommended to adjust an instrument or tracks fader after it has been set. Do anything to make the track / instrument / sound better now. When working each instrument or track, do try to adjust that track only, without adjusting the other tracks.
17. According to your stage plan, you must now have setup Level, Balance and Frequency Range for each separated instrument or track. And maybe already have rolled off some high trebles on some of the instruments or tracks that are more distanced, all according to our stage plan. We placed only dimension 3 when needed, mostly ambience for upfront instruments and larger duller reverbs for more distanced instruments.
18. Listen to the Drum set, Snare and Bass together. Maybe create a Group Track and route them to it. This will be your first Group of many to come. Some do like to route the drums to its own group, therefore you can also route the bass to its own group. This will keep them separated as an individual instrument groups.
19. Next assign groups to instruments that are close to each other and can form a layer together. Maybe a group for guitars. Another one for piano, Epiano and keyboards (synths). A group for the background vocals (choirs) and a group for the main vocals. Assign Group Tracks for each range of instruments. For now do not use any effects on the groups. If you like to use an enhancer while mixing, use it on a separate group and route only instruments or tracks that need to be upfront, but we don’t use it for now.
20 Try listening to the whole mix again, by muting or soloing instruments you can find out if the placement of each instrument or track is correct and according to our stage plan. Else keep correction dimension 1, 2 and 3. Be sure you have found some kind of clean sounding mix before you go on that is exactly according to our stage plan. If not keep fiddling about until you are satisfied. Try to stay inside dimensions 1 and 2 by using only Fader, Balance, EQ or Compression (gate, limiter). Then correct dimension 3. Maybe this will take an hour or so, it is crucial to get it correct.
21. Listen to the whole mix and decide it's level, pan, balance, EQ and compression, gate and limiter are setup correct. If not keep adjusting the mix until satisfied. Working only instrument or track based (see the specific instrumental details below). We tend not to use any effects on groups, sends or on the master track.
22. Now we should have a mix that is clear (dry), where instruments can be heard, still have some togetherness and have some idea of the dimensions 1,2 and 3, sounding correct as planned. Even with separation that is contradictive to its opposite togetherness, it is possible to have a combination of both. A mix thrives on separation from start (dimension 1 and 2) and get some kind of layering. Only adding some reverb or delay in dimension 3 to create some depth, when we are sure that we are happy with dimension 1 and 2 first. Be aware of masking and learn to understand it very well, learn how to unmask.
23. Now it’s time to glue the mix more by adding to the groups where needed, hopefully we have created enough headroom for mix adding purposes. EQ and Compression on a group can weld or glue instruments together. Making groups appear as layers for mixing purposes. Summing up towards the master bus fader output. Compression on a group can give a feeling of a layer (togetherness, glue or welding) and give some coherence of grouped instruments. Also by using EQ in front of the compressor (only place an EQ or compressor when needed) you can sort out the frequency range by cutting lows or highs (or compress), by this way the threshold of the compressor will only react to a cleaned dry input sound. You must cut lows when they are not needed, affecting other instruments in their range that are more fundamental. You can cut highs (trebles) when you need the group to be set back into distance (depth) or when you know these frequencies simply do not exist at all (preventing noise, humming, clicks, etc). Planning the three dimensions finally. Remember that Panorama is first looked at and adjusted, then Frequency Range, then Depth, follow the dimensions.
24. For working out depth on a dry sounding mix we can use reverb or a delay (most common) to give some space (dimension 3). The group tracks are likely places to add 3d spatial information (placement, depth) to a mix. So a good reverb or reverberation effect on a group or send track will give room characteristics and placement. As we did combine instrument sets, we can now use the groups function to combine overall effects (alike reverb, delay, compression and EQ, etc). Somehow you know you need at least a few reverbs for Drums, Snare, Bass and Vocal alone (ambient small room or drum booth), we can maybe route al instruments needed to this group. Each group can differ in room and reverberation settings (see the specific instrument details below). Place a reverb where you need it mostly, but be scarse. Rather on groups. You can decide to place a reverb on its own single track or on a group, depending on the purpose. By using groups (or sends) you can save just some reverbs though and keep it tidy. Now you understand you have at least a few good reverbs running in the mix, just to sort out dimension 3. Choose good quality reverbs. We did not even consider using reverb as an artistic (creative) factor; reverb or reverberation is common for dimensional placement (3d spatial information). You can understand that a mix with 4 to 8 Reverbs is common, because almost each different set of instruments (Tracks, Groups, Sends, Layers) need placement and depth, as well as some welding for togetherness. Use a bright reverb for upfront instruments or tracks, and a duller reverb for distanced instruments or tracks. Use compression on a group when you need to weld them more together. Summing up groups towards the master bus fader output.
25. With all these reverbs in place, avoid muddiness. So maybe EQ or filter the lower bottom end of the reverb with a good cut from 0 Hz to 30 Hz (50 Hz or much higher) on fundamentals. And a good cut from 0 Hz to 120 Hz (at least, > 180 Hz) on not fundamentals. When instruments or effects are masking separate them with Balance, Pan, EQ, Compressor or some delay after the reverb. Or in more extreme cases use a stereo expander after the reverb to even make the panorama wider, maybe use timed events as automation (just when we need it as a last resort). Crowded mixes could be widened and listened as if played outside the speakers; this gives some more room in the field (stage planning). Basically be reluctant to place the stereo expander and use only as a last resort. Watch the correlation meter, goniometer, when you are using the stereo expander or are working in dimension 3 with reverb. Check for mono compatibility, maybe you can leave the correlation meter in visual sight always. According to your dimensional planning now add depth in dimension 3, by adding those reverbs (delays) that are really needed to create depth and transmitting the 3d spatial information to the listener. According to our stage planning, some instruments need to be upfront and some more set backwards. If a set of instruments alike a drum group needs a particular reverb, place the reverb on the group track. If a reverb only affects the single track or instrument (snare for instance), place the reverb on the single track (snare track) or even still place it on a group so other instruments can make use / benefit. For instance with the snare reverb, you can place it on the instrument track to make a difference, but this will keep it from being used by other instruments. Try to have reverbs and delays available on group or send tracks, instead of using them on single tracks. Transients are always fist recognized by human hearing for calculating depth and distance; we need the dry signal to be present (transients, on top the reverb signal). The dry transients must be heard, as well as the reverb signal (also the transients from the reverb signal as well as the original dry signal). So our mixing tactics must include all necessary transients to be heard, to be perceived as natural depth (dimension 3). Any confusion created by not applying dimension 3 correctly will affect listening pleasure. Any conflicting information will confuse the listener.
26. Now here is where the routine starts to fade. As you have setup a mix that is consistent in placement in the three dimensions. Work around the mix for some togetherness and clarity balance (separation, quality and reduction), now it’s time to be more creative and invest some time. But with following guidelines 0 to 25 we at least have started a mix with some rules or routine. Anyway to finish off what you have started, do a check, a re-check and a double check on your placement. Check levels, peaks, frequencies. Use hearing, listening and visual methods (spectrum analyzers, correlation meter, goniometer, peak RMS meter, etc) to come to the right kind of decisions or conclusions. Now you should have a well sounding static mix where you can add more quality and effects or automation, because you have some headroom still left inside you can be creative and mix further towards the end result.
27. You could place a Limiter on the master track, just to avoid some peaks. But on most digital systems you will be signaled by a LED light when you’re passing over 0 dB. Anyway even on 32 Bit Float digital systems, going over 0 dB is not recommended. On a 24 Bit or 16 Bit system always stay below 0 dB. When you do use samples or audio repeated times inside your mix, from drum samplers or instrumental samplers, it would be a hassle to find out what bit rate they are all played in. Better use a common bit rate and sample rate (preferably 32 bit floating point). So staying below 0 dB everywhere seems to be a good solution of not harming any parts of your mix (else convert). If you have a limiter placed on the master track, just be aware it's for peak scraping only, mostly a Brickwall limiter with a threshold of -0.3 dB or a low peak reduction of 1 dB or 2 dB. Do not tend to use any more limiters. When your mix tends to be too loud and attacking the master limiter, then set back each instrumental fader or their corresponding group fader by the same amount (creating some more headroom). Do not touch the master fader; this will always stay at 0 dB. Only when your master fader is the last control to your speakers as an amplifier you can change it scarcely, better is to find a solution to keep the master fader at 0 dB at all cost. Listen you mix at loud and soft levels. Sometimes instruments disappear when playing at soft levels. A mix must stand loud and soft. But most of the time listen to soft levels while mixing, do not over excite your monitor speakers as well as your fatigue ears. You can train your ears better working at softer monitor levels.
28. Summing up - When you understand that Bass and Base drum should occupy the lower frequency range of 30 Hz to 120 Hz only, without interference of other instruments. Bass and Bass drum should own the lower range by themselves. This can mean all other instruments and its effects are somehow or completely cut in the 0 Hz to 120 Hz (180 Hz) frequency range, thus avoiding the bass range. Spend some time working on the misery area from 120 Hz to 350 Hz, where most instruments have a piece.
29. Keeping other instruments (not fundamentals) in their range and place them left and right (opposite to each other’s opponent instrument to counteract) is keeping them out of center. Center is the place for Basedrum, Snare, Bass, Main Vocals. Keeping the main vocals upfront by not cutting off its trebles. For setting other instruments more left or right (away from the center path), does not mean they are perceived as such. When they are accompanied by 3D spatial information (pan, frequency, depth) as in form of a reverberation sound opposite to its dry signal, cutting off trebles to make some distance, you are placing them inside the three dimensions. Reverb or delay can work as a counterweight. When placing a dry instrument to the left, maybe a reverb placed on the right can work as on opposite filler. Also comparison instruments can work as opposites. We tend to layer them in groups. The groups finally can be used working towards a finished mix (static reference mix). Using techniques on groups alike EQ, Compression and effects for more welding together. Using groups or send for our reverberation needs. Mostly we do not like anything on the master track, some like a limiter in place to scrape some peaks or for peak warning messages. Try to watch the master track vu-meter while mixing and try to keep it below 0 dB.
30. Keeping a balanced overall sound coming from both speakers is planning the three dimensions and mixing towards this goal. Avoid masking of reverberation by adding a touch more or pan (balance) them away. Sometimes a stereo delay might work behind the reverb to avoid masking. Watch the correlation meter for mono compatibility. Do checks and re-checks and make sure your planning and mixing rules are applied. Listen a mix dry (without those reverbs), check if you have not used too much reverb, but just enough to transmit the 3d spatial information to the human ears.
31. Quality is a general rule. Off course it is important how any separated instrument is sounding in quality. So while busy generating a nice mix, individual sounds (solo) make up the mix (summing). You can adjust any sound, track or instrument anyhow you like, with the use of EQ, Compression and other effects. Beef it up, make it nice. So when using effects (especially reverb) do not hesitate to use the best instead of using the most efficient. Avoid muddiness and fuzziness, apply separation (use the dimensions, the whole stage). Use the rules for quality and reduction. Use panning laws. Refer to the specific instrument details below. And finally as all instruments play as a mix on the master track, your mix must sound dam good! Only when you’re happy with your mix, as is, you should continue. Else revert to the basics of mixing (repeat the mixing steps above), add or remove until you’re happy with your final sound. As a final static mixing stage, adjust the groups or just play around with them until you find a nice coherent static mix.
32. Until now we have worked on the starter mix towards static mix, and have finished it until satisfied. Basic Mixing III will explain dynamic mixing. But for now we will skip the dynamic mixing and jump to a pre-master. A pre-master can be a good tool to hear and analyze the mix, before we continue with the dynamics of the mix. What final sound of a mix is best? Well, this is more complicated to explain, according to style and preference. But maybe you can remember this chart below? You can read about it in Basic Mixing I!
33. Volume automation for introducing events. Volume automation for song structure dynamics. Panorama and stereo expander automation for clearing up the last remaining fuzzy spots. Carry out further automation. Creative fine tuning to refine details. Constantly experiment in order to improve events that do not yet sound right. Set the brick wall limiter in the master section to -0.3 dB. Export mix down, 32 bit, no fade in or out and a bit of clean silence. Use the mute button composition wise when needed or create new pleasant combinations in time. Remember the more instruments play at the same time, the more worries and corrections needed. Also a song or track will sound dull and equal when all instruments plat from start to finish, consider composition wise events and cut when needed. Less is better than more.

Anyway, repeated mixing will give you a beforehand understood notion what a finished static mix should sound alike. Experience and understanding might be the main factor for learning to apply. For checking a mix, a spectral analyzer can be a worthy tool visually. For instance you could check your mix against other commercial recordings, using the A/B method. AAMS Auto Audio Mastering System can be good a tool to help you analyze your mix and get some suggestions for better mixing results. You can train your hearing by listening a lot of good commercial available music on your mixing monitors. Or just listen to a lot of commercial available music anywhere you can. At least you know what quality your monitor speakers will play. And you know what commercial music is sounding alike. When in doubt while mixing, take some distance again. Compare your mix to other music. Fist Revert back to dimension 1, then 2 and then 3. Check how much headroom you have left. Listen with clean ears, listening hours of music can make your ears fatigue. Then it might be good to leave the mix for the next day and start with a fresh mind and fresh ears or just take a good (>15 minutes) nap. Sometimes this is needed to really interpret well. Also pre-mastering a mix can help clarify more. You can use AAMS Auto Audio Mastering for this purpose. A mastered mix is perceived louder and also stands up more against other commercial recordings. Pre-mastering can reveal sometimes more (what is good, what is bad), even when not heard inside the mix, this suddenly becomes clear in the pre-master. Let somebody else listen to your mix (pre-master) and you will get some feedback, depending on the style of your music mix and this persons dislike, choose how to interpret this advice or criticism. Don't be worried by other people their critics, use this to your advantage. Do not bypass or hurry, you will never get anywhere near a finished mix bypassing the rules of engagement, bypassing natural laws of sound. A finished starter mix to static reference mix takes up to 4 hours of time (maybe more or less). A well finished static mix can take up to 12 hours of time. Together finishing off the static mix altogether can take up to 16 Hours. Remember that it takes the dimensions, quality, reduction, separation as well as togetherness to finish off a mix completely (static reference mix). Better be educated about these subjects and purposes, if not you could be stumbling with mud and fuzz for a long time! When you know by experience what you’re doing, time will decrease fast. Only continue with dynamic mixing when satisfied with the static mix!
FX example.
Send FX1, < 600 ms, Small Reverb, Ambience on Drums and some Bass, no or little pre-delay, slight trebles roll off (overhead, bass drum, loop, bass, snare, etc).
Send FX2, 1/4 note delay, medium to large reverb space, snare, no pre-delay, no treble roll off. Shorten the snare track with a gate. Experiment with a thick gated reverb.
Send FX3, > 1200 ms, big room, background events, chorus strings, up to 60ms pre-delay, trebles roll off strong.
Send FX4, 600 - 1200 ms, ambience, lead vocals, no pre-delay or 1/8 th note, no roll off trebles.
Send FX5, Decay depends on style, delay or reverb delay combination, lead vocals if needed.
Send FX6, Decay depends on style, guitar & keyboard if needed, L10/R20.
Send FX7, Delay effect, strong instruments (vocals), solos.
Send FX8, Chorus.
Send FX, Reverb layering. For instance give percussion tracks a medium, thick room with quality. The return is processed with a little widening to counteract the masking effect and to place the percussion behind the drums. A little pre-delay on the reverb and slightly attenuated trebles.
The frequency spectrum of a mix.
Frequency Range 0 – 30 Hz, Sub Bass, Remove.
Frequency Range 30 – 120 Hz, Bass Range, Bass and Basedrum.
Frequency Range 120 – 350 Hz, Lower Mid-Range, Warmth, Misery Area.
Frequency Range 350 – 2 KHz Hz, Mid-Range, Nasal.
Frequency Range 2 KHz – 8 KHz, Upper Mid-Range, Speech, Vocals.
Frequency Range 8 KHz – 12 KHz, High Range, Trebles.
Frequency Range 12 KHz – 22 KHz, Upper Trebles, Air.

Instrument Rages.
Frequency range 30 Hz - 120 Hz, Kick and Bass, Bass Range.
Frequency range 120 Hz - 8 KHz , All instruments.
Frequency range 8 KHz - 22 KHz , Cymbals, Hi percussion, High range of all instruments, Air.
Between, 1 KHz to 2 KHz. Irritating. Perceived as loudness for beginners.
Between, 350 Hz to 1 KHz, Generally it can be worthwhile applying a cut to some of the instruments in the mix to bring more clarity to the bass within the overall mix.
Between 350 to 2000 Hz , nasal, woody and piercing. A mix can sound nasal over here.
Between, 2 KHz to 3 KHz, Generally often used to make instruments stand out in a mix.
Between 2 KHz and 8 KHz, is speech related, vocals can shine over here.
Between, 6 KHz to 10 KHz, Boost, to add definition to the sound of instruments, edge, and ring.
Between 8 KHz to 12 KHz, Treble range, cymbals, high percussion, s-sounds, chimes, etc.
Between, 10 KHz to 22 KHz, Trebles area, follow stage plan for setting distance (Roll Off).
Between, 12 and 22 KHz, Upper Trebles are air, can aid a mix but overdoing is worse.
General and Specific Instrument Details.
First let's explore some instruments and basic settings for the whole frequency range of the mix. It is not important when an instrument sounds awful in single mode, it is important when it sounds goof in the mix. Deeper not fundamental (sure even fundamental) sounds spread in circular form and can hardly be detected below 100 Hz so avoid, whereas high frequencies spread directionally and are easy to detect. First of all the panning rule for fundamental instruments is in center, not fundamental instruments are not centered but placed more outwards.
Between, 0 Hz to 30 Hz (50 Hz), Bottom End. Stay away from the bottom end range unless you are mixing with and for sub. It allows to get rid of all sub-bass artifacts 100% with a very steep downwards cut. Mostly this range from 0 Hz to 30 Hz (50 Hz) is heavily reduced for all instruments, tracks, effects or sounding events, fundamental or un-fundamental (cut). The bass takes the lowest one-and half octaves in the center, not a place for any other instrument, keep free for bass. Above that is the bottom sector of the bass drum 80 to 100 Hz, small banded the thumb or kick. Between, 30 Hz to 120 Hz, Bass range. This bass range frequency is mainly for Base drum and Bass only. The only instrument that can go as low as 30 Hz is the Bass, therefore the Base drum could be cut from 0 Hz to about 60 Hz. Do carefully remove all other unwanted instruments, tracks or events happening inside this bass range (0 Hz to 120 Hz). Cut all other instruments, tracks, events heavily with a steep cutoff filter, be wary of boosting the bass range frequencies. You should be able to find the instruments main lowest frequency and cut just below this frequency.
Between, 120 Hz to 350 Hz, Misery Area. A frequency range where most instruments play, inside this misery area range, almost every instrument will play some of its main frequencies. Best left alone for the most part. But however you can make an outstanding mix when you know to work inside this misery area range.
EQ Tricks. Use a shelf filter type at 300 Hz and sweep around, then you will hear the instrument more distanced or not.
Panning tricks. Use Stereo EQ, work stereo, so we can frequency spectrum pan the whole signal, more left or right sounding. Or use a Dual Panner.
Reverb. To place an instrument using reverb we can use different techniques for planning our stage. The further as sound, the less high frequencies we hear. To distance the instrument (further away): Reduce Volume. Cutoff high frequencies. Cutoff even more highs on background sounds. Make early reflections sound louder than the dry sound. Have a long reverb tail. Do not use the enhancer. To approach the instrument (closer): Use enhancer, lifting area high. Reverberation must be panned very wide. Make the reverb sound bright, short and dry. Use a short delay and pan wide.

Instrument Effects
Cut high frequencies of every synth instrument or effects, (12 KHz - 20 KHz).
Drums in General.
Panorama: The location of the drum set is crucial, according to your stage planning, try to keep it natural. Basically Base drum and Snare are panned at center, the rest of the drum set more left or right (according to drum set position, keeping them out of center).
Quality: Drums need to be at a constant volume. Rarely do they change in level throughout a tracks or mix.
Reduction: Apply a good steep low cut from 0 Hz to 30 Hz (50 Hz) for the Basedrum. Other instruments of the drum set can be cut from 0 Hz to 120 Hz at least, to keep the bass range clear. For every instrument inside the drum set, roll off some highs anywhere from 10 KHz to 22 KHz to set the distance (must be behind Bass and Main Vocals according to your stage plan). A frequency component between 0 and 1Hz is called DC offset and must be eliminated, use a the DC removal tool for this purpose. The misery area between 120 and 350 Hz is the second pillar for the warmth in a song after 0-120 Hz, but potential to be unpleasant when distributed unevenly (L C R, panning laws). You should pay attention to these range, because almost all instruments will be present over here on a dynamic level. Cut all frequencies lower than 100 Hz - 150 Hz from all instruments except bass and bass drum, use elliptic 6 extreme cut.
Compression: Drum compression is an art to say the least. The different amounts and styles of compression can completely and utterly change the way the drums sound. Knowing how to compress can save you from a weak sounding mix. The attack and how big you make the transient peak is the most identifiable part of a hit. A too fast attack setting will cut the transient peak and your drum won't hit hard. But if you have a slower attack that initiates the compressor right after the transient peak, it will accentuate the hit (transients). The compression after initiating and bringing down a part of the sustain, the signal falls below the threshold and slowly releases bringing up the decay making the drum last longer and sound larger and more full. This is really a very general overview; you must experiment and listen to find the desired sound. Percussive elements (drums) with long attack time settings (10 ms to 30 ms >) enhance the transients, some more assertiveness, punch or bite is applied to the transients this way. Also setting up the compressor in Opto mode, allows percussive instruments to behave faster and that is a good thing. For all drums that are directly rhythmic and percussive use Opto mode. This will get your drum set more clear and defined. Keep the Snare, Bass drum and some HI hats short (only the transients pass the compressor unaffected) while reducing their sustain. You can always recreate a bit of depth by introducing ambience with a good quality reverb. By using a ducking gate or side chain compressor, you could compress the rest of the mix or certain instruments instead. Bass with Basedrum compression on a side chain.
Reverb: Drum rooms or drum booths (ambient) are recording industries standard on drums. In the early days when only acoustic drums where around, the only way to separate the drums from interfering with other instruments was placing them in separate rooms. So the microphones used could only pickup what was needed. We perceive drum booths as natural (ambient). Drums are mostly placed back on the stage (behind vocals and bass) cutting out some trebles from the reverb signal to create depth or distance. You can give drums some reverb but not too much, just enough to transfer the 3d spatial information, be scarce, only the snare needs a larger reverb or more ambience. Be scarse to use reverb on drums. Only when you mute the reverb, you will notice the change to the dry signal (inside the whole mix, do not solo). Only give enough reverb for drums to transmit the 3d spatial information to the listener. Listen dry and with reverb and decide how much is needed. In the drum section, apply a little less reverb to the Basedrum then to the other drum tracks. The Basedrum can sound flabby when too much reverb is applied. The snare can have a larger and louder reverb. Mostly the reverb tail will end rhythmically short, just before the next beat or bar appears. Reverb can be long (tough interfering with the rhythmic content) and afterwards shortened with a gate, to make them rhythmically stand inside the mix we sync them to tempo when we can. Avoid mud by setting a low cut EQ in front of the reverb or behind (cutting). When reverb is applied on drums, try to make the reverb sound in rhythm with the dry-signal. Maybe by gating the reverb sustain in sync with tempo. Use mostly no pre-delay or < 10ms, checking the rhythmic (we can use a high treble’s roll off for setting distance instead). Missing spatial information can make drums dry and unnatural, so enforce enough reverb so that the depth and distance is clear to be heard, use the best reverb you can find. When reverb becomes obvious, most likely you have gone too far. Just set the reverb so that the 3d spatial information comes across (enforced), but is not overcrowding or too powerful. The more natural the reverb sounds, the better (quality). Try to stay away from the pre-delay, set it at 0 ms to stay in rhythm. Use small rooms or ambient reverb. With a bit of pre-delay from 0 ms to 10 ms (0 ms please for rhythmical content). Just roll off some trebles after the reverb to set the stage plan even more. Try assigning the toms, snare and HI hat a short crisp plate program, with a reverb time of 1.2 seconds. A reverb with a longer decay time can be used on the overheads. Cymbals can be enhanced by a longer reverb. Generally, up tempo songs require a shorter reverb time to allow the reverb to decay between beats and thus avoid blurring the sound (sync).
Basedrum.
Sound: For more Kick drum, use sine-wave 60 Hz, Juno 60 Saw tooth. Set pitch for a high note and run this with the original bass drum, this is a house style bass drum. Combine a short transient kick with the HI hat or with a low frequency release from another. Add a closed HI hat (higher click) on the kick transient part, to add click in a mix. Even better to combine two bass drum samples into one, using the first part of the kick from one sample and the sustain from another. Bass drums have two components, kick and sustain highs.
Level: When bass drum and bass sound good, the mix is easier to achieve. Basedrum and bass. The levels between bass drum and bass should be, bass drum is -1 dB or -3 db on the vu-meter. Usually the bass drum will more or less disappear. We can cut some frequency range from the bass, just sweep around 60 - 150 Hz and at one moment the kick will come back (thumb sub kick will return and be ear able again). Also choose the kick and bass its timbres. As another resolvement we could delete all notes from the bass that overlap the kick, mainly 1/2/3/4 measured kick overlapping (start of the rhythmical bass drum content, midi, note deleting or sample cutting). Pay attention to the duration of a kick, it should correspond to the speed of the track. A beginners mistake will be raising the kick at 60 - 120 Hz, this will raise the bass drum but only will be of more level, not consistency.
Panorama: The Basedrum belongs in the center (fundamental). Also in the timeline the Basedrum belongs in dead center of the panorama (specially the lows). If at any time the Basedrum is more left or right, adjust until the base drum is dead center again (goniometer, correlation meter). Some simple conversion / effects can be used alike converting to mono and then back to stereo again, can keep the Basedrum dead center at all time during the mix. Specially working with bass drum samples, be aware they are straight in the middle centered. Beware of stereo, maybe even make the channel track mono (then you assure the signal is in the middle from the original signal). Specially the low range 50 - 120 Hz must be straight from center, sudden left or right events in this range are better to be avoided. Watch the correlation meter or goniometer with bass drums.
Frequency Range:
Find low kick bass drum for house in the range 60 Hz - 150 Hz.
Find low kick for rock or pop up to 200 Hz - 300 Hz.
Cut, 0 Hz to 30 Hz (50 Hz), Reduction, Separation.
Bottom, 60 Hz to 120 Hz, Find The Boom, kick or thumb.
Around, 80 - 90 Hz, Solid Bottom (club) End.
Cut, 80 Hz, 60's Records!
Cut, 120 Hz to 250Hz. Muddy Lose it, Separation.
Cut, 400 KHz, Open, Less Woody.
Around, 1 KHz, Knock.
Around, 2.5 KHz, Slap Attack.
Boost, 2.5 KHz to 4 KHz, Kick Drum Definition Presence, Skin.
Boost, 6 KHz, Click High End.
Roll off, 10 KHz to 22 KHz, Trebles to set distance and reduction.
EQ: The Kick Thumb (head or hole) and the Skin are two basic frequency ranges to find. It can be very handy to create out of a single bass drum (sample or real) two signal tracks, one track with the 0-120 Hz frequency range and one track with the rest of the highs. This will make our purposes and plans with the bass drum more easy to adjust until they sound correct. The bass drum is most important to keep track of rhythm. The Skin will result in higher frequencies 2.5 to 5 KHz. Apply some boost or cut over here. Mostly a boost will make the Basedrum more rhythmic into the whole song or tracks, what is a good thing. Sometimes the Skin sound will progress towards 7.5 KHz. The Thumb or Head/Hole has bottom range between 60 and 100 Hz. Use a bell filter with a medium Q, hunt down the Skin and Thumb frequency ranges until you find the hotspots of both. Now you know what to reduce, and manage the two hotspot frequency ranges. The lower the bass drum the harder to edit, between 75 and 100 Hz is best main frequency. In clubs pressure develops at 90Hz, because of the speakers output. Below 60 Hz or deeper you have to be very careful and avoid swaying in panning, keep it centered at all time. Usually there is not enough high frequency content in a kick, so you should add it. Mostly in the range of 5 KHz to 8 KHz, sometimes 3 KHz and higher.
General Quality: Apply a little cut at 120-300 Hz and some boost between 60 Hz and 100 Hz (when needed, Thumb or Kick). The main frequency ranges are from 60 Hz to 100 Hz for bottom boom and 2.5 KHz to 5 KHz for the heads or the thump sound. Search in these area's to improve the quality of the base drum (boost when necessary). When the sound has a tendency to boom or resonate, try cutting between 200 Hz to 400Hz. Creating a modern sound, boost slightly in the 6 KHz to 12 KHz range, to accentuate the transient click when the beater hits the skin. All this to make the bass drum more clear and can be spotted by the listener for rhythmic understanding.
General Reduction : Apply a steep cut from 0 Hz to 30 Hz (50 Hz), adjust by listening to keep bass range or bottom end clear, but does not affect the boom thumb or kick (around 80 Hz). The Basedrum has a specific middle frequency between 60 to 100 Hz, for instance 80 Hz. Then you can be sure you can cut the Basedrum lower frequencies from 0 Hz to 60 Hz, this will leave some more room for the Bass to play. A lower midrange EQ cut, can help in the 120 Hz to 350 Hz misery area, Basedrum has no purpose here, so cut. For bass drum and bass thin out some 180 -250 Hz by a few db. Apply a mid-cut from 1 KHz to 3 KHz, where the Basedrum really does not need much power. Roll off some highs 10 KHz to 22 KHz that are not needed, this will affect distance also, set according to stage planning. Kick bass drum *house' 60 - 150 Hz, thumb humb. Kick bass drum usually rock or pop up to 200 - 300 Hz. Usually there is not enough high frequency content in a kick, so you should add it. Mostly in the range of 5 KHz to 8 KHz, sometimes 3 KHz and higher.
Compression: The compressor has two functions. First restricting dynamics (high level peaks, top end limiting, and compression) for the occasional over's. Second getting more punch trough transients, using a long compression attack time is more percussive and avoiding the sustain, meanwhile as a rhythmic aspect keeping bass drum in center localized. Use Opto mode for all percussive drums.
Side chain Compression: We could use side chain compression for more unmasking options on all instruments and effects The side chain compressor has found its way and application especially in house music and other styles as well. The Basedrum can be used for input to compress the Bass when the bass drum is playing its transient kick.
Gates : Sometimes a noise gate is used for this purpose in sync with the rhythm. A bass drum can be gated short then added an ambience reverb (from the drum group). A short gated base drum can sound good with a cut sustain and transients intact (short impulses are less tonal, so especially for Basedrum good to keep short). Also when the Thumb Kick frequency range is short, it will affect less loudness of the whole mix (lower frequencies have more power). The shorter you can make de bass drum the better, with the ambient reverb or room reverb the tail will be recreated and will be more clear rhythmically. Sync to tempo 32nd note when needed. If you need very deep notes or a very deep bass drum, remember the rule, the deeper the shorter.
Reverberation: Be careful and apply the rule ' less is more'. Too much will affect the Skin sound and therefore making less rhythmic inside the mix (masking, fluttering). Use no pre-delay. If needed stay below < 10 ms. A good ambient room or small room reverb / drum booth can be used for the whole drum group, so a good reverb is available already. Just send in some of the bass drum. When you have used sustain compression or gating, a reverb can help for setting some space and depth. The bass drum is usually left dryer treated with a short reverb, to stop it sounding indistinct and cloudy (muddy). Be careful with the reverb loudness, this will make the Basedrum flabby, rather than punchy and dynamic. Set reverberation pre-delay at zero to be in sync with the rhythm. An Ambience reverb is just enough (small reverb). A large reverb is almost never used; this will easily make the Basedrum reverb flabby, muddy and overcrowding. When a Basedrum reverb is switched off (bypassed) you must recognize the dry signal. When turned on, the reverb must add but not too much, but is enough to convey the 3d spatial information. Keep Basedrum reverb lowest in level according to all other reverbs used on other drum set instruments or tracks, even bass. Use no pre-delay or < 10ms to set the distance (drums are a bit behind the bass and main vocals according to our stage planning). You can maybe roll off some high trebles by EQ ing the reverb signal (> 10 KHz) instead. Remember we already rolled of some highs for reduction. Be sure the reverbed signal does not contain too much lows < 60 Hz to not affect the bass. Remember a small frequency ranged and shortened bass drum Thumb is best rhythmically. Basedrum needs the least amount of ambience reverb.
Snare.
Panorama: The Snare belongs in the center (fundamental), according to the snare position (stage planning), maybe a little left or right (not much, very slightly). Beware of stereo, maybe even make the channel track mono, plugins can do this job and keeps the snare straight in center.
Frequency Range:
Cut, 0 Hz to 120 Hz, Reduction, Separation.
Between, 120 Hz to 400 Hz, Fatness Power, Wood.
Cut, 400 Hz, Snap.
Between, 400 Hz to 800 Hz, Body Thunk Sound.
Between, 800 Hz to 1.2 KHz, Power.
Cut, 1 KHz, Mellow.
Boost, 2 KHz, Bite.
Around, 4 KHz to 7 KHz, Crispness, Boxy.
Boost, 8 KHz, Sizzle.
Roll Off, 10 KHz to 22 KHz, Distance, Reduction.
EQ: Alike bass drum has two core frequencies, Lows 120 - 300 Hz, Strainer (high bands). Use a low cut at 80 Hz. Maybe pitch or tune the snare. Also splitting up the signal two ways makes processing easier.
General Quality: Anywhere from 120 Hz to 1 KHz, Boost or Cut. Boost around 240 Hz for more fatness, wood or power. Get some bite at 2 KHz. Crispness at 5 KHz, for more sizzle boost 8 KHz. Loose some boxiness at 6 KHz. For quality correction the ranges 110 Hz to 250 Hz (Bottom Snare) and from 3 KHz to 7 KHz are good boosting ranges. Accentuate the stick impact and rim shots at about 5 KHz. The rattle lies mostly between 5 KHz and 10 KHz. The bang is in the range of 1 KHz to 3 KHz. Body resonance can be found at 100 Hz to 250 Hz.
General Reduction: To separate Snare from the Basedrum (Frequency range collisions in dimension 2), use a steep EQ low cut up to < 120 Hz. A damping in the mid-range 1 KHz is where nice EQ cutting can be done to leave some headroom. Try applying some midrange cut to the rhythm section to make vocals and other instruments more clearly heard. Roll of some highs from 10 KHz to 22 KHz to set the distance according to stage planning. On digital systems often two components (samples) of a snare, actually produce the snare. The spectrum of the snare is the largest, cut steep at < 120 Hz. Snares resonate at 200 Hz - 300 Hz, cut and remove, it will be easier to place in a mix.
Composition and Tuning: A snare tuned to the chords or composition can be crucial. A snare with tonal content (tuned) can be more realistic and in tune with the song. You can be certain that a snare that is off tune (1 note plus or minus) can already sound horrible. Use the pitch to adjust the tonality (set the right toned snare). Some use pitch on all snare hits and adjust word by word throughout the composition. Again this may sound tedious and time consuming, still a pitch tuned snare is best.
Compression: First is top end limiting for the dynamic range (keep the transients intact but leave some headroom free). Second using compression with a long attack time for more transients (or maybe a gate). Creating more snappiness and percussiveness with longer attack times. Third, adjustment and control of the strainer sound (strings of the snare) with a faster release time. The snare will sound best when the transients are loud and of good quality. Using a gate or compressor to wipe away the sustaining snare sound is perfectly correct (especially in sync with the tempo). Use Opto mode for all percussive drums.
Gates: All right we tend to give the snare a good wide big reverb to make an open sound. Short snares are very nice, especially when going into the big reverb, so we need a gate to just only allow the transients and important sounds of the snare through. We can also cut the snare sample by manual edits. Mostly then mixed into an ambience reverb (group) for an ambience result. Maybe place a noise gate after the reverb device. For longer snares sync the gate to tempo.
Reverberation: Without a sustaining snare, we can now choose a decent reverb and make snare sound the way we need. For the snare to be different, single track a medium sized Room Reverb. It is perfectly all right when you choose a large reverb for the snare alone (a way bigger, larger room, then for instance we use on the bass drum or rest of the drum set). To separate the snare from the other drums a large reverb will help it stand out more or a short crisp plate program. Snare drums are traditionally treated using a plate reverb, hall settings also work well. Try 0.5 sec for a short reverb, and over 2 secs for an obvious effect. Use no pre-delay or < 10 ms, checking the rhythmic (use a high treble’s roll off for setting distance instead). Place a gate after the reverb and bring it within the beat of the snare (sync). If you don't roll off the highs of the snare or this reverb, the snare will sit nicely upfront (just cutout the lows). Place the snare a little behind the Basedrum, at its natural placement.
HI hat.
Panorama: The HI hat can be placed slightly left or right, according to its natural position more right. As the rest of the drum kit is all not fundamental, we place them into the panorama according to our stage plan. The HI hats needs to have a low-cut filter < 250 Hz. The more deep frequencies in the hi hats origin, the more you place it right (outwards). HI hats slightly to the right, place the shaker left (Counter weight instruments).
Frequency Range:
Cut, 0 Hz to 200 Hz (500 Hz), Reduction, Separation.
Boost, 800 Hz, Fullness.
Cut, 1.5 KHz, Smoothness.
Boost, 4 KHz to 5 KHz, Edge, and Crispiness.
Boost, 10 KHz, Sparkle.
Cut, > 15 KHz, Roll Off, Distance, Reduction.
Quality: Looking for some Fullness, Smoothness, Edge and Sparkle, cut or boost. This all depends on the actual sound of the HI hat, most usually they dominate the 8 KHz to 12 KHz area, so first apply a boost 3 dB and then surf the area until you find a sound which is suitable for the mix. Main frequencies are the ring from 7 KHz to 10 KHz. The stick noise at about 5 KHz, and a clang in the range of 500 Hz to 1 KHz. Use an oversampling EQ of quality.
Reduction: Apply a steep filter cut from 0 Hz to 200 Hz (500 Hz). Depending on the kind of HI hat, cut a lot more to about 3 KHz (5 KHz). However hi hats can use frequencies as low as 5 KHz, these don't necessarily contribute to the sound, they only serve to take up space in a mix (headroom). Roll off for distance > 15 KHz according to stage planning.
Compression: Do not use a gate on hi hats. Mostly HI hat signals are not compressed at all, or only slightly when some dynamical events need to be reduced or gained, use note or event based manual edits or automation to correct those parts. The HI hat has no natural dynamic content in the lower frequency ranges, so has not much effect on the dynamics, though is ear able.
Reverberation: Use no pre-delay or < 10 ms, checking the rhythmic (use a high treble roll off for setting distance instead). HI hats work well with a short to medium bright reverb setting. Try adding a high level of early reflections (ambience) to add interest and detail. Dance music uses little or no HI hat reverb to retain the timing and impact of the dry sound (else sync to tempo). Try a short crisp plate program.
Overheads.
Panorama: Keep centered, maybe use a stereo expander to set as wide as possible. Or used as an counterweight for other instruments (especially the drum set).
Frequency Range:
Cut, 0 Hz to 200 Hz (400 Hz), Reduction, Separation.
Cut, 1 KHz, Openness.
Boost, 12 KHz, Zing, Air.
Quality: Add some lusture around 4 KHz with a high shelf EQ. When processing highs use a quality or oversampling EQ.
Reduction: Apply a low-cut filter from 0 Hz to 200 Hz (400Hz). Roll off some high trebles to send the overhead to the back of the stage (according to your stage plan).
Reverberation: Use no pre-delay or < 10 ms, checking the rhythmic (use a high treble’s roll off for setting distance instead). Try a longer delay time > 1.2 S, using a hall programm with a decay of about 1.5 seconds.
Make Your Drum Overheads Sound Amazig, compressing the drum overheads is a great way to make your drums pop. You can tame any unwanted transients with the attack and release times. U can really smooth out and make the drums more consistent and make your drums sound a lot better. If your going for a heavier drum sound, you can really brick wall compress the drum overheads and get a really juicy sounding drum sound. Really harsh ratio and threshold setting can make the cymbals ring out for ages combined with a long release time. Sidechaining the overheads to the kick drum can really make the drums pump and breath, giving your mix a lot of life and energy.
Cymbals.
Panorama: Place according to stage position normal cymbals (not crash cymbals) need to be close to the HI hat on the right side, either more left or right. Sometimes at center but widened alike the overheads or used as counterweight. Crash cymbals can be placed anywhere, be sure to pan as wide as possible.
Frequency Range:
Cut, 0 Hz to 100 Hz (400 Hz), Reduction, Separation.
Boost, 100 Hz to 300 Hz, Clunk stick, Clang or Gong.
Cut, 200 Hz to 400Hz, to thin cymbals, Separation.
Cut, 1 KHz, Openness, Boxy.
Cut, 1.5 KHz to 6 KHz, Ring.
Boost, 7.5 KHz to 12 KHz, Shimmer, and Sizzle.
Boost, 12 KHz, Zing.
10 KHz to 16 KHz, Air, Crispy Cymbals.
Roll Off, > 12 KHz, Limiting, Distance.
Quality: Main clang or gong sound at 200 Hz, crispness at 5 KHz. There are many types of cymbals, splash, china, effect cymbals, orchestral cymbals, marching band, gongs and specialty stuff. Therefore only adjust the cymbals marginally. Reducing is always better when you adjust cymbals. Cymbals can be overcrowding and irritating. The main resonance lies below 1 KHz, in the range from 75 Hz to 300 Hz. From 1 KHz to 3 KHz is the bang of the beat and from 5 KHz to 10 KHz is the click. Resonance is from 8 KHz to 15 KHz. Pay attention to the quality of plugins used, adding some brilliance. When processing highs use a quality or oversampling EQ.
Reduction: Cut anywhere from 100 Hz to 350 Hz. A gentle roll off in lows 12 to 24db so it does not phase with the snare.
Compression: Do not try using a gate. Mostly signals are not compressed at all, or only slightly when some dynamical events need to be reduced or gained, use note or event based manual edits or automation to correct those parts. Has no natural dynamic content in the lower frequency ranges, so has not much effect on the dynamics, though is ear able. For crash cymbals their frequency of play is often very small, therefore compression is unsuitable and can be a hassle when trying to setup. Alike toms when they are just sporadic, we tend to only use compression when the input signal is more constant over the timeline included and can be managed more. Else use manual edits instead.
Make Your Drum Overheads Sound Amazing, compressing the drum overheads is a great way to make your drums pop. You can tame any unwanted transients with the attack and release times. U can really smooth out and make the drums more consistent and make your drums sound a lot better. If your going for a heavier drum sound, you can really brick wall compress the drum overheads and get a really juicy sounding drum sound. Really harsh ratio and threshold setting can make the cymbals ring out for ages combined with a long release time. Sidechaining the overheads to the kick drum can really make the drums pump and breath, giving your mix a lot of life and energy.
Reverberation: The cymbal track is already a kind of close ambient room sound. Use no pre-delay or < 10 ms, checking the rhythmic (use a high treble’s roll off for setting distance instead). Cymbals particularly can be enhanced by a longer reverb.

Toms.
Panorama: Hi Tom placed slightly or far Right, Low Tom placed far left, or opposite. Remaining Toms placed in between, alike their natural stage. Mid tom slightly left, floor tom far left.
Frequency Range:
Cut, 0 Hz to 30 Hz (50 Hz), Less Muddy Mix events, Separation.
Between, 80 Hz to 300 Hz, Fullness, Boom.
Boost, 400 Hz to 800 Hz, Warmth.
Between, 1 KHz to 3 KHz, Ring.
Between, 3 KHz to 8 KHz, Attack.
Between 8 KHz to 16 KHz, Air, Distance.
Quality: If the toms sound weak, use a bell EQ about 100 Hz to 200 Hz (150 Hz mid frequency) or identify the exact center frequency for each tom. Rack toms fullness at 240Hz, attack at 5 KHz. Floor toms fullness at 80-120 Hz, attack at 5 KHz. Each tom has only one frequency range, so this can be adjusted with only one single steep bell filter, toms mostly have just a small frequency range sweet spot. Roll of some trebles to set the distance.
Reduction: Cutting out the lower bottom end < 120 Hz or more can free up some headroom, but as toms are not continues events maybe < 50 Hz is quite ok, to keep some power.
Compression: A noise gate on the toms can remove some sustain or some compression artifacts, keeping the transients intact. Sometimes a manual edit, does not take any more time as toms only appear in sudden events. Use Opto mode for all percussive drums. Alike crash cymbals when they are just sporadic, we tend to only use compression when the input signal is more constant over the timeline included and can be managed more. Else use manual edits instead.
Making The Toms Punch, compression on toms can create some amazing results. Using heavy enough compression along with a gate can make your tom drums seriously punchy. Even if you don't have individual tom mics and just an overhead pair, or just a single overhead mic, compression can really make the toms punch out. Think of songs like Shine On You Crazy Diamond by Pink Floyd. The compression on the toms make them really punchy and beefy, really adding to the mix.
Reverberation: For toms maybe a large snare reverb (same as snare) can bring them out. Toms have a natural sustain, so don't need much reverb. Plate and small room settings are good for pop, with metal benefiting from longer settings. Hall settings are good for a big tom sound or try a short crisp plate program.

Percussion.
Panorama: There is no basic placement for panning on percussion and cymbals. Percussive elements are often panned left or right and kept away from the center, set as much outwards as possible. A stereo expander can bring the percussion elements even more outwards. We like to pan percussion more left or right, not centered. Bongo’s to the left and far behind in distance, conga's far to the right and also far behind in distance. Panning outwards they remain unmasked by other signals, set in distance when other instruments already overcrowd the stage.
Frequency Range:
Cut, 0 Hz to 120 Hz, Reduction, Separation.
Cut, 200 Hz to 400 Hz, Higher frequency percussion.
Between, 200 Hz to 240 Hz, Resonance.
Around, 5 KHz, Presence Slap.
Between 10 KHz to 16 KHz, Air, Crisp Percussion.
Quality: Resonance at 200 Hz to 240Hz, presence slap at 5 KHz. For distance depth roll of some high trebles, send the more to the backstage.
Reduction: Roll off some lows from 0 Hz to 120 Hz or more, as they are outwards and do not need a lower transmission (panning laws). According to stage placement, roll off lower frequencies. Percussion and cymbals can be cut 1 KHz and higher. Cut with shelf filter at 800 Hz and higher (1 KHz - 4 KHz), be careful otherwise will sound acid and unnatural.
Compression: Compression can help bring forward the transients while reducing the sustaining sounds (keep some headroom). Use Opto mode for all percussive drums.
Chorus: Often used.
Reverberation: As for using reverbs or delay, maybe the reverb placed for the snare (Group, Send)can be useful also for percussion purposes, we tend not to use the ambient reverb of the whole drum set, maybe just some to glue into some togetherness with the rest of the drum set. Percussion requires a long reverb with little pre-delay and a little high frequency cut or is damped by the reverb setting. For the Percussion (Group, Send) a medium sized Room from 1.5 seconds to 2 seconds of delay time. A pre-delay of 15 ms and a medium roll off in frequency (damped or EQ). The masking effect might hide the reverb, but just set the loudness of the reverb high enough to get some 3d spatial information transmitted. Maybe a stereo expander after the reverb signal and some automation will solve the hiding problem, panned outwards, just watch the correlation meter as you are using the stereo expander to widen. A delay can help sweeten the percussion, only when you adjust the delay in tempo synced and keeping pre-delay short. Reverberation, use no pre-delay or < 10 ms, checking the rhythmic (use a high trebles roll off for setting distance instead). Transients are more important for percussive sounds, they are mostly placed backstage so for rhythmical content we need the original transients to be heard. Percussion instruments are placed consciously toward the rear, we will need a large reverb with some pre-delay and filtered trebles. Reverb can be generously applied here, so the masking effect will stay away or is overpowered by reverb and brings over the 3d spatial information. Reverb layering for instance, gives percussion tracks a medium, thick room with quality. The return is processed with a little widening to counteract the masking effect and to place the percussion behind the drums. A little pre-delay on the reverb and slightly attenuated or lowered trebles.

Bass.
Level: Bass must sound in the mix. While playing single mode you cannot hear the outcome inside the mix. Mostly bass is 2 or 3 dB higher on the vu-meter than the bass drum. Use Envelope, Filter Release and Sustain, Amp Release and Sustain for creating a bass on a synth, try to fiddle with envelope ADSR as well as above mentioned parameters. The levels between bass drum and bass should be, bass drum is -1 dB or -3 db on the vu-meter. Usually the bass drum will more or less disappear. We can cut some frequency range from the bass, just sweep around 60 - 150 Hz and at one moment the kick will come back (thumb sub kick will return and be ear able again). Also choose the kick and bass its timbres. As another resolvement we could delete all notes from the bass that overlap the kick, mainly 1/2/3/4 measured kick overlapping (start of the rhythmical bass drum content, midi, note deleting or sample cutting). Pay attention to the duration of a kick, it should correspond to the speed of the track. A beginners mistake will be just raising the kick at 60 - 120 Hz, this will raise the bass drum but only will be of more level, not consistency.
Panorama: The Bass is most fundamental (next to the Basedrum). A bass that is not played in center entirely through the track timeline, but rolls a bit from left to right is offsetting the balance of the mix, because the bass uses heavy lower frequency components. Bass is always placed at the center and if not, it is correction time. So really keep the bass dead centered. Sudden events in the bass that are left or right, make the bass less effective, sway around making transmission of both speakers less effective. Maybe convert bass to mono or use a mono convert at the end of the channel. Convert bass samples to mono. The bass needs to be dead center at all times! Use a correlation meter and most of all the goniometer to make the bass dead center in all events.
Frequency Range:
Bass Note Range: 33 Hz (C1) to 523 Hz (C5).
Bass Guitar Note Range: 31 Hz (B-1) to 392 Hz (G2).
Roll Off, 0 Hz to 30 Hz, Reduction, Separation.
Boost, 60 Hz to 100 Hz, Bottom, Small Frequency Range, Careful and Exact.
Cut, 60 Hz, Humming Noises, Eliminate.
Boost, 100 Hz to 120 Hz, Pointy, Prominent, Fat.
Between, 120 Hz to 300 Hz, Warmer.
Around, 200 Hz, Leave it or cut.
Around, 250 Hz, Nasty Bass Frequencies, Cut.
Between, 400 Hz to 800 Hz, Clarity.
Between, 500 Hz to 1.5 KHz, Pluck noise.
Around, 800 Hz, Mid Tops, Fret noise.
Around, 2 KHz, Presence and Definition.
Between, 2 KHz to 6 KHz, Edge, String noise.
Roll Off, > 10 KHz, All Highs, Distance, Reduction.
Reggae Bass Sound : Boost, 40 Hz, 10 dB, Boost, 80 Hz, 12 dB, Cut, 160 Hz, - 8 dB, Cut, 240 Hz, - 6 dB, Cut, 600 Hz, -15 dB, Boost, 1 KHz to 1.5 KHz, 1-3 dB.
EQ, Frequency wise the bass needs room. Every low frequency 0 - 120 Hz content must be bass only, especially in center. Only the small range 80 - 100 Hz Basedrum bottom kick frequencies are welcome, other instruments should have a big cut over here.
Quality : To get some quality maybe a bit of a boost in the 40 Hz to 70 Hz range, better not to do so, be careful. For that wooden sound try the 750 Hz to 1 KHz range. Main area's bottom at 60 Hz to 80 Hz, attack pluck at 750 Hz to 1 KHz. 800-1200 Hz is nasal, or the woody part. String noise pop at 2.5 KHz.
Reduction: Bass needs space to play, any unnecessary sound event in the lower frequency range will create a muddy bass (masking). So it is best to cutoff rest of instruments frequencies anywhere from 0 Hz to 120 Hz at least, but we pay special attention to the rest of fundamentals, Bass drum, Snare and Main Vocals. For bass this does mean a lot, we expect that the range 0 Hz to 30 Hz can be cut steeply, while leaving 30 Hz to 120 Hz (180 Hz) intact. The only instrument that can go as low as 30 Hz is the Bass, no other instruments will get this low. So for Bass you can cut from 0 Hz to 30 Hz. Just to get rid of all flabbiness, pops, rumble, bottom end bass sounds. A cut or damp in the 120 Hz to 350 Hz (500 Hz) misery range, will get some more headroom back, listen how much you can cut over here. For bass drum and bass thin out some 180 -250 Hz by a few db. Roll off some highs > 10 KHz, to set the distance according to stage planning. Also the bass does not really need any high frequencies, so cut anyway. The bass must fall behind the main vocals in distance. Try to cut 150 Hz - 400 Hz on bass, often this bass part is resonant and unwanted, it keeps the misery area more clear. For better earabillity a bass can be raised a bit at 1 KHz to 1.5 KHz.
Compression: Control balance of heavy notes and stop notes, damping or dead notes. Dynamic limiting of sudden level peaks and irregular playing. Creation of sustain with long notes (especially in song with low tempo), with a long release time, sync to tempo. Boosting quieter side notes (funk with fast release times must exclude sustain). Supporting rhythmic and percussiveness with long attack times (transients). Sometimes multiband compression can help a bass, only resort when all else fails. A good played baseline is worth millions, making easy manual level / volume / muting adjustments and less compression tricks needed for avoiding those dead notes or just edit them out of the baseline. Bit slower attack and slower release, so you leave or accentuate the transient of the hit. Off course if you want to smooth out the bass and bury your bass in the track by getting rid of the attack, have a fast attack on the compressor. Attack time can be set to between 10 ms to 40ms. For getting Bass more sustain, ratio 4:1 (to 6:1), reduce threshold until it hits. View the gain reduction meter, try to get the bass as stable in sustain as can be. Use some gain to compensate for reduction. Set release, so that the sustain reduction is stable. Attack times that are longer 5 ms to 30 ms is letting the transients (first part of a note) through pass. The compressor attack time can be used to control the snappiness and therefore the definition at the start of each note. The amount of compression controls the balance between the heavy sounding notes and corrects damping sounds and dead notes. The dead notes can be well emphasized with the compressor by sustaining. A short attack time cuts the transients more, therefore raising the sustain. The length of the bass note is the groove. Baselines specially sound good when notes sustain equally on each second or fourth quartertone. A compressor can also be used to shape dynamics, limiting peaks. (Creating sustain for long sustain tones in tempo to the rhythm). A long release time (according to tempo) is more rhythmical. If the bass sounds weak in the transients you can support a long attack time. The release time must be set for the bassist playing style, short notes will need a fast release time. Watch for background noise pumping.
Side chain Compression: We could use side chain compression for more unmasking options on all instruments and effects The side chain compressor has found its way and application especially in house music and other styles as well. The Basedrum can be used for input to compress the Bass when the bass drum is playing its transient kick.
Reverberation: Try not to use. Else try an ambient reverb (alike the base drum on the drum group) and use very subtle or inaudible. Maybe a small Room or Ambient reverb. With a bit of pre-delay from 0 ms to 10 ms (0 ms please for rhythmical content), when set higher synced to tempo. Just roll off some trebles after the reverb to set the stage again. Use no pre-delay on reverbs, (maybe a bit just to set the distance behind the main vocals, but you could use a treble roll off instead). Bass just needs enough ambient reverb, just slightly more than the bass drum has.
Chorus: Double signal the bass, splitting into two signals, lows and highs. On the highs the chorus can do its job without phasing > 250 Hz (no to sway the lower frequencies around, keeping it centered). Chorus and phase, on a bass only above > 250 Hz. Maybe you have split the bass signal already in two frequency parts, then just use chorus on the higher part > 120 - 250 Hz.

Guitar Acoustic.
Panorama: In mixes guitars mostly come in pairs. As we can use this technique to set one left and one right, to keep a balanced feel and to stay upfront. As guitars might be understood as crucial, they are not fundamental. So not placed in center. When only a single guitar is played, maybe use some other instrument on the opposite side (counteract). When acoustic guitar and vocals are the only fundamental mix components, we have to use different mixing techniques, vocals centered upfront and acoustic guitar off-center with a widening effect more outwards. Even for solos a switch filter can become a good tool. Keeping the main vocal upfront at center, we try to avoid masking the main vocals.
Frequency Range:
Cut, 0 Hz to 80 Hz (120 Hz), Reduction, Separation.
Between 80 Hz to 120 Hz, Power.
Between 200 Hz to 400 Hz, Boom, Warmth.
Cut 500 Hz to 1 KHz, Brittleness.
Between 1 KHz to 1.5 KHz, Strumming.
Between 2 KHz to 3 KHz, Abrasion, Bite.
Between 2 KHz to 5 KHz, Clarity, Honky.
Between, 5 KHz to 10 KHz, Nasal.
Quality: Checkout the highs with a spectral analyzer. Add Sparkle, try some gentle boost at 10 KHz using a Band Pass Filter with a medium bandwidth. Bottom at 80 Hz to 120 Hz, body at 240 Hz, clarity at 2.5 KHz to 5 KHz. Apply a little cut at 300 Hz. Roll off a bit of the high trebles to set the distance. Guitars solo-ed can sound thin, while in a mix they are good.
Reduction: Cut lows from 0 Hz to 80/120 Hz (250 Hz/400 Hz) depending on the note range and when the guitar events are combined with vocals (automation). Be sure everything below 100 Hz is at -15dB cut. A good steep roll off in EQ from 0 Hz to 120 Hz (250 Hz) can help free up some headroom and get rid of some nasty guitar body sounds. Now the correlation gets better. Also when the highs are not nicely rolled of, do so with a roll off in EQ for distance. Sometimes the lead vocals and guitar play at the same time, meaning they need to stay in distance upfront. We can try to switch cutoff filters when the main vocals are sounding ( > 250 > 400 Hz). Use a quality oversampling EQ on the range > 8 KHz. Cut low guitar frequencies with a shelf up to 400 Hz, a guitar can have lows from 84 Hz, a bass can have lows from 30 Hz, so they tend to overlap. You can add frequency to the guitar from 1.2 KHz to 3 KHz, when it sounds to acid cut.
Compression: Can sound weak when adjusted with an EQ in front of the compressor. The frequency range and broadband was specified by the EQ and removes low rumble and other unwanted signals. Attack time can be set to between 10 ms to 40ms, for more transients and to be percussive/rhythmic. Fast attack usually somewhat fast release. Compress with ratio 4:1, with an attack of about 5 ms, hold 250 ms, release 50 ms (100 ms to 250 ms), for the sustain sounds. Make up for gain. You might even need to add an effect that generates more warmth. Uncompressed guitars are difficult to handle inside the mix. For a more percussive rhythmic approach use Opto mode, for a softer more contained sound use RMS mode.
Reverberation: A short bright plate reverb can work well on a steel strung acoustic guitars. Apply some reverb or delay (or any other guitar effect) can help to counteract as opposite. Many guitar players prefer the sound of the spring reverb in their amplifiers. Maybe setup a delay afterwards. Maybe use some small doze ambient reverb available on a group or available send. Use a hall reverb for starters.
Delay: Delay can work out better for guitars that must stay upfront, a reverb will draw more to the back. Delays are more clear and less muddy/fuzzy, so this helps again to make the main guitar upfront but still have some space. Maybe an widener or expander placed behind.
Guitar Electric.
Panorama: In mixes electric guitars mostly come in pairs. As we can use this technique to set one left and one right, to keep a balanced feel. As guitars might be understood as crucial, they are not fundamental. So not placed in center where it is already overcrowded. Don’t be shy with panning settings, more outwards. When only a single electric guitar is played, maybe use some other instrument on the opposite side (counteract). When acoustic guitar and vocals are the only fundamental mix components, we have to use different mixing techniques, vocals centered upfront and acoustic guitar off-center with a widening effect more outwards. We can use a switch filter setting when main vocals are sounding or not. Even for solos a switch filter can become a good tool. Keeping the main vocal upfront at center, we try to avoid masking the main vocals.
Frequency Range:
Cut, 0 Hz to 80 Hz (120 Hz), Reduction, Separation.
Between, 125 Hz to 250 Hz (400 Hz), Warmth.
Boost, 500 Hz Body.
Cut, 500 Hz to 1 KHz Brittleness.
Boost, 2 KHz to 3 KHz Abrasion, Bite.
Filter, 2.5 KHz 3db LF / 6db MF.
Crisp, 3 KHz to 5 KHz.
Roll Off, 4 KHz to 4.5 KHz, Irritating.
Boost, 6 KHz, Distorted Guitars.
Quality : Fullness at 240 Hz, bite at 2.5 KHz. Clean electric guitars can be treated like acoustic guitars. Apply a little cut at 300 Hz. Roll off a bit of the high trebles to set the distance.
Reduction: Cut lows from 0 Hz to 120 Hz (250 Hz) depending on the note range and reduction needs (are the main vocals sounding?). Be sure everything below 100 Hz is at -15dB cut. Now the correlation gets better. Also when the highs are not nicely rolled off, do so with a roll off in EQ for distance. Sometimes the lead vocals play guitar at the same time, meaning they need to stay in distance upfront. Checkout the highs with a spectral analyzer. Add Sparkle; try some gentle boost at 10 KHz using a Band Pass Filter with a medium bandwidth, use oversampling quality EQ.
Compression : With ratio 4:1 with an attack of about 7 ms, hold 250 ms, and release 50 ms. Fast attack usually somewhat fast release. When needed enhance the transients, electric guitars tend to have enough sustain. Make up for gain. You might need even need to add an effect that generates more warmth. For sustain, set a fast attack time and a release of around 250 ms, when really needed. Set the ratio from 4:1 upwards, and apply gain reduction up to 12 dB.
Controlling Guitar Dynamics, When recording lead guitar there are always a few notes here and there really jumping out a lot louder than the rest of the guitar track. Usually compress with a ratio of about 5:1, then turn the threshold down until you can hear the audio being squeezed a bit. Then set the attack time so the transients are shining through unaffected and the rest of the signal is getting compressed, ultimately making the audio more consistent dynamically. Try the release settings until it fits the song.
Reverberation: Apply some reverb or delay (or any other guitar effect) can help to counteract as opposite. Many guitar players prefer the sound of the spring reverb in their amplifiers. Maybe setup a single delay. Use a hall reverb for starters.
Delay: Delay can work out better and makes any instrument stay more upfront, as it tends to keep upfront, a reverb will draw more to the back. Delays are more clear and less muddy/fuzzy, so this helps again to make it stand upfront but still have some space (unmasking). Metal guitars are often panned completely left or right and sometimes make use of heavy delay.
The huge modern rock and metal guitar sound - There is no one answer, but there are some very typical things used to create great modern rock guitar sounds. Often, it's a tasteful guitar going into an all-tube 1x12, with different microphone positions and types being tried out and the best one selected (many rock engineers prefer ribbon microphones). The microphones are amplified by a great preamp, and may go through a "color" compressor (often a high quality tube compressor). Finally it is converted with a high quality AD/DA converter as they the sound is recorded into the DAW. There may be several overdub layers recorded and mixed in subtly. Many of the other tips suggested here are in use.
Piano.
Panorama: Also it is more likely we will place the piano (as an not fundamental instrument) by setting pan more left or right. When it appears as fundamental instrument (alongside main vocals) we can try to widen and expand around the main vocals. We could counteract the piano with another instrument or reverberation device opposite of the panorama. Or even use a widened reverb tail that progresses outwards. A piano can get any placement, when played by band members, left or right. But however sometime the main vocals will also play the piano, so therefore maybe set the main vocals a bit to the left or right, with the piano as opposite. In this case we do not roll off any trebles and keep them upfront. We can also place the piano slightly behind the main vocals at center (as fundamentals), switch mute the filter of the piano in solo mode or when main vocals are sounding.
Frequency Range:
Piano Note Range: 28 Hz (A-1) to 3651Hz (B7).
Cut anywhere from 30 - 120 Hz, Reduction, Separation.
Boost, 100 Hz, Power.
Around, 250 Hz, Clarity.
Boost, between 1 KHz -3 KHz, More Aggressive.
Boost, 2 KHz, Harmonics.
Boost, 6 KHz, Attack.
Boost, 12 KHz, Sparkle, Air.
Quality: Bottom at 80 Hz to 120 Hz, presence at 2.5 to 5 KHz, crisp attack at 10 KHz, honky-tonk sound (sharp Q) at 2.5 KHz. Roll off some highs when needed for distance.
Reduction: Difficult to master inside a mix. Basically because piano can play a wide range of notes on all octaves. Depending mixing purposes, we can address two situations. First we have a mix where already Basedrum and Bass are fundamental instruments playing. In this case the piano becomes not fundamental. For the Bass range to stay clear, we can cut a lot from 0 Hz to 120 Hz out of the bottom end of the piano. Second, when we have no Basedrum or no Bass playing, or both are absent, thus the piano can be more fundamental, we can leave some lower frequencies inside the spectrum and be more careful rolling of the lows. Anyway a good EQ cut from 0 Hz to 30 Hz (50 Hz) is always applied. Still we like to roll off all frequencies lower then < 120 Hz. We can roll off some high trebles for distance.
Reverberation: Depending on stage planning, we can add some ambience reverb for upfront, and depth by using a larger reverb. Maybe use some delay instead (especially when needed upfront).
Delay: Delay can work out better and makes any instrument stay more upfront, as it tends to keep upfront, a reverb will draw more to the back. Delays are more clear and less muddy/fuzzy, so this helps again to make it stand upfront but still have some space.

Epiano.
Panorama: An Epiano can get any placement, when played by band members, still not at the already overcrowded center. It is more likely we will place the Epiano (as an not fundamental instrument) by setting pan more left or right. We could counteract the Epiano with another instrument (piano) or reverberation device opposite of the panorama. However when fundamental sometimes combined with the main vocals. So therefore maybe set the main vocals a bit to the left or right, with the Epiano as opposite. In this case we do not roll off any trebles and keep them upfront. We can also place the Epiano slightly behind the main vocals at center (as fundamentals), switch mute the filter of the piano in solo mode or when main vocals are sounding.
Quality: A famous Epiano is the Rhodes Epiano. Less difficult to master inside a mix. Roll off some highs when needed for distance.
Reduction: Depending mixing purposes, we can address two situations. First we have a mix where already Basedrum and Bass are fundamental instruments playing. For the Bass range to stay clear, we can cut a lot from 0 Hz to 120 Hz out of the bottom end of the Epiano. Second, we have no Basedrum or no Bass playing, or are both absent, thus the Epiano can be more fundamental, we can leave some lower frequencies inside the spectrum and be more careful rolling of the highs (keep them upfront). Anyway a good EQ cut from 0 Hz to 30 Hz (50 Hz) is always applied. Still we like to roll off all frequencies lower then < 120 Hz when not fundamental.
Reverberation: Depending on stage planning, we can add some ambience reverb for upfront, and depth by using a larger reverb. Maybe use some delay instead (especially when needed upfront).
Delay: Delay can work out better and makes any instrument stay more upfront, as it tends to keep upfront, a reverb will draw more to the back. Delays are more clear and less muddy/fuzzy, so this helps again to make it stand upfront but still have some space.
Organ.
Panorama: Organ alike piano and Epiano can combine together, maybe placing organ left and (e)piano right. Counteracting is common, placing left or right. Remember that organ when using a rotary effect (Leslie effect) can move inside the panorama. Keep track of where the organ is supposed to be placed according to your stage planning.
Frequency Range:
Roll Off, 300 Hz, Lowers Power.
Boost, 2 KHz to 3 KHz.
Quality: Bottom at 80 Hz to 120Hz, body at 240Hz, presence at 2.5 KHz. Roll off some highs for distance.
Reduction: For the Bass range to stay clear, we can cut a lot from 0 Hz to 120 Hz out of the bottom end and bass range.
Reverberation: Depending on stage planning, we can add some ambience reverb for upfront, and depth by using a larger reverb. Maybe use some delay instead (especially when needed upfront).
Delay: Delay can work out better and makes any instrument stay more upfront, as it tends to keep upfront, a reverb will draw more to the back. Delays are more clear and less muddy/fuzzy, so this helps again to make it stand upfront but still have some space.
Keyboards
Panorama: More left or right, we use counteracting and our stage plan to decide where to place these instruments. Keyboard often sweep in panning, just keep them out of center, reduce the lows. More left or right but maybe use some stereo expander when they are more fundamental.
Quality: Keyboards usually can play lots of different instruments altogether. Keyboards always use a low-cut filter anywhere between 50 - 150 Hz. Lookout for DC offset and remove it.
Reduction: Dividing each keyboard instrument and giving them a separate track makes the mix more adjustable. Depending on the instrument played by the keyboard, decide what to do. Playing a Bass or Piano, Epiano or Synth, Brass, with a keyboard is deciding where their frequency ranges are. Cutting still from 0 Hz to 50 Hz is always applied, but still leaving the Bass range alone we should cut towards 120 Hz or even higher. Also we could control the trebles to set some distance according to individual stage planning of each instrument. Sometimes keyboard can play bass or Basedrum (drums), then we will refer to them as bass and drums and react alike (making then fundamental instruments). Sometimes keyboards can play percussive instruments; we react accordingly as if they were real percussive instruments.
Reverberation: For Background Keyboards or background sounds (Group) use a Large Reverb with a pre-delay of about 25ms (Check the snare reverb for starters). Use an EQ to roll off the highs strongly and the reverb sends all to the back in distance. Maybe a Modulation delay. Use a hall reverb for starters.
Delay: Delay can work out better for keyboard that must stay upfront, as it tends to keep upfront, a reverb will draw more to the back. Delays are more clear and less muddy/fuzzy, so this helps again to make the keyboards upfront but still have some space.
Synthesizers.
Panorama: Panned more left or right, we use counteracting and our stage plan to decide where to place these instruments. Synths can play bass sounds as well, so decide on tactics according the instrument sound. For a good wide sound on synths and guitars, use a double track recording, record twice and pan left and right, the slight nuances in playing make it very wide.
Quality: There is no best synth. Synthesizers usually can play lots of different instruments altogether, mostly analog or digital artificial sounds. Synths, leads (100 Hz cut), pads (400 Hz cut) and strings (1 KHz cut). Cut high frequencies of every synth instrument (12 KHz - 20 KHz).
Reduction: Dividing each instrument and giving them a separate track makes the mix more adjustable. Depending on the instrument played, decide what to do, deciding where their frequency ranges are. Cutting still from 0 Hz to 50 Hz is always applied, but still leaving the Bass range alone we should cut towards 120 Hz or even higher. Also we could control the trebles to set some distance according to individual stage planning of each instrument. Sometimes a synth can play bass or Basedrum (drums), then we will refer to them as bass and Basedrum and react alike (making then fundamental instruments). Sometimes a synth can play percussive instruments, we react accordingly as if they were real percussive instruments.
Compression: Most synthesizers don't need compression, be scarse. Analog filter sweeping can be compressed for peaks with a ratio of 4:5 to 6:1.
Reverberation: Adding delay can support the synth sound to become more natural and fitting inside a mix, used as a creative effect. To set the distance we could roll off some highs. Maybe a Modulation delay. To thicken synth sounds, try a bright reverb with predominant early reflections. A short, high level reverb makes the synth sound like multiple instruments in an acoustic space. Use a hall reverb for starters.
Delay: Delay can work out better and makes any instrument stay more upfront, as it tends to keep upfront, a reverb will draw more to the back. Delays are more clear and less muddy/fuzzy, so this helps again to make it stand upfront but still have some space.
Violins.
Panorama: Depending on the frequency range of alt-violins and the higher violins we place them more outwards (according to panning laws. As for modern pop music we might set all strings behind the drummer, spreading them out in panorama (stereo expander). Leaving the viola’s and cello’s more centered. The violin and alt-violin more outwards. For a more classical approach use the orchestral stage plan to place all stringed instruments.
Frequency Range:
Violin Note Range: 195 Hz (G3) to 3136 Hz (G7).
Viola Note Range: 131 Hz (C3) to 2093 Hz (C7).
Cello Note Range: 65 Hz (C2) to 1047 Hz (C6).
Roll Off, 0 Hz to 120 Hz (180 Hz), Reduction, Separation.
Around, 200 Hz to 500 Hz, Fullness.
Cut, 800 Hz to 1 KHz, Recession.
Boost, 5 KHz to 10 KHz, Clarity.
Between, 7.5 KHz to 10 KHz, Scratchiness.
Between, 10 KHz to 16 KHz, Air, Sparkle (if present).
Roll Off, 10 KHz, Distance, Reduction.
Quality: Fullness at 240 Hz, scratchiness at 7.5 KHz to 10 KHz. Roll off highs for distance.
Reduction: Cutting a lot of lower frequency range 0 Hz to 120 Hz (195 Hz), but not harming the main frequency range. Viola's and cello’s have a lower frequency range, so we might cut a little less 0 Hz to 120 Hz. Still we like to cut all rumble and lower frequencies, also rolling off highs to set them behind the drummer.
Reverberation: High pre-delay for strings can send them assigned to the back, to the back rows and roll off the highs of the reverb can set even more backwards.

Brass.
Panorama: Horns, Trumpets, Trombones and Tuba. Depending on their frequency range and placement, decide where they fit in. Scattered across the whole panorama. Placing lower instruments more centered and higher instruments more outwards (panning laws).
Frequency Range:
Trumpet Note Range: 115Hz (E3) to 1047 Hz (C6).
Trombone Note Range: 82 Hz (E2) to 698 Hz (F5).
French Horn Note Range: 65 Hz (C2) to 698 Hz (F5).
Tuba Note Range: 37 Hz (D1) to 349 Hz (F4).
Piccolo Note Range: 587 Hz (D5) to 349 Hz (F4).
Flute Note Range: 262 Hz (C4) to 2349 Hz (D7).
Oboe Note Range: 247 Hz (B3) to 349 Hz (F4).
Clarinet Note Range: 147 Hz (D3) to 349 Hz (F4).
Alto Sax Note Range: 147 Hz (D3) to 880 Hz (A5).
Tenor Sax Note Range: 98 Hz (G2) to 698 Hz (F5).
Baritone Sax Note Range: 73 Hz (D2) to 440 Hz (A4).
Bassoon Note Range: 62 Hz (B1) to 587 Hz (D5).
Cut, 0 Hz to 120 Hz (180 Hz), Reduction, Separation.
Between, 120 Hz to 550 Hz, Power, Warmth, Fullness.
Between, 1 KHz to 5 KHz, Honky, Contrast.
Between, 6 KHz to 8 KHz, Rasp, Harmonics, Solo.
Between, 5 KHz to 10 KHz, Shrill.
Roll Off, 12 KHz, Distance, Reduction.
Quality: Fullness at 120 Hz to 240 Hz, shrill at 5 KHz to 10 KHz. Roll off some highs according to distance.
Reduction: For the higher instruments alike trumpets and some trombones, cut a lot from 0 Hz to 180 Hz. As for lower instruments alike Tuba and Horns cut a lot from 0 Hz to 120 Hz. We do not like the brass instruments behind the drummer, so do not roll of too much.
Compression: The trumpet is by far the loudest of the horns, with a large dynamic range that can reach from soft melodies up to stabs and shouts, not so constant overall levels. When dealing with EQ and compression, you'll often deal with the horn section as a single unit (Group). Apply a good amount of compression on peaks, but stay away from really compressing the main parts.
Reverberation: There's something that adds to the excitement of a horn section when you hear it from a distance, when it's interacting with the room. We tend to use a more roomy reverb sound, hall. Reverb and delay work very well with horns.
Orchestral Instruments
Recording: Orchestral instruments are so many, only composition wise and arrangement can help to keep pathways clear.
Panorama: According to stage position.
Frequency Range:
Harp Note Range: 65 Hz (C2) to 2794 Hz (F7).
Harpsichord Note Range: 44 Hz (F1) to 1319 Hz (F6).
Xylophone Note Range: 392 Hz (G4) to 2093 Hz (C7).
Glockenspiel Note Range: 195 Hz (G3) to 349 Hz (F4).
Vibraphone Note Range: 175 Hz (F3) to 1397 Hz (F6).
Timpani Note Range: 73 Hz (D2) to 262 Hz (C4).
Marimba Note Range: 65 Hz (C2) to 2093 Hz (C7).
Quality: Keep track of the Note Ranges.
Reduction: Cut below lowest note.

Vocals.
Record doubled takes. Use low in the mix so it is not obvious. Timing is important, so maybe manually edit the audio. The different doubled takes can differ in tuning and vocal quality, but most of the time does not need to be returned at all Many modern engineers are using auto-tune processing such as Antares Autotune on almost every vocal. We're not saying it's the best thing to do, we are just saying that it is extremely common. Main Vocals are placed at center and upfront, dead in front of all fundamentals and not fundamentals. Maybe have two different copies running at left and right (doubling), still this must result in centered main vocals (avoid swaying around). A good trick is panning duplicates of the vocals left and right. You can invert the right signal for a real dramatic effect. Also pitch shifting left -4 and right 4 can make a more dramatic effect. But however the vocals should align to center always. You can use all kinds of EQ, when the vocals are monophonic (like al single vocals are) use a dynimic EQ that is for monophonic instruments, these EQ's follow the notes and frequency and cut the same amount as other notes and can make the vocals way more steady.
Top End Boost (Highs) is perhaps the easiest and fastest way to make a vocal sound expensive. When using a more affordable microphone, you can simply boost the highs to replicate this characteristic. The best way to do this is with an analogue modelling EQ. Use a high shelf, and start with a 2dB boost at 10kHz. Experiment with the frequency and amount of boost. You can go as low as 6kHz (but keep it subtle) and boost as much as 5dB above 10kHz. Just make sure it doesn’t become too harsh or brittle. When you start boosting the top-end, the vocal can start to sound more sibilant. To counteract this problem, a de’esser can be used. These simple tools are a staple of the vocal mixing process, and required in at least 80% of cases. If you’re recording in a room that’s less than ideal, room resonances can quickly build up. Find these resonances using the boost-and-sweep technique and then remove them with a narrow cut. For a modern sound, the dynamics of vocals need to be super consistent. Every word and syllable should be at roughly the same level. Most of the time, this can’t be achieved with compression alone. Instead, use automation to manually level out the vocal. I prefer to use gain automation to create consistency before the compressor. But regular volume automation works well too. Using a limiter after compression is another great way to control dynamics. You don’t need to be aggressive with it (unless you are going for a heavily compressed sound). Aim for 2dB of gain reduction only on the loudest peaks. As vocalists move between different registers, the tone of their voice can change. For example, when the vocalist moves to a lower register, their voice might start to sound muddy.
Instead of fixing this with EQ and removing the problematic frequencies from the entire performance, you could use multiband compression to control these frequencies only when they become problematic. For any frequency-based problem that only appears on certain words or phrases, use multiband compression rather than EQ. Sometimes EQ alone isn’t enough to enhance the top-end. By applying light saturation, you can create new harmonics and add more excitement. Use a delay for a modern sound, the vocals need to be upfront and in-your-face. Applying reverb to the vocal does the opposite of this, so is undesirable. Instead, use a stereo slapback delay to create a space around the vocal and add some stereo width. Use a low feedback (0-10%) and slightly different times on the left and right sides. I find that delay times between 50-200ms work best.To add more width and depth to the vocal, try adding a subtle stereo plate on the vocal. You don’t want the reverb to be noticeable, as discussed in the previous tip. Instead, bring the wetness up until you notice the reverb, then back it off a touch. Start with the shortest decay time possible and a 60ms pre-delay to give the transients a bit more definition and room to breathe. Another way to give the vocal a bit of depth and shimmer is to apply subtle chorusing. Again, you don’t want the effect to be noticeable. Add a stereo chorus to the vocal and increase the wetness until you notice the effect, then back it off a touch.
Frequency Range:
Vocals Note Range: 82 Hz (E2) to 880 Hz (A5).
Cut, 0 Hz to 100 Hz (120 Hz), Roll Off, Reduction, Separation.
Fullness, 120 Hz.
Male Fundamentals, 100 Hz - 500 Hz, Power, Warmth.
Female Fundamentals, 120 Hz to 800 Hz, Power, Warmth.
Cut, 200 Hz to 400Hz, Clarity.
Boost, 500 Hz, Body.
Boost, 315 Hz to 1 KHz, Telephone sound.
Boost, 800 Hz to 1 KHz, Thicken.
Vowels, 350 Hz to 2 KHz.
Cut, 600 Hz to 3 KHz, Loose Nasal quality.
Consonants, 1.5 KHz to 4 KHz.
Boost, 2.5 KHz to 5 KHz, Definition Presence.
Between, 7 KHz to 10 KHz, Sibilance.
Around, 12 KHz, Sheen.
Around, 10 KHz to 16 KHz, Air.
Between, 16 KHz to 18 KHz, Crisp.
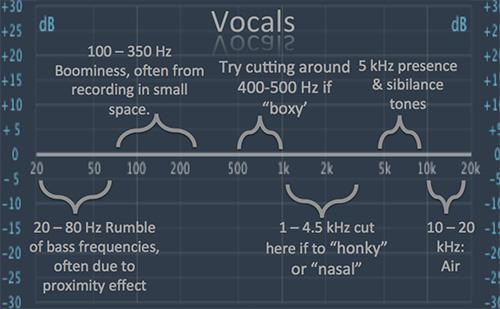
Words:
sAY, 600 Hz to 1.2 KHz.
cAt, 500 Hz to 1.2 KHz.
cAr, 600 Hz to 1.3 KHz.
glEE, 200 Hz to 400 Hz.
bId, 300 Hz to 600 Hz.
tOE, 350 Hz to 550 Hz.
cORd, 400 Hz to 700 Hz.
fOOl, 175 Hz to 400 Hz.
cUt, 500 Hz to 1.1Kz.
EQ: If vocals sound tend to close-up, boost some 120 to 350 Hz. Men range 2 KHz and women 3 KHz, with a wide Q-factor (standard for vocal use). The range trough 6 - 8 KHz are sensitive sibilant sounds to 12 KHz. Boost subtle always. Combining a de-esser can help. Even before EQ look at some manual editing. Wideness and openness at 10 to 12 KHz and beyond. Use a quality oversampling EQ on highs. Sometimes a complete vocal track needs to be processed overall, AAMS Auto Audio Mastering System can help with its reference vocal presets.
Quality: Filtering can make a difference for a chorus section (for instance that is mudded, masked). Boost some, 3 KHz to 4 KHz for our hearing to recognize the vocals more naturally and upfront. Boost, 6 KHz to 10 KHz, to sweeten vocals. The higher the frequency you boost the more airy and breathy the result will be (the more quality EQ you will need). Cut, 2 KHz to 3 KHz, apply cut to smoothen a harsh sounding vocal part. Cut around 3 KHz, to remove the hard edge of piercing vocals. When a vocal sounds boxy, then apply some steep EQ 150 Hz to 250 Hz. This will reduce these levels to unboxy (sounds more open). Boost 2 KHz to 3 KHz (5 KHz) with a low Q-factor to ranging from 1 KHz to10 KHz, to adjust speech comprehensibility. Some slight support here is standard, any microphone will muffle the sound a bit, so we must compensate for this at the 2 KHz - 3 KHz range. Main adjustment ranges, fullness at 120 Hz, boominess at 200 Hz to 240 Hz, presence at 5 KHz, sibilance at 7.5 KHz to 10 KHz. You could add a small amount of harmonic distortion or tape emulation effect. A good trick can be running duplicated manipulated copies of the main vocal left and inverted right, this will be heard in stereo, but not in mono.
Reduction: Roll Off < 50 Hz (< 80 Hz downwards steep), cut below this frequency on all vocal tracks. Use a good low-cut from 0 Hz to 120 Hz. This should reduce the effect of any microphone pops. It is common to use a high pass filter (at about 60 to 80 Hz) when recording vocals to eliminate rumble. The better vocals are recorded, the better they can placed inside the mix. Breathers are a question of style, cutting them is common. If you duplicate a track, do not duplicate the breathers. You can edit out all breathers separately on its own track, and then remove all other breathers from the vocals. Syllables and 'Ts' end sounds (rattleling in chorus) can be faded out. Mostly done by manual editing the vocal tracks. No roll off to make the main vocals even more upfront (keeping trebles intact), roll off background vocals though. When a Main Vocal is not sounding, cut 600 Hz out of all other conflicting instruments except drums. When still having problems do a little more cut at 1.2 KHz, solves all problems. Voice is very easy to make flat, sharp or unnatural, think twice before using EQ. The classical way is to record vocal to tape in Dolby mode, and played without Dolby mode. Digital systems Dolby 740, digital up activator.
De-esser: Expanding or Compressing frequencies between 6 KHz to 8 KHz are in the 'sss' and de-esser range. With a band pass filter. A good de-esser is crucial (extreme reduction, but no ‘ lisp’ effect). You can also edit all 'sss' sounds manually. To make the vocal more open, boost trebles from 10 KHz > (use oversampling EQ) to make them sound upfront. Consider manual editing before using a de-esser.
Tune and Double: Auto tune or tune the vocals. Maybe to original track mixed with the tuned track together, just copy a ghost track and manipulate. You can even use some stereo expansion or widening. When you do not have enough vocals or background vocals, copy them and double / tune / manipulate. Do not widen at copied tracks for main vocals, but you can widen de background vocals with an stereo expander according to panning laws.
Compression: 1176! To make all vocals sit in the mix, we need compression. Mostly compression on vocals can sound loud and hard, it will be fine inside the mix and keeps it upfront. Background choirs can be of many voices, often compressed on a group combined. A fast attack and release, ratio depends on the recording and vocal style. Usually a soft knee compressor. Long attack times for the transients, and release time should be set to the song tempo (shorter then) with little sustain. Vocals now have more presence and charisma, upfront. Start with a ratio of around 4:1 and work upwards for a rockier vocal. Use a fairly fast attack time, release time would normally be around 0.5 sec. A reduction of 12 dB is common for untrained vocalists. Be careful not to over compress, you can always add more later on. A multiband compressor is a good tool for removing unwanted sounds from vocals, use as de-esser for sss sounds, but also for other unwanted frequencies alike pops clicks and some rumble. Also the multibands can be used for different vocal applications. One Band, 0 Hz to 120 Hz, mainly compress for rumble and pops, use a fast attack. Another Band, 3 KHz to 10 KHz, search for de-essing sss sounds. Start with ratio 5:1 to 8:1. Lower the threshold until sss peaks are hit. Another Band, 4 KHz to 8 KHz, can be used for presence with light ratio's 1:5 to 3:1.
Compressing the room mics can make your rooms sound huge and add a lot to your mix. Some heavy compression can sound quite interesting as long as your not making it too noticeable. Combining this compression to some moderate saturation can make your mixes jump out. Also, some long decaying reverb can sound interesting. Ultimately it makes the room sound bigger and more acoustically pleasing.
Reverb and delay: Using a large reverb on main vocal is not allowed, it is less direct, the singer will sound backed up. Use small room or ambient reverb, be subtle, making the listener not aware of them or noticeable. Combined with bigger rooms and delay, help make the vocals sound fuller without pushing them backwards. Delay, instead of reverb. A delay can make main vocals fuller, without placing them further back on the stage. The more delay used, you must pay attention to the center placement of the lead vocals. Use the goniometer.
Reverberation: Reverb for the lead vocals tend to be dry, require a high-quality oversampling device to prevent them from being pulled into a cloud of reverberation. You need a small, unobtrusive reverb with attributes similar to a drum booth. Often combined with a delay works well. That might blur less than a medium reverb. A delay might be far better on main vocals, especially when you need then to be upfront as in most cases. A delay tail on the front vocals, make the vocals appear with more warmth and appear fuller. Without putting the frontal placement into danger mode (panorama). The more the delay is appearing in the mix, the more it will cover the vocals, using ducking (side chain or not) on the first part of the vocals (transients and a little sustain part) can free up and loose some fuzziness. Record vocals dry and you can apply reverberation in style later on. Use a large amount of small room reverbs on the main vocals, instead of using a larger size reverb. Or double the main vocals. Add one track with a small room reverb. Add another with a bigger room trough a delay (1/4 step) and a gate to stay in rhythm (1/4 step). Maybe use a spaced echo. Anyway it is better to not clutter the vocals with on top reverbs and delays after each other (serial). Separate all reverb channels here (parallel), containing dry signal and reverbed signals. Sometimes expand the reverb or delay outwards. For Main Vocals (Single Track or Group) a vocal room, drum booth or small ambient reverb. Bright reverbs can sound exciting, but emphasize sibilance. No pre-delay to set the vocals upfront. Combining with a delay, using a medium reverb might be just too much. Main Vocals - Try to use a Stereo Reverb with delay tail for the main vocals, place the reverb a little hidden. You might solo the reverb and listen to it and find it a bit loud. Within the vocal mix it might be just right, so don’t be scared by this effect. The dry vocals will mask the reverb a bit. To place a choir into the back requires a long reverb, with a bit of pre-delay and damped high ends. The reverb can be set quite high for our ears to accept the 3d spatial information and fight the masking effect. Experiment with a stereo expander in the reverbs return. For Vocals delay can give more depth and placement inside a mix. Use a stereo delay to add small amounts of delay (around 35 ms), watch out for correlation effects.
Delay: Delay can work out better and makes any instrument stay more upfront, as it tends to keep upfront, a reverb will draw more to the back. Delays are more clear and less muddy/fuzzy, so this helps again to make it stand upfront but still have some space. Lead vocals reverb and delay, it’s all about the mix. Create a dry counterweight by doubling the lead, add EQ, compression maybe a short delay, mix it back in. This way the lead vocals are not pushed back too far, but at the same time sound fatter. A little stereo reverb with delay tail for the vocals may work.
Offside Vocals.
Panorama: Sometimes a main vocal singer is accompanied by one or more vocalists. Mostly placed more left and right from the centered main vocals. According to their stage position. As long as you counteract and balance the stereo field, both speakers are playing the same kind of vocal loudness. The background vocals are spread by panning laws, lower voices more in the middle and higher on the outsides. Basically the settings for these accompany vocals are the same as for the main vocals.
Background Vocals or Chorus.
Panorama: The chorus is always arranged that the higher voices are more outside and lower voices more centered according to panning laws. Use a stereo expander for the chorus to widen even more. Also there are effects that can double or harmonize vocals.
Quality: When a vocal sounds boxy, then apply some steep EQ 150 Hz to 250 Hz. This will reduce these levels to unboxy (sounds more open). Boost 2 KHz to 3 KHz (5 KHz) with a low Q-factor to ranging from 1 KHz to 10 KHz, to adjust speech comprehensibility. Some slight support here is standard, any microphone will muffle the sound a bit, so we must compensate for this at the 2 KHz - 3 KHz range. For bigger chorus you can duplicate tracks and use some automatic tuner, pitch or any modeler, thus slightly changing the color of each copy. Chorus can be layered on several tracks, as for recording chorus maybe 4 to 16 (or more) vocals could be used to generate a nice sounding chorus section. The more natural vocals sound the better. Roll of some great deal of highs for distance, set them at the back of the stage.
Reduction: Use a good low-cut or roll off 0 Hz to 120 Hz. To make the chorus more distanced, lower trebles from 10 KHz > to make them sound at the back of the stage (behind the drummer).
Pitch Shifter : A real-time pitch shifter set to shift -4 and 3 panned more left and right, can be used for doubling and creative effects. Also pointing out doubling, harmonizing and special vocal effects alike the vocoder or voice changers.
Reverberation: Backing Vocals are placed toward the rear, a large reverb with some pre-delay and filtered trebles. Reverb can be generously applied here, so the masking effect will stay away or is overpowered by reverb and brings over the 3d spatial information.
Record vocals dry and you can apply reverberation in style later on. For Background Vocals or Choirs (Group) use a Large Reverb with a Pre-delay of about 25ms (Check the snare reverb for starters). Use an EQ to roll off the highs strongly and the reverb sends them all to the back in distance where they belong. High pre-delay for choirs can send them assigned to the back, to the back rows. Try sending the background vocals to a group track. Set a compressor that compresses the loud section, but leaves the quiet ones uncompressed. When this is used to feed a reverb the loud sections will be dryer and the softer sections wetter.
De-esser: Frequencies between 6 KHz to 8 KHz are in the 'sss' and de-esser range. A good de-esser is crucial (extreme reduction, but no ‘ lisp’ effect). You also edit all 'sss' sounds manually.
Static Mix Reference.
Reading up to here, you should have enough information to finish off the Static Mix as a reference for furthermore mixing. Using the dimensions, quality and reduction. As well as finding some stability with separation and togetherness. Unmasking as much as we can to have clear pathways and at the same time save some headroom. Until now we have discussed first the Starter Mix progressed towards a finished Static Mix. Basically called static because after setting up there is no automatic timeline movement of knobs, faders and settings in the timeline of the mix. In the Static mix, we have setup quality, separation (headroom) and the three dimensions (stage plan). We have discussed why it is better to start with dimension 1 and 2 (starter mix) before starting with dimension 3 (static mix)). We would like to finish off dimension 1 and 2 as well as dimension 3 for a good static mix to finish off. Again the Static Mix is our reference point for furthermore mixing purposes, so we need to be sure we have done our very best to get the highest possible result before we progress mixing more dynamical. Now is a great time to just listen, correct until your completely satisfied. Waiting a day and resting our fatigue ears might be a good idea for a last later on re-check. Be 100% sure you have finished a good reference static mix, or else re-check or re-start, before progressing...
Dynamic Mix.
The rest (after finishing off the static mix reference) is dynamic mixing. Dynamic mixing is taken in account events that can happen suddenly or on a timeline throughout the mix, then most likely will return to static reference mixing levels. Mostly digital sequencers offer a lot of automation possibilities. For controlling some outboard equipment alike a control mixer or plug-in, controllers can help to automate easier. Understand that dynamic mixing is influencing all time lined events, even if this is just hitting the mute button while recording and automated mixing. The mute button can be handy for a static mix, we still see them when used automated as dynamic events.

Automation.
One important thing to know beforehand is that automation should only take place when you are finished setting up the starter mix and static mix. Adjusting Fader, Balance, EQ, Compression, Gate, Limiter, Reverb, Delay as well as setting up routing, the three dimensions for each instrument, leaving some headroom by separation and togetherness as a mix. This can be seen as fiddly jobs that can take hours, it is. Well most of this Starter to Static mixing is technique. Understanding the material you are working on. Be happy with the Starter Mix and Static Mix before entering Dynamic Mixing (Automation). Often starting to soon with dynamic mixing will mean you need to adjust the Static Mix or even adjust the Starter Mix in a repeated kind of fashion. This is basically not allowed, but sometimes necessary for correcting our mistakes. Better nit to make these kind of mistakes. When adjusting the Dynamic Mix, you might get into an endless loop of adjusting. You will notice that you are swapping between both worlds (static and dynamic), constantly making corrections. It is better to first have the starter mix and static mix completely finished off and then go on to dynamic mixing. When you think dynamic mixing is not needed, we all commonly think different. But dynamic mixing can take longer than a starter mix and static mix altogether. When you have spent up to 4 hours for a static mix, expect dynamic mixing will take up to 12 hours.
Automation Events.
Let's begin by getting clear on what we mean by 'effect': an effect is a device that treats the audio in some way, then adds it back to a dry or untreated version of the sound. Echo and reverb are obvious cases, and you can use pitch-shift and pitch modulation in a similar way. 'Processors', by contrast, generally are those devices that change the entire signal and don't add in any of the dry signal. Things like compressors and equalisers fall into this category: as you'll see from the tips and tricks, processors can often be used as effects in their own right, or as part of an effect chain, but until you know exactly what you're doing and what the consequences are likely to be, it is a good idea to stick to these guideline definitions, as they dictate how you can connect the effects into your system. If a device has a Mix control on it that goes from 100 percent wet (effect only) to 100 percent dry (clean only), then you can be pretty sure it is an effect. If it doesn't have a Mix control, and doesn't rely on electronic delays to create its results, then it is probably safe to assume it is a processor. Effects can be connected via insert points, or the effect send and return loop that is included in most consoles and DAWs (Digital Audio Workstations). When effects are used in the send/return loop, their Mix control should be set to 100 percent wet, so you add back only effected sound to the dry sound, which comes directly through the mixer channel.
Processors, on the other hand, comprise an entirely different water heating appliance filled with piscean vertebrates, as they tend not to need any of the dry sound, other than in a few specialist applications. As a rule, processors such as EQ and compression are connected only via track, bus or master insert points — at least until you have the necessary experience to understand why you might want to break the rules once in a while. Having got that off my chest, let's look at some specific effects (we'll look more closely at processors another time).
We can do so much with automation to make a mix stand out more, we will not discuss every aspect, we only discuss a few often used automation tricks:
1. Introducing new sound events, new instruments or new tracks. Automating the instrument fader level can do some good sound information tricks. Let's say you have a Mix running (playing) and at a certain timeline a guitar starts to play solo. New instruments (alike this guitar solo) can be introduced at a louder level at the start of the first introduction (let's say 1 bar in the tempo line or timeline). Then we will reduce the solo guitar instrument to its normal level. Our hearing will accept newly introduced instruments better (spatial information) when the transients at first are a bit louder than normally played. When the solo guitar plays onward automate back to its normal operating level. Normally this louder setting for 1 to 3 seconds will make our hearing accept the solo guitar (reconization). This can be done by setting the Fader of the Solo Guitar (Static Mix Reference) and then automate the louder timeline event parts.
2. Whenever we need more Emphasis on a part of the mix. Sometimes a chorus or verse will be a bit overcrowded, this can make this part of the timeline a bit misunderstood. For instance on the chorus or verse of a song maybe other instruments (not fundamentals alike drums or bass) do not come out clearly. A good trick is to automate the whole drum group, setting a lower level while playing the chorus or verse part. Or maybe automate the main vocals level a bit louder instead while playing the chorus or verse. Also maybe just automate the reverb section of the drum and bass to a lower level setting while playing chorus or verse.
3. Arranged fade-in and fade-out on single instruments or tracks. When you need to fade-in or fade-out a whole mix, leave this for the mastering stage. We do not usually fade when a mix starts or ends. Also we never automate the master track. So what is left is automation fades to make individual instruments or tracks fade-in or fade-out in a certain way. This is purely based on the material and creativeness.
4. Panorama automation. When single spots appear obscure (alike when main vocals clash with the chorus section). Sometimes while playing a mix certain events just seen to clutter, hiding behind other instruments (masking) or any other reason to shortly adjust the panorama. By doing this we can make some time lined panorama events by automation to avoid instruments overcrowding or masking. Sometimes we need to move a reverb or delay for unmasking them for a short while to make then heard better. You can correct this situation only in the timeline part where this occurs, you can just shortly pan one instrument more left or right, and then returning to its static mix position. The use of an automated stereo expander can do a wonderful job, without touching the panorama setting. When for instance the main vocals clash with the chorus vocals, maybe a little automation on the stereo expander of the chorus vocals can do the trick of unmasking. Also automated widening / expanding effect can help.
You can only correct automation by using automation. We always return to the static mix reference level. Whenever you have automated a fader for instance, you can only correct this by automating it back to the original static level. Setting the main vocal fader (as we do in the starter / static mix) does correct the level, but when we have automated this fader already, this setting will be overruled by the automation. Once you start using automation, you can only correct it by automating more timelines or just edit the automation. Stay away of changing the static mix and always use them as reference. Don't use an offset while automating. Maybe now you understand why finishing of a Starter Mix or Static mix first is important as reference, before starting with Dynamic Mixing (Automation). Automation or dynamic mixing can be time consuming and maybe takes three times as much as finishing off a Starter Mix or Static Mix. But can be very rewarding and creative. Take as much time to correct little instances. Do not add more effects until later on. First we try to correct the static mix with automation, before we will add.
Mixing and Listening, finishing up a completed mix.
After basically starting a mix and finishing a static mix, progression of a dynamic mix, here we will explain some more technique and effects. For furthermore mixing some more creative aspects will be discussed, alike automation and finishing a mix. Don’t start with automation before ready with a coherent static mix, the static mix is your reference for level, pan, dimensions, your stage plan. Each time using automation, keep in mind the reference static mix setting and return to these settings when the automation part has passed. The static mix provides the basement, the floor plan or stage plan, the foundation of a house, and is called static because from the listeners point of view instruments tend to be in the same location with the same amount of level, pan and dimension.
Tempo.
The tempo is a measure for the rhythm, how fast or slow a track is playing. The tempo is mostly set by the drums or the drum player. Drums are used to define tempo and rhythm. The drum player transfers the tempo and rhythm to all other players. Specially in digital mixing or in sequencing the tempo is unattended by beginning users. Mostly set and forget. But in real life the tempo of a playing band or group of instruments will vary. When sequencing or mixing tempo can be of importance to betray the listener in a rhythmic sense, for this we use a timeline. For instance making the chorus slightly more up-tempo can create a sense of stronger listening, what can be of need to make the chorus stand out a little. Varying the tempo up down 5 or -5 BPM by automation on the correct timeline inside the mix, can create a more natural listening feeling. Knowing something about the song, track or mix intensions and knowing a bit about the composition or have the composer in place can be of importance when setting tempo. Tempo can drag (slower) or tighten-up (faster). Also used as a measurement for effects alike delays synchronizing to tempo can be of importance. Especially the rhythmic instruments like percussion drums must be watched according to tempo. It could be handy to know the delay time, when a reverb or delay placed on a snare, how long the snare can die out, until the next snare hit comes. Sometimes in sync with a bar or beat. Avoiding a reverb to overleap the next hit, give rhythmic percussive instruments a short reverb or use a gate after the reverb. Adjust the effect to fade before the next hit, bar or beat starts.

Some calculations can be made beforehand. For instance 12 Bars filled with each 22 Seconds refers to (12* 240/ 22) = 130.9 BPM.
To calculate delay in milliseconds 60000 / BPM = Delay time in ms.
(60 / tempo in BPM) * 1000 ms = Delay time in ms.
(60 / tempo in BPM) * 1000ms * 0.75 = Dotted Note.
(60 / tempo in BPM) * 1000ms * 2 = Half Note.
(60 / tempo in BPM) * 1000ms * 0,666 = Crotched Triplet.
Pitch and length can be adjusted on digital systems without lowering the tempo. The tempo can be adjusted without adjusting the pitch. Or otherwise adjusting the pitch without adjusting the tempo. Some DJ equipment depend on the BPM, pitch and tempo calculations and automated software, that could not be done on a normal vinyl pickup record player. To sync BPM of two recordings is calculation and skill that DJ's did when they did not have digital equipment at that time. Now days a computer (digital system) can do this job, leaving space and time for the DJ to be creative. Midi becomes more important to tempo, as notes are placed in measures and bars of music, controllers do use mostly midi information. The resolution of mid is mostly set at 384 ticks for a single bar of music notation. 192 ticks form half a bar. 96 ticks form a quarter of a bar. (48 = 1/8, 24 = 1/16, 12 = 1/32, 6 = 1/64).
Mix Pix, fight the pix.
For removing pix peaks. Use Stereo Compressor or Brickwall limiter. The peak Pix size is about < 40 Samples long. Use Peak limiters just so that the Pix peaks disappear, visualize with a sample display plugin.
Saturation and Distortion.
Yes, saturation is a pleasing mix colouring tool, but its real genius is its ability to craft texturally interesting sounds that grab the listener.
All of those tubes and transformers in the signal path, not to mention the tape itself, had pronounced effects on the sounds that passed through their circuits.
In particular, the transients those superfast bursts of energy at the start of every dynamic envelope in a sound.
Were shaved down a little at a time by each part of the signal chain, becoming rounder, smoother and softer with every step.
This rounding of the otherwise spikiest, loudest transients is one of the main reasons that sounds which pass through a lot of analogue kit tend to be more well-behaved and quite often easier to mix.
What’s more, in order to make the signals louder than the noise and hiss created by all this gear, the engineers tended to run the levels as hot as possible, which pushed the tubes and transformers to their limits. The result? For every musical note and overtone in the original sound, new notes and overtones rose out of the depths in the form of harmonic distortions. Basic physics dictates that the harder a circuit is pushed, the more prominent the added distortions become, meaning generous amounts of harmonic distortion throughout the mix. We call these added overtones harmonic distortions for a reason, they are harmonically aka musically related to the original notes and overtones within the undistorted sound.
Since this harmonic distortion is inherently musical, people tend to describe its sound in terms like euphonic, rich and warm.
The merging of the two aforementioned effects transient rounding and harmonic distortion adds up to the beautiful phenomenon that is at the heart of my own artistic and sonic life, saturation.
For starters, with all those additional harmonic overtones in play, your EQ literally has more sound to grab within a given swath of frequencies.
So if you’re looking to enhance a vocal’s forwardness in the mix by boosting 1 kHz, there’s going to be more vocal character and personality packed into every decibel boosted, because the sound itself is more dense, vibrant and electric.
Put another way, you won’t just get more vocal presence, you’ll get a more interesting vocal presence. That’s the kind of subtle thing that, when multiplied across 16 or 83 tracks, adds up to something much more compelling than a simple sum of the parts.
Secondly, in dance music, which relies so heavily on the sound of smashed transients for emotional impact (the splatting ‘doosh’ of the snare, the pumping ‘oomph’ of the kick).
Saturation can help solidify sounds. Shaving a fraction of the transient off the front edges of your sounds gives the compressors more room to breathe.
It gives them more controlled signals to work with. This is especially true of percussive sounds. And by that I don’t just means drums, I mean stabbing keys, plucked arpeggios, basslines, exotic stringed instruments.
Any sound that comes on fast and hard, and where the beginning of the sound has far more amplitude than the sustain. Think of it this way: if the sound you’re feeding into a snappy compressor is already smoothed on the front edges, the device won’t have to sweat a bunch of fast impulses that are, relatively speaking, out of proportion to the bulk of the energy they’re trying to shape and control.
Saturating a sound after compression allows you to dial in even more colour. Saturation is a formidable and often underused tool in the mixer’s arsenal. It enhances and even creates new textures in a source, and it allows for a finer degree of control over transients. As such, it can have a powerful effect on the overall clarity and punch of the mix, which in turn can make the difference between a production that merely sits at the edge of the speakers and one that physically jumps out of them.
When you use your tools like that, when you can make texturally interesting sounds and get them to jump out of the speakers and grab someone’s attention.
You’ve gained tremendous ground in the battle for the listener’s hearts and, ultimately, their love for the music.
Reverse Reverb
An enduringly popular effect, with all sorts of uses for vocals, drums, guitars and synths, is genuine reverse reverb. This is where a reverb tail appears to increase in volume ahead of the sound that gives rise to it — a completely unnatural sound and something that's impossible to create in real time. It's easy enough to do in a DAW application though. First, find the section of audio you want to treat and reverse it. In the DAW I use, Digital Performer, there's an offline plug-in for this. Now apply conventional reverb to this 'backwards' audio — either by playing it through a reverb plug-in and recording it to another track, or by rendering it using an offline process (if your DAW offers this). In either case make sure you allow enough additional time at the end of the audio to capture the full, final reverb tail. In the screen grab I've done this by allowing 1500 milliseconds of post-roll processing. Then, reverse the resulting audio. The original audio plays correctly once more, but the reverb you just applied is reversed. You may need to manually realign the audio in your track, to accommodate the extra length of the first reversed reverb tail.
Stereo Expander.
Mostly used in panning law situations when the sound even needs to be more outwards. Check the correlation meter or goniometer. It is better to place widening effects on groups. Never control panning trough groups, only by its individual channel. Never control straight panning or expanding with automation, just small panning and expanding settings for clearing a mix temporarily then setback to the original static mix reference value.
Effects.
The range of available effects now days is vast, big and versatile. We cannot inform about every available effect over here, but we start off with the most common ones. Some music styles are soly generated by the cause of effects. Some instruments or sounds are soly generated by the cause of effects. Although we have discussed EQ, Compression, Gate, Limiter, Delay and Reverb before, all effects are of importance. An effect behaves by changing the dry input signal. So we could even say fader and panning are effects, but we will not for this mixing example. We have discussed effect placement on single tracks, group tracks and send tracks, as well as pre-fader and post-fader. Panning laws, dimensions, etc. Experience and knowing what can be used and where to place an effect is important. Experiment and learn, learn from others work and experience. Always stay at bay for correlation, masking, separation and togetherness. Use effect to manipulate original sound or to manipulate the dimensions (stage plan) at first. Be creative but try to remember the mixing rules.
Effect Tools.
Tough fader and balance are not really effects; they are tools of a mixer. But EQ, Compression, Gate and Limiter are effect tools we commonly use in mixing. Especially for the purpose of Quality, Reduction and the Three Dimensions (Stage Planning), these tools are commonly used. Some more tools are Dynamics, DE clicker, Denoisers, Expanders, Harmonics and Exciters. When we are looking for separation, togetherness, quality, reduction or stage planning inside the three dimensions, we can first address these tools.
Effects Based On Nature.
Most common are Reverb and Delay. Sometimes Echo, Pitch and Stereo Effects could be used. Basically nature effects have to do with depth and distance (location). For dimension 3, to have any effect on the listener for measuring distance or depth, we need dimension 1 (balance) and dimension 2 (frequency spectrum) in place. Finally when setting dimension 3 with an effect (especially reverberation), makes our stage planning come to life. Pre-delay is an important factor for setting distance, as well as rolling off some high trebles (in dimension 2). For as our hearing perceives the first returns of reverberation of the dry signal and the amount of high trebles as distance. The reverberation by itself is mostly causing our hearing to recognize a room or space.
Effects Based On Artificials.
The biggest group. Some we do explain and discuss over here. Some common examples are Flanger, Phaser, Modulation, Filters, De-Esser, etc. But this group of effects is so vast and versatile, we cannot even name or discuss them all. For instance the Flanger and Phaser are basically originated from reverb or reverberation. But a flanger and phaser use such small time settings, they are normally not produced by nature. Basically when effects can be used for being creative, we place them in this artificial group. Effects that perceive distance or depth can reside in the Effects based on Nature. And effects that can be used as common mixing tools can be placed in the Effect Tools group.
DE clicker.
A DE clicker is used for removing clicks and scratches. More common on single instruments or single tracks. Also mostly used by processing audio offline. As a nasty outcome, the DE clicker by its setting can generate clicks. So watch out. DE clickers can have well to very bad results, only use them when they work. Sometimes it is easier to remove clicks by just cutting them out of the audio (manually). Use a gate to remove long standing clicks.
Denoisers.
A denoiser used for removing noise. At first this effect might seem a solution for noisy recordings, but still far better not to use. Do not process anything until you are certain the denoiser removes the right kind of noise and does not take away more in its path. Mute or solo listen, listen to the mix. You might hear that the denoiser is doing its job a little bit too much, and then adjust the denoiser until it only removes the noise you want. If a denoiser does not work, don’t use it. A lot of mixes or commercial recordings contain noise, so don't worry that much. Also background noise can enhance the mix and contains 3d spatial information, better not to delete at all. By using the denoiser on a master track for instance, might remove the depth you are working on for so long to create. So do not use a denoiser on a full mix. For a denoiser it is easy to remove the 3d spatial information that is resting in the background (-60 dB). Just in some cases where the equipment just recorded too much noise, use it. Use a gate to remove long standing noise. Better not to use at all, but resort to better recordings at first, use good noise free equipment instead.
Exciters and Enhancers.
Often used by inserting an enhancer to a group track for effects sending. You could send all instruments or tracks that need to be upfront to the enhancer, while keeping out instruments or tracks that are more distanced. When you need contrast inside a mix, exciters and enhancers make a mix sound better and work best on the complete mix or maybe some groups. Stereo Exciters spread the signal, watch the correlation meter. Use exciters scarcely only when you need to influence the sound, when frequency ranges overleap and the mix is dull. Sometimes used after compression and Denoisers, just to enhance the sound a bit back to its original behavior. Still if your ears are fatigue, do not add any of these exciters or enhancers. Then take a good rest and come back later.
Expanders.
The amount of expansion that is applied is usually expressed as a ratio, such as 2:1, 4:1, etc. While the input is below the threshold, a change in the input level produces a change in the output that is two times, four times, etc, as large. Basically this does the opposite work of a compressor, sometimes referred to as de-compressor. So with a 4:1 expansion ratio (with the input level below the threshold), a dip of 3 dB on the input will produce a drop of 12 dB on the output. When an expander is used with extreme settings where the input and output characteristic becomes almost vertical below the threshold (expansion ratio larger than 10:1), this is often called a noise gate.
Pitch shifters.
A more creative effect in pitch and time. Pitch shifting could be used as echo effect when panned L R. When using two pitch shifters a chorus effect can be heard, hard left and right for an all-round sweetening trick. Some pitch shifters have auto harmony functions for vocals. A Full Stop tape effect can be created, when you turn the offset down gradually. Pitch spirals are a 70's thing, bypassing a delay in front or behind the pitch shifter and maybe do some feedback loop. Pitch-shifters work by slicing the incoming audio into extremely short sections (typically a few tens of milliseconds long) and then lengthening each section where the pitch is to be decreased, or shortening each section where the pitch is to be increased. Though cross-fading algorithms and other techniques are used to hide the splice points, most pitch-shifters tend to sound grainy or warbly when used to create large amounts of shift (a couple of semitones or more), though they can sound very natural when used to create subtle detuning effects, using shifts of a few cents. A refinement of the system, designed for use with monophonic sources, attempts to synchronise the splicing process with whole numbers of cycles of the input signal, which makes the whole thing sound a lot smoother but, as soon as you present these devices with chords or other complex sounds, the splices again become audible. Though some sophisticated processors combine pitch detection with pitch-shifting, to generate musically correct harmonies in user-defined keys, simple pitch-shifters always change the pitch by the same number of cents or semitones. In musical terms, that means that only the octaves, parallel fourths and fifths are very useful. Other intervals tend to sound discordant, as they don't follow the intervals dictated by typical musical scales. When using subtle detuning to thicken a sound, I suggest trying values of between five and 10 cents and, where possible, adding both positive and negative shifts, to keep the pitch centre correct. Then combine with the dry sound and adjust the level to control the subjective depth of the effect. This is very effective for fattening up guitar solos or backing vocals. By putting a pitch-shifter before a delay, then feeding some of the output of the delay back to the input of the pitch shifter, you can create delays that keep climbing or falling in pitch as they recirculate. Though not always very useful in a musical context, this effect is often used in TV and film dream sequences. Because large pitch-shifts can sound grainy, it is common to combine the effect with the dry signal, rather than using only the 100 percent effected signal, though ultimately this is an artistic rather than technical decision. Though pitch-shifting is an effect, it is easier to control when used via an insert point. However, if you need to use the effect on several tracks in varying amounts, you can use it via a send/return loop, providing the shifter is set to 100 percent wet. That way, you can adjust the effects depth for individual mix channels by using the send control feeding the pitch-shifter.
De-Esser.
To reduce the ' Sssssss' sounds from vocals. Commonly in the 4 KHz to 8 KHz range. Use scarcely only when the ' Sssssss' sounds are just too much heard, reduce them only a bit, not a lot. A good de-esser will do a good job, a bad de-esser or settings will do a bad job. Try to remove anything manually before using. Works great on vocals though.
Panning.
One special effect I used quite a lot in analogue studios, but which is surprisingly tricky to implement in a lot of software sequencers, is where you feed the left and right outputs of an auto-pan effect to two different effects processors. With this setup, the outputs of the two effects can then be mixed together to create a variety of different modulation-style treatments. This patch always worked well in a send-return loop with a pair of phasers, especially if you also EQ'd the two returns wildly differently. The same setup used as an insert could do great things with distortion and ring-modulation processors, and if you were feeling really adventurous, you could fiddle with the panning rate in real time while mixing down.
Filtering.
Filters are commonly used in dance and house music as a creative tool. Years earlier used to make music alive and have some spacy sounds. Filtering (EQ) is still the best way to solve problems and purposes in dimension 2, the frequency range or frequency spectrum. An EQ is reducing or gaining frequencies. A filter will not reduce frequencies but just leave them intact or just cut them out. Specially used for low and high cuts (reduction). There are many kinds of filters, band pass, low pass, Mids, high pass are common. Modern filters have more tricks like synchronization to tempo or a matrix sequencer. Filtering can make a mix jump out, for instance make a difference to a chorus section that is mudded or masked. As a frequency range tool, filtering with a steep high pass filter or low pass filter is a very common heavy EQ technique. For cutting frequencies below 350 Hz (keeping out of the misery area), or 180 Hz, towards 120Hz (Bass range for Base drum and Bass) or 30Hz (pops, low clicks and rumble) a good high pass filter can be used on all kinds of instruments and tracks. Whenever you need a good roll off, filtering might do a better job than just EQ. Also now days EQ's come with filtering elements as well.
Distortion.
Mostly known for distorted guitars. Distortion can help flat sounds, dull sounds and bad sounds. With full sounds distortion is not commonly used, too much harmonics will crowd the frequency range. Distortion makes a sound more dark and can add some warmth. Distortion alike compression can sustain the signal, by this the lower parts are raised more. Harmonics from distortion can be used to replace the frequency spectrum and can make a difference. Technically, distortion is defined as being any change to the original signal other than in level. However, we tend not to think of processes such as EQ and compression as distortion, and the term is more commonly used to describe processes that change the waveform in some radical and often level-dependent way. These include guitar overdrive, fuzz, and simply overdriving analogue circuitry or tape to achieve 'warmth'. In the analogue domain, heavy overdrive distortion is usually created by adding a lot of gain to the signal to provoke deliberate overloading in a specific part of the circuit. Such high levels of gain invariably bring up the level of hum and background noise, so it may be helpful to gate the source. Though overdriving analogue circuitry is the traditional way of creating intentional distortion, we now have many digital simulations, as well as some new and entirely digital sound-mangling algorithms. The most musically satisfying types of distortion tend to be progressive, where the audio waveform becomes more 'squashed' as the level increases. Hard clipping, by contrast, tends to sound harsh. All these types of distortion introduce additional harmonics into the signal, but it is the level and proportion of the added harmonics that creates the character of the sound. Harmonically related distortion can be added at much higher levels than non-harmonically related distortion before the human hearing system recognises it as such, so there is no way to define a percentage of distortion below which audio is acceptable or above which it is unacceptable. The reason that digital distortion has its own character, which most people find less musically pleasant, is because it is not usually harmonically related to the input signal. For example, quantisation distortion, which results from sampling at too low a bit depth, sounds quite ugly, though many dance and industrial music producers have found a use for it, and some plug-ins deliberately introduce it. The use of overdrive distortion as a musical effect probably originated with electric guitar amplifiers, where the less pleasant upper harmonics created by overdriving the amp are filtered out by the limited frequency response of the speaker. If you use a distortion plug-in without following it up with low-pass filtering (or a speaker simulator) in this way, you may hear a lot of raspy high-end that isn't musically useful. This is why electric guitar DI'd via a fuzz box or distortion pedal sounds thin and buzzy unless further processed to remove these high frequencies. The warmth associated with tube equipment and analogue tape is quite subtle when compared with deliberate overdrive effects. As a rule, if you're trying simply to warm up a sound and you can hear the distortion, you should back off it a little, as there's probably too much of it. Adding a little distortion to sounds such as drums, electronic organs, and even vocals, can help them stand out in a mix, and give substance to a sound that's too thin or uneven. Software guitar amp models often sound more convincing if you use external guitar pedals to create overdrive prior to the audio interface.
Vocal Distortion
The hardest part of mixing is getting the vocals to sit properly. There are a lot of tricks you can apply that can help, but I think one of the most useful is to send the vocal to a bus and insert a compressor there, with a high ratio of around 10:1 or more. Set a low threshold, and a medium attack and release, then, in the next slot, load a distortion plug-in with a warmish sound. Use high- and low-pass filters, set to around 100Hz and 5KHz respectively, and mix a small amount back in alongside the lead vocals. You don't need to add much — it should be almost 'subliminal' — but it can really help to fit the vocal in the track.
Overdrive.
Overdrive effects such as the use of a fuzz box can be used to produce distorted sounds, such as for imitating robotic voices or to simulate distorted radiotelephone traffic. In science fiction use as a talk box effect, to make a voice sound more robotic or alike transmitted radio signals. For example when to star fighters talk by their radio (com). The most basic overdrive effect involves clipping the signal when its absolute value exceeds a certain threshold. In rock music and related genres, overdrive is a term used to describe the sound of an amplifier running at high volume, usually deliberately, to the point where distortion (clipping) is clearly audible in the output signal. This distortion may range from a slight added growl or edge with some increase in sustain up to a thick distorted fuzzy sound.
Modulation.
The modulator is a lesser used effect, maybe some unattended. Especially for Bass instruments when producing less harmonics or Keyboards / Synths. All modulation will produce fewer harmonic and is a bit uneasy. Even though it is a good effect and can create some nice sounds. Modulation changes the frequency or amplitude of a carrier signal in relation to a pre-defined signal. Ring Modulation is also known as amplitude modulation. The effect made famous by Doctor Who's Daleks and commonly used in sci-fi. In modulation is the process of varying a periodic waveform or tone in order to use that signal to convey a message, in a similar fashion as a musician may modulate the tone from a musical instrument by varying its volume, timing and pitch. Normally a high-frequency sinus waveform is used as carrier signal. The three key parameters of a sine wave are its amplitude (volume), its phase (timing) and its frequency (pitch), all of which can be modified in accordance with a low frequency information signal to obtain the modulated signal. A device that performs modulation is known as a modulator and a device that performs the inverse operation of modulation is known as a de-modulator (sometimes detector or demod). A device that can do both operations is a Modem (short for MOdulate-DEModulate).
Resonators.
Resonators emphasize harmonic frequency content on specified frequencies. A resonator is a device or system that exhibits resonants or resonant behavior, that is, it naturally oscillates at some frequencies with greater amplitude than others. Although it's usage has broadened, the term usually refers to a physical object that oscillates at specific frequencies because it's dimensions are an integral multiple of the wavelength at those frequencies. The oscillations or waves in a resonator can be either electromagnetic or mechanical. Resonators are used to either generate waves of specific frequencies or to select specific frequencies from a signal. Musical instruments use acoustic resonators that produce sound waves or specific tones. Resonation occurs when you play your speakers loud and maybe a door or glass window will vibrate and make noises. Also instruments (or even all world objects) have their own main resonation point, hot spot. Maybe a vocalist can break a glass by singing at a certain frequency, this frequency (when the glass breaks) is the main resonation frequency of the glass or object.
Flanger.
Flanging is caused by the dry signal and a mixed and slightly delayed second signal. The length of the delay is randomized slightly, but is very short < 10 ms. If the delay is too long > 50 ms, the delay gets the lead and starts to generate its own effect (echo, reverb). The flanger and phaser are artificially created, but however are basically reverberation effects. This effect is now done electronically mainly digital, but originally the effect was created by playing the same recording on two synchronized tape players, and then mixing the signals together. As long as the machines were synchronized, the mix would sound more-or-less normal, but if the operator placed his finger on the flanger of one of the instruments, that machine would slow down and it's signal would fall out-of-phase with its partner, producing a phasing effect. Once the operator took his finger off, the instrument would speed up until its tachometer was back in phase with the master, and as this happened, the phasing effect would appear to slide up the frequency spectrum. This phasing up-and-down the register can be performed rhythmically. A Comb filter is mostly some kind of flanger. Flangers make signals a bit fatter, but not as much as its big brother the phaser. Flanging is a time-based effect that occurs when two identical signals are mixed together, but with one signal time-delayed by a small and gradually changing amount, usually smaller than 20 ms (milliseconds). This produces a swept comb filter effect, peaks and notches are produced in the resultant frequency spectrum, related to each other in a linear harmonic series. Varying the time delay causes these to sweep up and down the frequency spectrum. Part of the output signal is usually fed back to the input (looped, feedback), producing a resonance effect which further enhances the intensity of the peaks and troughs. The phase of the feedback signal is sometimes inverted, producing another variation on the flanging sound. Depth (Mix) - Defines the mix between dry and flanged signal. Delay -Defines minimal distance differences between dry and flanged signal. Sweep Depth (Width) - The height of the notches of the flanging signal, the notches are extra frequencies in the frequency range that are created by flanging and the height of the notches. Between 5 to 50ms delay time, mix control 50%, modulation rate between 3 to 8 Hz. For more drama, increase feedback. Feedback Invert sometimes.
Phaser.
The phaser makes use of minimal differences between dry and phased signal, this mainly in form of an all pass EQ Filter. The phaser and flanger are artificially created, but however are basically reverberation effects. By adding the dry and phased signal there is a fase difference created that is clearly ear able. Another way of creating an unusual sound, the signal is split, a portion is filtered with an all pass filter to produce a phase shift, and then the unfiltered and filtered signals are mixed. The phaser effect was originally a simpler implementation of the flanger effect since delays were difficult to implement with analog equipment. Phasers are often used to give a synthesized or electronic effect to natural sounds, such as human speech. The voice of C3PO from Star Wars was created by taking the actor's voice and treating it with a phaser. A phaser is an audio signal processing technique used to filter a signal by creating a series of peaks and troughs in the frequency spectrum. The position of the peaks and troughs is typically modulated so that they vary over time, creating a sweeping effect. For this purpose, Phasers usually include a low frequency oscillator. Depth (Mix) - Defines the volume of the filter output that is added on top of the dry signal. Sweep Depth (Range) -Adjusts the sweep of the filter. Speed and Rate - The speed of the filters adjustable in seconds. Feedback and Regeneration - Negative and positive feedback to make the dry signal more interesting. In reggae often used on Drums, Bass and Guitar (Piano). Between 3 ms to 10ms delay time, mix control set to 50%, modulation rate between 3 Hz to 8 Hz. Feedback Invert sometimes.
Chorus.
Good effect for spatial displacement also moves sounds backwards in the mix. Chorus can make a single instrument sound as multiple or more sweet. Makes the sound more fat a richer. Chorus is a brother of the flanger but only differs in delay. Chorus is basically an artificially created reverberation effect alike flanger and phaser. A delayed signal is added to the original signal with a constant delay. The delay has to be short in order not to be perceived as echo, but above 5 ms to be audible. If the delay is too short, it will destructively interfere with the un-delayed signal and create a flanging effect. Often, the delayed signals will be slightly pitch shifted to more realistically convey the effect of multiple voices. Chorus is a condition in the way people perceive similar sounds coming from multiple sources, is a simulation of this effect created by signal processing equipment to produce this effect. Between 30 to 100ms delay time, mix control 50%, modulation rate between 3 Hz to 8 Hz. Little or no feedback. Increasing feedback creates a rotary speaker effect.
Chorus and Flanging
Chorus and flanging are created in fairly similar ways, the main difference being that chorus doesn't use feedback from the input to the output and generally employs slightly longer delay times. Phasing is similar to both chorus and flanging, but uses much shorter delay times. Feedback may be added to strengthen the swept filter effect it creates. Phasing is far more subtle than flanging and is often used on guitar parts. With chorus, phasing and flanging, the delay time, modulation speed and modulation depth affect the character of the effect very significantly. A generic modulated delay plug-in allows you to create all these effects by simply altering the delay time, feedback, modulation rate and modulation depth parameters. Most of the time, low modulation depths tend to work well for faster LFO speeds (often also referred to as the rate), while deeper modulation works better at slower modulation rates.
Chorus is useful for 'softening' rhythm guitar or synth pad sounds, but it does tend to push sounds further back into the mix, so it should be used with care. Adding more brightness to the sound can help compensate for this effect. Chorus also works well on fretless bass, but tends to sound quite unnatural on vocals. Phasing can be used in a similar way to chorus but, whereas chorus creates the impression of two slightly detuned instruments playing the same part, phasing sounds more like a single sound source being filtered, where the frequencies being 'notched out' vary as the LFO sweeps through its cycle.
Flanging is the strongest of the standard modulation effects. The feedback control increases the depth of the 'comb filtering' produced when a delayed signal is added back to itself. Because it is such a distinctive effect, it is best used sparingly, though it can also be used to process a reverb send to add a more subtle complexity to the reverbed sound.
Vibrato.
Vibrato is a musical effect. Vocal and on musical instruments can produce vibrato by a regular pulsating change of pitch, and is used to add expression and vocal-like qualities to instrumental music. Use 2 ms to 15 ms delay time, modulation rate between 2 Hz to 10 Hz.
Doppler Effect.
The Doppler effect, named after Christian Doppler, is the change in frequency and wavelength of a wave as perceived by an observer moving relative to the source of the waves. The total Doppler effect may therefore result from motion of the source or motion of the observer or motion of the medium. Basically the best explanation is, an ambulance passing by with sirens turned on. Not commonly used, but sometime very creatively added or automated.
Pitch Shift.
Similar to pitch correction, this effect shifts a signal up or down in pitch. For example, a signal may be shifted an octave up or down. This is usually applied to the entire signal and not to each note separately. One application of pitch shifting is pitch correction. A musical signal is tuned to the correct pitch using digital signal processing techniques. This effect is commonly used in karaoke machines and is often used to assist pop singers who sing out of tune. It is also used as a creative effect. They are also used to create effects such as increasing the range of an instrument (like pitch shifting a guitar down an octave). Few pitch-shifting algorithms are transparent enough to allow you to transpose anything by more than a couple of semitones without obvious side-effects. If what you're processing is going through an amp modeller, however, you can get away with much more radical changes. You can even do effective swoops and dives in pitch by progressively increasing the amount of pitch-shifting you apply to a note, and pitch changes of an octave or more can sound good, although they probably won't sound natural at these extremes.
Vocal Widening
One of the send effects I most frequently use at mixdown has got to be the classic vocal-widening patch that I always associate with the vintage AMS DMX1580 delay unit. From a mono send a stereo ADT-style effect is created using two pitch-shifting delay lines, panned hard left and right. Normally, I set the first channel to 9ms delay, with a pitch shift of -5 cents, and the other channel to an 11ms delay, with 5 cents of pitch shift. That said, though, I will often tweak the delay times a few milliseconds either way, as this can dramatically alter the effect's tonality.
Time Stretching.
The opposite of pitch shift, that is, the process of changing the speed of an audio signal without affecting its pitch. Pitch scaling or pitch shifting is the reverse, the process of changing the pitch without affecting the speed (tempo). These are more advanced methods used to change speed, pitch, or both at once, as a function of time. These processes are used, for instance, to match the pitches and tempos of two pre-recorded clips for mixing when the clips cannot be re-performed or re-sampled. A drum track could be moderately re-sampled for tempo without adverse effects, but a pitched track could not.
Tuning Effects.
Tuning effects can be used to tune the instrument or single track. Mostly used for tuning guitars or harp, violin, etc. But however can be used on all kinds of instruments, for the purpose of tuning the mix. When all instruments are in-tune, most likely a better and clear mix will arrive. Spend some time tuning your instruments and you will be rewarded by a better frequency spectrum and composition wise a better mix.
Auto Tuning Effects.
Very welcomed effect now days on vocals and all sorts of instruments (correcting the tuning). Also used for creative effects. A good auto tuner will do a good on vocals, especially when designed for vocal use. But for melody instruments alike Bass also commonly used to tune its lower fundamental frequency range. Tuning instruments can also be done by reverting to the synth or sampling device and tune their settings. Often using a tuner, you can sort out the overall tuning beforehand. Recording in tune would be even better. When all instruments are in tune, you will often get better mix in return. For creative aspects there are quite some recordings around with the auto tuner set awkward.
By contrast, tuning (or pitch) correction processors and plug-ins are normally considered processors rather than effects, but they do have creative uses. The idea behind these devices is to monitor the pitch of the incoming signal, then compare it to a user-defined scale, which can be a simple chromatic scale or any combination of notes. Pitch-shifting techniques are then used to nudge the audio to the nearest semitone in the user's scale but, because the amount of pitch-shift required is usually quite small, the result doesn't sound grainy or lumpy, as often happens when large amounts of pitch-shift are generated. Because pitch tracking is used to identify the original pitch, only monophonic signals can be treated. When used with the human voice, it is important that the pitch correction doesn't happen too quickly, otherwise all the natural slurs and vibrato will be stripped out leaving you with a very unnatural and robotic vocal sound. If only a few notes need fixing, consider automating the pitch-corrector's correction speed parameter so that it is normally too slow to have any significant effect, then increase the speed just for the problem sections. This prevents perfectly good audio from being processed unnecessarily. If you stick to a simple chromatic scale (all the semitones), you also run the risk of the pitch correction moving the audio to the wrong note if the singer is more than half a semitone off pitch. A user scale, containing only the desired notes, generally works much better. Some systems also allow you to dictate the correct notes via MIDI. If the song contains sections in different keys or that use different scales, it is often simplest to split the vocal part across several tracks and then use a different pitch-corrector on every track, each one set to the appropriate scale for the section being processed. If your audio track suffers from a lot of spill, or includes chords, the pitch correction may not work correctly. Where spill is loud enough to be audible, you'll hear this being modulated in pitch alongside the wanted part of the audio as it is corrected. As a rule, chords are ignored, so guitar solos, bowed stringed instruments and bass parts (including fretless) can be processed, and only single notes will be corrected. The main creative application for pitch correction is the so-called 'Cher effect', which is achieved by setting the tracking speed as fast as possible to deliberately generate a robotic-sounding result. It's a matter of taste, but for me, this is one effect that has already been done to death!
Tube Amplifier Simulator Effects.
A valve audio amplifier or vacuum tube audio amplifier is used for sound recording, reinforcement or reproduction. Until the invention of solid state devices such as the transistor, all electronic amplification was produced by valve (tube) amplifiers. Whilst solid-state devices prevail in most audio amplifiers today, valve audio amplifiers are still used where their audible characteristics are considered pleasing,. In music performance, especially used on guitar amplifiers. In the case of electric guitar amplifiers a degree of deliberate, often severe, distortion is intentionally added to the sound, and contributes directly to the tone of the guitar, being by itself a major part of the instrument. Sometimes used in music reproduction in high-end audio. Sometimes used for simulating historic equipment. Mostly giving more warmth compared to a transistor, some believe tube amplifiers are better. This is a debated subject. We can use the tube for more warmth and apply as an effect.
Amp Moddeling
One of the most useful features of guitar-amp simulation plug-ins is that they can help mask some quite serious problems with whatever you're putting through them, without necessarily changing it beyond all recognition. I've found that even relatively clean settings can disguise such horrors as clipping on transients to a surprising extent. If you're ever faced with a badly recorded guitar part (even one that's played on an acoustic guitar, or through an amp), try putting it through an amp modeller.pitch-shifting can work well in conjunction with amp simulation, but other ways of editing and processing the raw guitar file before it goes through the amp modeller also yield interesting results. Reverse reverb, resonation, vocoding and Auto-Tune can all produce distinctive effects. Try chopping small sections of guitar out, for an interesting stuttering effect that's nothing like tremolo. A piece of guitar that's been reversed before being fed through an amp modeller sounds quite different to what you get by reversing a guitar part that's already been through an amp, and this technique can be very effective. Likewise, recording three or four separate tracks of single guitar notes and routing them simultaneously through the same guitar amp simulator sounds very different from playing chords. Re-amping a DI'd keyboard or bass can really liven up a sound, but if you don't have access to a nice amp or amp modeller, you can simulate the effect by sending the audio to a bus with a delay plug-in set to a short delay time and with the wet signal set to 100 percent and dry to 0 percent. Then send the bus's output to another bus with a distortion (or better still, a guitar amplifier emulator) plug-in inserted. This simulates the delay you get from miking up a speaker, and if you blend this in with the DI'd sound, it can give the recording a live feel — especially if you use a convolution reverb to add some 'room' ambience. You may also want to roll off the very low and high frequencies to help get rid of that DI'd vibe.
Vocoder Effects.
Create robotic sounds or sparkle the piano. A vocoder (voice and encoder) is a speech analyzer and synthesizer. It was originally developed as a speech coder for telecommunications applications in the 1930s, the idea being to code speech for transmission. Its primary use in this fashion is for secure radio communication, where voice has to be digitized, encrypted and then transmitted on a narrow, voice-bandwidth channel. The vocoder has also been used extensively as an electronic musical instrument. The vocoder is related to, but essentially different from, the computer algorithm known as the phase vocoder. Whereas the vocoder analyzes speech, transforms it into electronically transmitted information, and recreates it, the vocoder generates synthesized speech by means of a console with fifteen touch-sensitive keys and a foot pedal, basically consisting of the second half of the vocoder, but with manual filter controls, needing a highly trained operator. Modern vocoders are more automated and versatile.
Guitar Amp Simulator Effects.
Very welcomed effect for mixing purposes, not also for guitarists. Versatile and comes often with a bunch of presets. Sometimes containing famous guitar players presets. Containing different kinds of guitar amplifiers, speaker setups, delay, echo, reverb, phaser, flanger, etc. A good tool to give a different feel to guitar instruments, but also used on all kinds of instruments, groups and sends. Good tool to revive a dull sound and is very creative.
Loudness Maximizer Effects.
Mostly used for mastering purposes. A combined effect of gaining and compression (limiting) for the purpose of getting the most dynamic out of a mix, without added too much distortion. Better than using only gain or master fader level and a limiter, a loudness maximizer can give more loudness levels. Only sometimes used while mixing, for soft instruments that have almost no level, to give more loudness. This is more a remedy for a bad thing. For mastering purposes the loudness maximizer is last in line, so only used at the end of the mastering stage after mastering EQ and mastering compression, for instance.
Analyzer Effects.
Audio analyzers are really not effects, but to be mentioned. Analyzers are always great tools for visualization. Analyzers can visualize Level, Peak, RMS, Bit, Spectrum, Spectrogram, Scope, Phase or Correlation Meter. Sometimes visualizing can be very helpful depending on the purpose and mixing skill you’re working on. Simple analyzers are peak, vu-meters or red Led’s. RMS is average level. Spectrum and spectrogram are good tools for working inside the frequency spectrum, finding frequencies can be easier with visualization tools instead of listening. A phase or correlation meter checks for mono compatibility.
Midi Controlled Effects.
Often effects can be controlled by midi messages. Especially when using a hardware controller, knobs, faders and buttons can have a function for adjusting and automation. Midi is a standard for transmitting notes, aftertouch and controller information. Pitch bend and modulation controls are common on most midi keyboards. Also controllers used for mixing purposes can be used for effects control. Hardware midi controllers can give an analog feel to digital systems, avoiding using the mouse. Mixing suddenly becomes easier and more precise with an outboard midi controller. Don't forget that you can create audio-style effects purely through MIDI. For example, using a grid-style sequencer, it's very easy to program in echo and delay effects, just by drawing in the repeated notes and then putting a velocity curve over the top to simulate the echoes fading away. By combining this with automated MIDI control of other parameters — reverb send, filter cutoff and resonance, for example — you can alter the timbre of the repeated note and create dubby-sounding, feedback-style delays. They may not always be the first thing you reach for, but the MIDI effects plug-ins that come with most DAW applications like Logic and Cubase often offer something very different from most audio plug-ins. For example, arpeggiators and step sequencers can be great for use in the composition process, and you can use MIDI note to controller data (CC) plug-ins to generate automation data for the parameters of other plug-ins. As they process only MIDI data, and not audio, MIDI plug-ins put very little strain on your computer.
Explore
You don't have to create audio effects in your sequencer. For example, I use the Access Virus synth, which features a simple delay effect, with the added bonus that all its parameters are available in the modulation matrix. One favourite trick involves routing velocity to the delay colour parameter. For parts that get brighter with increased velocity, it adds extra animation and bite if the echoes also get brighter. Unusually, the Virus also features four-way audio panning, so you can position an audio signal anywhere between the main stereo outputs and a second pair. If the second pair of outputs is routed to an external effects unit, you can play with the concept of moving a note around in a space, where its position also determines the treatment it gets. More fun can be had by modulating reverb time and colour via an LFO. The same LFO can then be used to control filter cutoff, EQ frequency and maybe wavetable position too (if your Virus is a TI). In this way, timbral changes happen at the same time as effect changes.

Warning Signs
Effects are fun, and can make mixing a more creative process, but it's worth bearing in mind that they won't help in situations where the basic principles of recording have been ignored! Used with care, effects can help turn a good mix into a great one, but they are seldom successful in covering up other problems. It is also very easy to over-use them — sometimes their most valuable control is the bypass button, and it is certainly worth learning to use the basic effects well before throwing lots of complicated tricks at your sound. As long as you let your ears decide what is right, you should be OK, and a little critical listening to your favourite records will give you a feel for what works and what doesn't.
![]()
Finishing a mix is a creative aspect.
Starting a Mix is basically setting up a mix using fader, balance, EQ, compressor, gate and limiter to setup for quality and reduction. Static mixing is bringing the dimensions and stage plan into the game. Then adding dimension 3. To add more effects as we showed all effects above, is placing instruments where they belong. You can add effects for making some more quality on individual instruments or tracks. You can add effects for glueing or welding on a group for making the layer sound better. You can add effects on send tracks as well. Depending on your stage planning or to just get some more quality and reduction, remember adding means more overcrowding. So each time you add an effect, understand that your mix is changing each time. Revert back to the dimensions, quality, reduction, separation and togetherness. Do a check and re-checks to stay in the ballpark of mixing. When finally happy with the static sound of a mix, we can use automation to correct some certain timeline parts of a mix. The time it takes to finish a static mix (80%) is just a 1/4 to 1/3 part of finishing the mix. The last 20% will take 4 times more time to finish, the dynamic mix contains automation an all tricks to make the mix sound correct. A static mix is more know-how and experience can take half a day to finish. The dynamic mix only can be started when the static mix stands as a house foundation, and will take a day or two, also this time is improved by experience but also involves more creativity.

Automation.
Automation is part of the dynamic mix. We can use automation to be creative or correct certain aspects alike masking, 3d spatial information, balance, fader, etc. Endless possibilities exist for automation. Therefore automation can make or break a mix, do spend a great deal of your time on automation. Then at last we listen to the final mix and really are happy. Only then we can finalize the mix.
Introduction Automation events.
One of the first and most forward use of automation is the introduction of new events or instruments. The listener will always be introduced to new instruments, so we automate the first sounding part (maybe a measure or more) with a louder introducing level. This will make the attention of the listener and will recognize the sound, then after this we reduce the introduction level to its basic static mix level again.
Automation of drums.
If you want to combine the dynamics of a well-recorded drum kit with the pumping excitement you get from heavy compression, send either the overheads only or the entire kit to a buss and insert a nice-sounding compressor there. Set the compressor to a high ratio and low threshold and mix in some of this with the song. You may need to adjust the attack and release controls to get the effect you're after, but you don't need to blend in much of the compressed sound to really add punch and weight to a drum track Programmed or sampled drums rarely have natural authentic sound, as recorded drums. The verse, bridge, and chorus, are important parts. The verse automation level is often reduced, to have more dynamics or headroom.
Automation / Muting.
The mute button is a great automation tool. Basically affecting composition, but at least it is not as boring as all instruments playing throughout the whole mix. Experiment with muting drums or instruments, leaving the vocals.
Automation of fade-outs.
All events inside the mix or ending can be automated to be faded in or out. Be careful not to use automation for a complete fade in or out, this can be done after the mastering process.
Automation of Background Vocals, Vocals and Acoustic Guitars.
Apply a low cut filter switch between 80 Hz and 250 - 400 Hz, each time the main vocal and background vocal play together switch to cut more heavy inside low frequency range. When background solo's switch back. When main vocals sing together with acoustic guitars you can apply the same function.
Finalizing the Mix.
As we have explained and discussed, we are mixing in stereo. So outputting the mix as a stereo track is recommended. Maybe we could use a dithering device for resolution purposes. Internally on digital systems, remember what the calculations are based on. For 32 bit float mixing we do not actually need dithering at all. For 24 Bit or 16 Bit integer mixing we do need dithering. When we did use tracks or samples with a 16 Bit or 24/32 Bit integer format, we definitely need dithering. So it is most likely you need dithering when exporting your mix for mastering purposes. For instance when your final product is CD, you need to dither at 16 Bits. Only when you really have mixed everything entirely with 32 Bit Float or maybe even 64 Bit Float operations, you might decide not to use dithering. As we have exported to mix to a stereo track, try not to use normalizing or any other gaining function. This we can do at the mastering stage. Also do not try to clear up the outcome. This kind of cleaning must be done inside the mixing process and then exported again. Only marginal clearing can be done while mastering, so try to bring out the best and cleanest mix you can! Revert to the starter mix, static mix or dynamic mix, but do not try to adjust the outcome of your mix afterwards before the mastering stage.

Some helpful tips.
As you could work completely independent on composing, recording, mixing and even mastering, it is still a good thing to have some people around. Maybe just for the information or their opinion. In the early days of recording music, at least a few people where needed to help just working with all the equipment. So structure and planning was essential as time is money. They needed the best mixing engineer, best recording engineer and a bunch of other people to manage or produce. Now days a single digital computer system could do this work by only a single person. And this is perfectly understandable. A single human being can now days do almost anything by themselves. Even release tracks, songs, collections of clips or entire albums on the internet. Planning, experience and a good deal of time are needed. Other people might think differently about your mix sounding, so let them listen and judge. You will learn from them and their approaches’ to solve a case. In any other way your experience and level can be judged by measuring other people, adding upwards. It is now days possible to do all by yourself, only do when you have the experience. Sometimes searching advice on the internet can help you, on forums you can maybe drop a question. Maybe visit somebody else their studio or see live bands in action can help to improve stage depth in your mixes. Watch people play their instrument and their commitment can help you imagine how this instrument sounds and can be mixed. Maybe then you can imagine what effect can be used inside your mix or to plan the stage. From aged to modern music, planning the stage still is important. And stage planning goes for most music that can be mixed and is a natural approach to our ears. We are better to apply panning and dimension laws, to ease the listener. Listen a mix at very low volumes, when bass drum, snare, bass and melody still sound good and blend in together, the mix is ok and can be surely played at higher volumes as well as lower volumes. Coherent mixing. Do not use a fade in or out during a mix down. Do not cut beginnings and endings, better to have some free (no sound) at start and end of the mix down.
Audio and Midi Latency
Recording Latency - Latency is a very common problem that plagues inexperienced engineers. While recording, it is best to go into your DAW's options and switch the driver system to ASIO (WDM is usually the default), and set your audio interface buffer settings (which are in it's options) to the lowest that your computer will allow. Setting your buffers below 512MB usually give acceptable latency. Set your DAW back to WDM to hear the full resolution sound of your mixes. ASIO gives lower fidelity but is faster.
The plague of MIDI Latency - Having problems with latency when you use MIDI? Go into your DAW's options and switch the driver system to ASIO, set your buffers low and set your audio interface's buffers to below 512MB. If you still experience latency, you may need to lower the buffers further or upgrade your computer.
Buffer settings - Higher buffers will make the recording environment more stable, but with higher latency. Lower buffers will make the enviornment more volitle, but will reduce latency. If you reduce buffers too far, you will get a very weird, obviously choppy sound. Both your audio interface and your DAW will have buffer settings. Switching between the WDM and ASIO driver systems is another option for reducing latency. WDM gives you the full fidelity of the recording while ASIO allows for lower latency, but with lower fidelity.
Monitoring
Using good monitors - The adjustments you make can only be as accurate as the accuracy of your monitoring environment. Imagine painting while wearing foggy glasses, the painting could not possibly be as detailed as it could be with clear glasses. Monitoring is about both high resolution monitors and the acoustic environment. If you cannot afford an acoustician and building modifications, then you will likely want to deaden the room as much as possible. A very practical home studio fix is to move a mirror around the wall of the room and place an Owens and Corning 703 panel ($18) at every place where you can see the monitors in the mirror from the mix position. You may want to cover the panels with fabric to make them look more attractive.
Monitor placement - You will want to place your monitors symmetrically in the room (each monitor should be the same distance from the wall as the other). You will want to make an equilateral triangle with the 2 monitors and the mix position as the end points. Basically, that means that there should be the exact same distance between you, each monitor and the monitors themselves. Monitors will sound brighter the farther away they are from from the wall (Speaker Boundary Interface Response). For instance, if your mixes sound too bright everywhere else that you play them except in your studio, then you can move your studio monitors a little closer to make them more bright to compensate. Therefore, you can move your monitors with this in mind to achieve a better frequency balance.
Two subwoofers - Using a left and right subwoofer will result in more accurate bass adjustments.

Basic Mixing End
The goal for a good mix is a warm, clear, deep and punchy sound. Where all events are clearly defined, or correspond to the genre and sound good. Examine every event, less is often better. So now we have discussed all parts of the mixing process. We hope our explanation of this process becomes clearer to you and maybe you know why your previous mixes could sound muddy or fuzzy. You know to finish a starter mix and static mix first using quality and reduction. Adding the dimensions according to your stage plan. You know how to separate instruments and tracks as well as welding and glueing to create some togetherness. Apart from the creative aspects of mixing, there are a lot of technical and commonly used set rules that apply. You will notice keeping your mix natural to human hearing and not overcrowding is the way to go. If you do not exactly know what masking means and sound alike, do learn and know exactly. Cutting (reducing, separation, muting, deleting) is the main tool for success, first cut then raise. Also being tidy, taking time to correct things and do it the only way you know how to do so. Understanding that mixing depends more on common sensible rules, then being creative. At start apply the rules more, at end be more creative. Don't go for loudness while mixing, but go for togetherness as well as knowing how to separate. Understanding all of this material explained before in basic mixing I, II and III, should improve your mixing skills and finally generate a well balanced mix.

Mastering
The next thing on your list should be mastering, as will explain in our mastering tutorial.
We hope you have enjoyed this section and explanation over here.
We tend to add information and keep these pages updated, so new information could be added over time.
Have Fun!

Denis van der Velde
AAMS Auto Audio Mastering System
www.curioza.com
Mixing Tips
Before you use AAMS Auto Audio Mastering System, Check the Mix!
There are a number of audio mixing and editting tips that will help you prepare your mixes before using AAMS.
It is important to know how to prepare your mix, so you can get the best sound for your songs!
When quality is at stake, be sure to read this page and spend some time to get your mixes right.
Audio mastering is a process that stands far from mixing, it is the next stage afther mixing and it is the final stage for sound quality. Actually while mixing we do not attend the loudness much, we mix. What everybody is thinking of 'How to get our mix sound loud'! That is what AAMS Mastering stands for, most likely preferred that your mix will become an adequate to commercial radio, CD or MP3 streaming levels, just to fit in correctly. We do not attend the Loudness War, but we need appropiate levels and professional quality. Also when Mastering a Full Album, AAMS Mastering will make the whole Album Sound as an Album. We name it 'the album sound'. So AAMS can do single tracks as well as full albums, and create a good quality professional sound for you. But however, mixing is an important stage before mastering with AAMS starts. So we ask you to attend some time and thought.
Maintain Punchyness - You will want to make sure that your final mixes are punchy. You will want the bass drum, and the overall punchyness to be a little more than you would expect from the final master. If you are thinking that a bass drum punchyness transformation is going to happen in mastering then you are not on the right path. If your bass drum is not punchy enough, revisit #___ about Subtractive EQ and #___ about Low-frequency roll-offs.
Final mixes do not need to compete with final mastered recordings - Due mostly to higher dynamics, final masters usually sound different, and do not need to compete in volume with final commercial masters. This is especially important because if the final mixes are as loud as a commercial master, then the mastering studio cannot use their sweet limiters and compressors to increase the levels in the ways that make mastering magic.
Focus on achieving a good balance - The main goal in your mixes should be to achieve a good frequency balance and a good volume (level) balance between recorded tracks.
Reference CDs are not always as good of an idea as you might thin - Sometimes mixing engineers have a client bring in a reference CD and the goal is to make the mix sound like the commercially released reference CD. That reference CD is almost always a final mastered CD, and chasing after its sound is often like a cat trying to catch a laser dot. After all, the reference CD has been professionally mastered, and you are comparing a final mix to a final master. Trying to achive that "huge" sound you hear on a commercially released master recording while mixing can stop the mastering engineer from being able to help you actually achieve it. Concentrating on getting a good balance is usually the best main goal.
Don't be afraid to do the work - I learned in the military that while shining boots, there are many methods but the most important factor is the time you spend. The same holds true for mixing -- the more time you spend checking this list against the work on your mixes, the better your recordings will sound.
Don't go overboard with effects - Just because you have them doesn't mean you need to over-use them. This is especially true with compression and EQ. A little bit of compression and EQing goes a long way. Reverb can become over-powering, especially if you don't use pre-delay. You must understand how to use the tools that you have, but it is equally important to know when they should not be used.
Good Mics and Good Preamps - Using high quality microphones and preamps can have a serious impact on your recording. If money is not an issue, we recommend George Massenburg preamps, if money is a factor, the grace designs preamps are a very good value.
Check, Check, Double Check!
0. You should do these mix check steps before you plan to use AAMS.
1. Eliminate any noise or pops that may be in each single track. Apply fades or cuts or mutes to spots containing recorded noise, pops or clicks.
2. Keep Your Mix Clean And Dynamic. Unless there is a specific sound you need, do not put compressing or processing on the master out of the mixing bus. It is best to keep the master buss free of outboard processing or plugins. Dont add any processing to the overall mix, just to individual channels.There should never be a limiter or loudness maximiser set on the master out mix bus!
3. The loudest part in a mix should peak at no more that -3db on the master bus, leaving headroom. It does not matter How Loud your mix sounds at this time, mixing means mixing.
4. Does your mix Work In Mono? As a final reality check, switch the master buss output to mono and make sure that there is no weakening or thinning out of the sound. In any event, do not forget to switch the bussing back to stereo afther this check.
5. Only when a mix is completed and finished off, and your are happy with the overall mixing sound and quality, then the next fase is Aplus Mastering to do their work.
6. Normalising a track is not necessarily a good idea.
7. Dont add any fades or crossfades, anywhere. Dont fade beginning or end.
8. Do not dither individual mixes.
9. You can output the mix on a stereo, save your mix in Stereo. Use a lossless format! Using digital equipment Wav 32Bit Float Stereo is a good output format.
10. Do not try to output your mix to a mp3 file, this can mean loss of information! If you do want to send in MP3 files, be sure they are of quality, prefer a bitrate higher than > 192kbps, 320kbps is quite good.
11. Export your mix out of your sequencer or audio setup in a correct and quality unharming format;
12. Finally, always back up your original mixed files!
13. Put all your files of a single mix (the stereo file, reference songs, text documents or pictures or any file that you need to send) in one single directory.
14. Use a packing program like ZIP, RAR, 7z and pack all files in that directory to one single packed file. Name this file correctly, preferably the track number and name of the track.
15. Backup your files!
Prefer the following audio formats.
![]()
![]()
![]()
![]()
![]()
- Uncompressed Audio : Wav, Aiff.
- Lossless Audio : Flac, WAVpack, Monkey Audio, ALAC.
- Lossy Audio : MP3, AAC, WMA (> 192 Kbps).
Mastering Stems
Mastering from stems is becoming little by little more common practice. This is where the mix is consolidated into a number of stereo stems subgroups to be submitted individually. Instead of submitting a Stereo output of your mix, you can send the mixing tracks seperately. For example you might have different tracks for Drums, Bass, Keys, Guitars, Vocal, and Background Vocals. This will give Aplus Mastering more control over the mix and master. If a master from stems is desired, following the same steps listed above is best for each stem. When submitting stems each file track must start at the beginning and must durate though the end, most mixing sequencers will output this way exactly to the sample. Each stem file should be exactly the same length.
Denis van der Velde
AAMS Auto Audio Mastering System V4
AAMS V4.x is freeware to Download, with high encouragement to Register AAMS V4 Professional Version.
Buy AAMS V4 Professional Version!
AAMS V4 Professional Version direct pay and download!

AAMS V4 Professional Version direct pay and download!
![]()
Registration ensures users to have all functions and options opened, having full control!
The price of AAMS V4 Registered (Pro) is 65 Euro or about 75 Dollars.
![]() Pay with a Bank or Credit Card with PayPal
Pay with a Bank or Credit Card with PayPal
![]() Pay with a Bank or Credit Card with PayPro
Pay with a Bank or Credit Card with PayPro
Fill in our Contact form for Registrations or Questions. Or go to our Shop!

AAMS Auto Audio Mastering System
The license and keycode are for all versions of AAMS V4 and upcoming V4.x versions.
User Registration is needed for administration purposes only and offcourse to open all professional features of AAMS Software.
We do not use your user information for other purposes but to keep track of the license system, read our license agreement.
A single registration license grants you acces to all professional functions with a single AAMS V4.x version installed on one single computer you retrieved the installcode from.
So be sure you have AAMS software installed on the computer you need the License for, wise the given Keycode will only work for that computer.
Just understand when you buy for the first time a registration license and pay 65 Euro's for a AAMS V4 single computer licence, you are a registred and licensed user.
And when you send in the installcode, you will get an email with the corresponding keycode.
With this AAMS V4 registration as a user, you can register each extra copy on another computer of AAMS V4 software later on at a half price discount.
For AAMS V1 or AAMS V2 users there is a special Upgrade half price discount available towards all AAMS V4.x versions.
Please allow a maximum of 48 hours for us do our adminstration and send you the correct Keycode back.
To get send a invoice or have any questions, you can send an email or use the AAMS Contact Form below this website.

If you want to install AAMS V4.x version to another computer, you will get a different installcode.
Therefore the combination of installcode and keycodes given, are unique!
Each computer you install AAMS needs a seperate Full Registration License applied.
Therefore you can register a license for AAMS V4.x version for each single computer and it's installcode / keycode.
Every other computer (you have 2 or more computers) as a registered user there is a half price discount.
Because as a registred user can have one or more licenses at cheaper rates, but not the first license.
For AAMS V1 or AAMS V2 users there is a special Upgrade half price discount available towards all AAMS V4.x versions.
Use our contact form for any keycode or license questions.

With PayPal, you’re protected from checkout to delivery.
You can pay with your Credit card or with your Paypal account.
We spot problems before they happen with the latest anti-fraud technology.
Your financial info is never given away to sellers.
And if something goes wrong with your order, the order will be cancelled right away. 
![]()
Safe and easy online payment
With PayPro you can easily pay your customers. Furthermore, we would like to make it even easier with extra modules, links and plugins.
Guaranteed safe
The security of your money and the data of your customer are central to PayPro. We do not have a license from De Nederlandsche Bank and Currence for nothing. Moreover, our requirements go beyond all standard standards.
That is why you use PayPro
Your payments at PayPro go quickly, easily and safely.
Fraud prevention
We keep an eye on everything and constantly check what happens. Suspicious customers, IBANs and IP addresses are tracked to exclude risks.