Audio Mastering

Welcome to AAMS!
The introduction towards Automatic Audio Mastering!
Get your music to sound good without a hassle with AAMS.
As a musician or engineer working on music, you need the best sound possible when releasing material to the public and to create a sound that is working for all audio speaker systems is a difficult and time consuming task.
AAMS is windows software for Fully Automatic Audio Mastering. To process your Mix to a commercial great sounding Master! Featuring 100 Band Equalizer, 8 Multiband Compression, Balancing and Loudness settings for internal DSP Processing with all audio corrections automaticly done. A Reference Database of200 Musical styles. Creating your own personal sound! Making the mastering process easy and less time consuming, having a good overall commercial sound quality on all kinds of listening systems.
Now you can listen to what you expect!

Audio mastering is a process that is done after audio is mixed and we want to raise te standard towards commercial audio levels and sound. Audio Mastering stands far from mixing. Actually while mixing we did not attend the loudness much, we mix. We mix multibple channels of audio mostly into 2 channels of stereo audio. With Mastering we start off with 2 channels of audio mostly stereo. This will give limited access to how we can change the sound, but we can improve the audio by using tools for volume, balance, EQ and Compression. Mostly not changing the sound, but to improve and to go by levels we need for the public to be happy. While mastering loudness becomes more important. Most likely preferred that our mix will become an adequate to commercial radio or CD levels, just to fit in correctly. Also for more togetherness and quality we could use some tools we did not use while mixing, for glueing and welding more.
Understanding LUFS Standards for Mastering
Mastering is not music or mixing. Mastering is more of a technical science then it is a musical expression. Yes, there is an art to it, but you have to understand a lot of basics on how we perceive sound and different loudness standards.
Back in the wild days of the internet many streaming services arose. At the same time, there were loudness wars ramping up on Tv and video streaming. Along the way, we had a massive range of loudness per platform. If you had your headphones in and listened to a song and then flipped to another song, you might hear a huge difference. Or worse, TV and commercials. Some really smart people made a standard of tracking loudness.
There are two main ones LUFS and LKFS.
LUFS and LKFS are in practice the same thing.
This standard helped make volumes of songs or video be pretty close to each other. It has helped a lot in ending the loudness wars. The different streaming services have different loudness standards and algorithms to take measurements and apply the normalization. When mastering songs we want to keep the LUFS range to about the final range by that particular streaming service. Otherwise, if we go over then the service might lower the volume to get the LUFS they have decided to keep as a standard.
If you are thinking of self-mastering and don’t understand LUFS, consider learning it or getting a Mastering Engineer or get AAMS. You might want to have a different master sent to the different services. At the very least a different master for YouTube than for iTunes. I also like to remind engineers of the art of mastering as well. The rule of thumb has been the same since the 90s, make it as loud as possible as long as it still sounds good. You want to make it loud, but not distort the sound.
Having said this, it makes sense to know the LUFS standard of the platform you are releasing on. There is no reason to push the sound louder and degrade the sound further, the platform you are releasing on is going to lower it anyways. Resulting in the same volume and worse quality. You want to balance the art of making it sound good with the science of the standard of each platform.
Let’s take Spotify as our example. Spotify streams audio at around -14 LUFS. If a track has a loudness level of -8 LUFS, Spotify will decrease the volume of that track to -14 LUFS. If a track is -23 LUFS the volume will be increased to -14 LUFS. This is GREAT news. It encourages artists to make their music more dynamic and less compressed. If you’re a producer, songwriter or artist you may have heard of the ‘Loudness War’. The loudness war ideology is ‘the louder your track, the better it will sound to your listeners’. That is no longer necessarily the case.
Apple iTunes = -16 dB LUFS
YouTube = -13 dB LUFS
Spotify = -14 dB LUFS
Tidal = -14 dB LUFS
CD Compact Disc = > -9 dB LUFS
Club Play = -7.5 to -9 dB LUFS
Soundcloud = -9 to -13 dB LUFS
There is no need to compress and limit your music to the max to ‘compete with other releases’. A dynamic and less squashed track will make your music stand out from the rest on online streaming platforms. Master your audio to a loudness that you feel best serves the music. But be aware that high peak levels and super-loud masters will give your listeners a sub-standard listening experience when they stream your audio.
iTunes
The iTunes Store converts audio to AAC (Advanced Audio Coding). For the best result, bounce your audio at 24 bits with a maximum peak of -1.0dbTP (decibels true peak). iTunes Radio streams audio around -15 to -16.5 LUFS. If you will be submitting your music to a radio station that operates through iTunes Radio it’s worth creating a specific version around -16 LUFS.
YouTube
YouTube is still one of the main places people discover and enjoy the music they love. YouTube normalizes music to around -14 LUFS so the ideal settings for your YouTube master would be -13 to -15 LUFS. With the dynamic range reading on LEVELS not exceeding 9DR and with a safe true peak of -1 dBTP.
Spotify
With over 100 million people using Spotify, it’s crucial to make sure your music is heard in its best light. Consider this, the loudest your music will ever be heard on Spotify is about -14 LUFS. So why submit a CD master or Club Master measuring -9LUFS when it’s just going to be turned down. It’s better to make good use of the opportunity to provide a more dynamic master. Lay off the limiter and go for a setting of around -13 to -15 LUFS with the dynamic range reading on LEVELS not exceeding 9DR and a true peak of -1 dBTP.
CD
CD is the only time you’ll want to use a ‘16bit’ bit depth. This is just the technical configuration of the CD, for other purposes you should use 24 bit. Click here learn what bit depth is in 2 minutes. CDs obviously are not subjected to any normalization so you could push the loudness a bit further it you wanted to. I would recommend not breaching a threshold of -9 LUFS and -8DR as this is the point at which the audio can start to sound distorted and lifeless. A good setting would be from -9 to -13 LUFS with the dynamic range reading on LEVELS not exceeding 9DR.
Club Play
Mastering audio for clubs would be an exception where you could push the loudness a bit further. Club tracks will be the last to submit to the end of the loudness wars. UNLESS there were loudness/normalization guidelines brought into clubs. The louder club tracks sit around -4 to -6 LUFS during the drops. I master club tracks to about -7.5 to -9 LUFS for my clients and they work perfectly in their mixes. They might not be quite as loud as other tracks in their genre but they have superior dynamics & transients which make them hit harder and sound punchier. So I would recommend a setting of about -7.5 to -9 LUFS with the dynamic range reading on LEVELS not exceeding 8DR.
Soundcloud
Soundcloud has over 175 million users. Most artists utilize the Soundcloud platform to present their audio to their fans free of charge. Soundcloud streams audio in MP3 format at 128 kbps (I hope they change this soon as 128 kbps is extremely poor quality). You’re able to upload a high quality 24 bit Wav file to Soundcloud but it is transcoded to MP3 to make streaming faster for its users. To make the best of this situation Headroom is more important in this scenario than any other. I would recommend mastering your track to -1dbTP for Soundcloud to minimize the artefacts that WILL happen when your track gets transcoded to MP3. Regarding loudness, A good setting would be from -9 to -13 LUFS with the dynamic range reading on LEVELS not exceeding 9DR.
Recommendations and conclusions
For anything that is for stereo online (including RSS distribution via podcasts), I will now publish everything new at -14 LUFS. Since it is silly to spend extra time to publish some online material at -16 LUFS and some at -14 LUFS. For anything else (including the aforementioned ATSC for US conventional television, NPRSS & PRX, EU R128 for European conventional television), we need to create proper versions for them. If you need to publish different versions for different venues, include the standard or target in the file name. I choose to cover for -14 LUFS, either with factory presets or via a user custom preset.
Did we finish the mix ?
Only when a mix is completed and finished off, then the next fase is mastering the mix. Mostly you can output the mix on a stereo track. Using digital equipment Wav 32Bit Float Stereo is a good output format. Do not try to output your mix to an mp3 file, this can mean loss of information or use a high bit rate > 256 Kpbs. Anyway export your mix out of your sequencer or audio setup. For analog mixers, the methods are most likely based on the equipment you have for mastering purposes. For digital equipment just export your mix to a stereo file. Basically the mastering tools are EQ, Compression and Loudness.
Mastering EQ.
First we can use a good EQ for correcting the frequency spectrum. Specially an EQ equipped with a real-time spectrum analyzer can visualize and localize better. For a good start we take a look at the bottom end of the mix. The range 0 Hz to 35 Hz contains mainly rumble, pops and lower clicks. So we actually do not need this sound, we can cutoff with the EQ. Basically in this lower range no instruments do play, if an instrument could reach this low it would be bass. Check if you’re not hurting the bass (mostly you’re not) and do a good steep cutoff. By placing this kind of cutoff when starting mastering, is giving you some more headroom as well as remove some nasty events. The rest of the spectrum can be changed, but however do not change anything. You’re affecting the mix! Well just be careful, some cutting or boosting is allowed. Use a good low Q-Factor, this will ensure that the EQ is working well and not generating side effect sounds that we do not need. Specially using a high Q-Factor can generate unwanted sounds. Do more cutting then boosting, but be scarse.
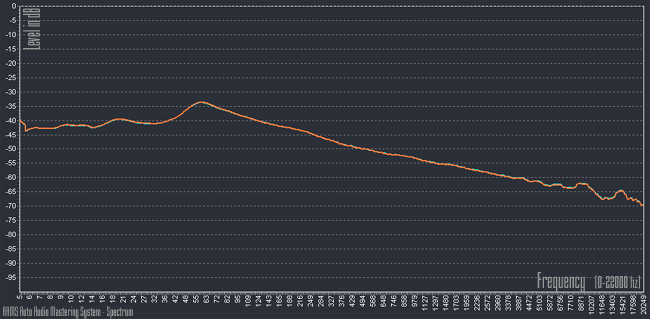
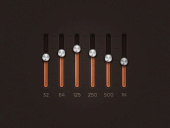
This chart is taken from AAMS Auto Audio Mastering System - Software. It shows a frequency spectrum for a finished mix. Depending on using Mastering EQ, we can decide where to cut and where to boost more. Do not boost a lot and do not cut heavily. Anyway you may find a Mastering EQ setting that is suited. Be scarce with being tidy and fiddly. The general mastering EQ setup can be done by lowering or boosting just a few bands. Using too many EQ bands means you actually are changing the mix, so maybe when you are just using too much EQ while mastering, you could adjust your mix first. Mastering the frequency spectrum of a mix should be no more than just a little bit. If your find yourself using heavy EQ setting while mastering, you can decide to adjust your mix. Sometimes we can master an unfinished mix, just to hear the mastered sound and then do some more corrections on the mix, according to the outcome of the master. Anyway using Mastering EQ, we can have two purposes. First delete unwanted events (bottom end). Second, according to decisions based on the whole frequency spectrum, we can use furthermore EQ to raise the overall quality. Also with Mastering EQ we can prevent loud sounds (in frequency) to enter the Mastering Compressor, by correcting the input signal. Also for Mastering EQ, if you’re using stereo settings (different settings for left and right), be aware that the overall balance of the mix should stay at center. So use pan or balance to correct your settings and re-place the whole mix at dead center. Use a steep filter to cut from 0 Hz to about 30 Hz. Beginners might find this alarming, but only a few people can actually hear down to 20Hz. Only a very small part of musical information is lost by cutting, the benefits are more headroom and fewer rumbles, pops and low end clicks. What people perceive as the bass range is in n the 50 Hz to 100 Hz region. Generally a pleasing high frequency roll off is recommended. Don't roll off too much; else the mix end's up dull. Cut bands instead of boosting, lesser EQ bands are better, use a wide bandwidth, low Q. Cutting more than 6 dB on smaller ranges, can bring out unwanted sounds, often we return to the mix to correct. For bass dynamics do not boost the lower bottom end, instead do this on band 1 of the multiband compressor.
Master Track EQ.
Roll off, 0 Hz to 30 Hz, No subs needed, Reduction.
Boost, 80 Hz, Front Base.
Cut, 40 Hz, Back Base.
Cut, 120 Hz, Back Base.
Boost, 100 Hz, Boom Weight.
Cut, 100 Hz, Light LF Clarity.
Boost, 120 Hz, Cloud Wood Body.
Boost, 400-800 Hz, Snares Claps Boink.
Cut, 120 Hz - 1 KHz, Spice Openness.
Boost, 1 KHz - 10 KHz, Harshness/clarity.
Cut, 1 KHz - 10 KHz, Absence/distance.
Boost, 10 KHz >, Sparkle/sizzle.
Cut, - 10 KHz >, Dullness.
Muddering, Cut, 100 Hz -300 Hz (180 Hz).
Nasal, Cut, 250 Hz -1000 Hz (520 Hz).
Harsh, Cut, 1000 Hz -3000 Hz (1820 Hz).

Mastering EQ (Low Cuts).
Low Cut is very important tool, but the importance of a tool is nothing without proper knowledge how to use it. I will not present Low Cut filter as a coloring tool, but only as corrective, with other words, to erase what doesn’t exist. To use this tool properly we should know from which frequency our music element starts, what is the frequency response of the mic. Lower frequencies are bigger frequencies. They took so much from the headroom and in todays music era we need a lot of headroom. Proper usage of Low Cut filter is the best way to achieve more loudness without alien frequencies in the spectre. With Low Cut you mustn’t cut audible frequency, it is invented as filter for the rumble, room, air conditioner sounds, for frequencies that are not a real part of the music element.
REMEMBER THIS : Good Low Cut is the inaudible, unnoticeable Low Cut.
Bass – 40 Hz (clean electric bass guitar)
Bass – 20 Hz (The Bass Amp generates lower octaves, lower than the E1 note of the bass which is 41 Hz. The lowest tone possible will be 20 Hz as first lower octave from 41 Hz )
Kick – 30 Hz (it is known that the sine wave frequency triggered on kick drum was 32 Hz, lower octave from the foundation frequency. )
Organ – 20 Hz (If the organ plays solo performance with all tones included. The reason is simple it has E0 tone which is 20 Hz)
Organ -100 Hz (If the organ is in combination with other instruments. You must do this especially if there are kick and bass)
Brass – 25 Hz (In orchestral performance and if there is Tuba or Bassoon which last note is B0 29Hz)
Brass – 80 Hz (in combination with other instruments and contemporary music )
Toms – 60 Hz (Floor Tom)
Toms – 120 Hz (Rack Tom)
Guitar – 80 Hz (the lowest tone is E2 which is 82 Hz)
Snare – 100 Hz (When I mix a Fat Snare, I cut everything under 100Hz and I am adding a lot of 100 Hz in the same time.)
Snare – 80 Hz (Standard snare)
Cymbals – 200 Hz
Vocal – 80 Hz (Male Vocals)
Vocal – 100 Hz (Female Vocals)
Mastering – 20 Hz (There is no information at all under 20 Hz)
Even if we don’t hear this musical information, in our digital era is still a digital information which takes a part from your headroom, and it gives a hard time to every compressor.
Use Low Cut Filter properly and your ending product will be cleaner, wide open and louder.
Mastering Compressor.
Master compression, super-fast attack and release, with usually a high threshold, only use the compressor here as a peak reduction tool. A limiter would be best for this purpose. Basically a Mastering Compressor has a different purpose then a compressor intended for mixing. For getting more loudness, compressing some frequency bands with a 4 to 8 band multiband compressor. With a multiband compressor you can divide the mix into sections. Band 1, 0 Hz to 120 Hz, focusing on the bottom end, mainly Base drum and Bass or fundamentals. Band 2, 120 Hz to 2 KHz, fundamentals of vocals and midrange instruments. Band 3, 2 KHz to 10 KHz, can contain cymbals and upper harmonics of instruments (trebles). Band 4, 10 KHz to 22 KHz, Some trebles and air. For each band use the mute button to hear exactly the frequencies that are played. You can adjust each band cut off frequency for each band. A more consistent sound can be found with the multiband compressor as opposite to boosting EQ. The general EQ settings and frequency ranges also apply to a multiband compressor. Actually we are changing the frequency spectrum with each multiband in place, so the multiband compressor could be used to correct the frequency spectrum of a mix. When louder band sounds go over a certain threshold for each multiband, thus compressing more or less, we can control the peaks, as well as their transients and sustain. Anyway a compressor mainly lowers a signal when it peaks over the threshold. Mostly this will start a pumping effect, by hearing this you will know you went too far with compression and you most likely have to set the compressor for a lower level. Anyway sometimes this pumping or breathing effect is used while mastering, but better to be fixed inside the mix. Whenever Mastering EQ or Master Compression is done for a creative aspect, try to do this inside the mix before mastering. As the compressor only lowers signals, we leave more headroom. Using gain inside the mastering compressor is not really recommended, but sometimes we have to. The Ratio can be set lower 1.5:1 to 3:1 (while mixing we use 4:1 or more). Adjust the threshold for each band, just hitting peaks. Anything more would not be common; we are just scraping some peaks. Using heavy compression is not recommended, you could maybe revert to your Mastering EQ settings and correct over there. Sometimes stereo wideners are applied or even a reverb, but hey why not use this while mixing? Actually it is better to place any effect inside the mix, not while mastering. If you still need effects while mastering, use scarse and be aware you are actually changing the sound of the mix. Use a correlation meter to check mono compatibility. Also for Mastering Compression, if you’re using stereo settings (different settings for left and right), be aware that the overall balance of the mix should stay at center. So use pan or balance to correct your settings and re-place the whole mix at dead center. First set ratio, depending the band in place. Full mix, 1:1 to 2:1. Bass, Bass drum, 3:1 to 5:1. Vocals, 2:1 to 3:1. Set threshold, attack and release timings. Short attacks will level off more of the transients, can cause distortion. Go for the lowest attack possible before hearing any artifacts.
Mastering Expander.
An expander affects the lowest level signals, below threshold is expanded. Bringing up the softer parts of the mix. This is called upward compression, a ratio less than 1:0. Also the expander can be used as noise gate.
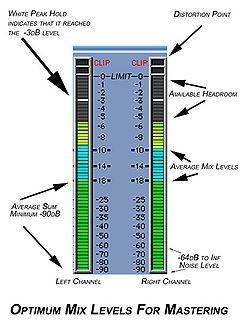
Mastering Loudness.
Now we have removed some unwanted events with EQ and Compression, as well as leaving some more headroom, we can address loudness. Loudness is mainly detected by peaks and RMS measurements. For a mix to be acceptable anywhere between -8 dB and - 14 dB is quite common. The tools for loudness are a good limiter and a loudness maximizer. Before we use gain or loudness, we should check the mix will play at the center of both speakers. Use pan or balance to adjust the panorama. Then next use a tool for getting more loudness. Some use a limiter set at -0.3 dB to -1 dB and just raise the master fader until the desired loudness is heard. This is kind of a basic approach and work best with digital systems working with a higher bit value or sampling frequency. Because of clipping and distortion issues this approach is quite radical. Using a loudness maximizer we can raise the level more easily without too much distortion going on. Aiming for RMS levels between - 10 dB to -12 dB for louder styles and -12 dB to -16 for softer styles. Depending on the material or mix. Mastering loudness at RMS -11 dB, threshold at -11 dB, Margin -0.3 dB, Setting Infinite 8182, 50 Hamm. Steep cut around 36 Hz.
Finishing the Master.
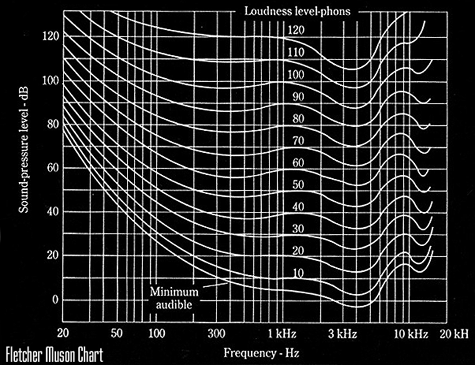
Maybe a little fade-in and fade-out can be done. If we are using this track for radio or single track releases, you can apply some normalization. Else wait for normalization when all complementing tracks are finished, maybe then apply some normalization. Be wise, normalization can ruin the compilation's coherence. If you do not know what you’re doing, do not apply normalization on multiple tracks. The mastering engineer carefully increases loudness and shapes the material according to the Fletcher-Munson curve and makes adjustments so that the tracks sound equally.
Audio Mastering Tips
Many home recordists hope to perfect their productions by doing their own mastering on their studio computer.
However, few seem to achieve the classy results they are after. So how much can you realistically achieve by going it alone, and what techniques will give the highest-quality results. Mastering is a vital part of the recording process, so much so that a substantial amount of mythology is associated with it. We have all heard stories of high-priced mastering engineers with mystical, proprietary gear based on gilded vacuum tubes salvaged from ancient Russian submarines or something similar.
But we have also heard of computer studio owners with a two-track editor and a few plug-ins who have started mastering their own material.

Can You Do Your Own Mastering?
Prior to the digital revolution, mastering had a very defined set of functions. You brought your finished mixes on tape to a mastering engineer, who would often bounce them to another tape through various signal processors designed to sweeten the sound. The tunes would then be assembled in the desired order, and acetate test pressings would be made to evaluate the final product prior to mass-producing albums. Mastering was rightly regarded as an arcane, mystifying art. Few musicians had access to the high-end, expensive tools needed to do mastering, nor did they have the experience of someone who had listened to thousands of recordings, and knew how to make them ready for the real world. Today, the tools for quality mastering are finally within the financial and technical reach of anyone whos serious about recording.
But 95 percent of mastering is not in the tools — its in the ears. Unless you have the ears of a mastering engineer, you cant expect any plug-in to provide them for you. Besides, much of the point of using a mastering engineer is to bring in an objective set of ears to make any needed changes prior to release. This buss in Steinbergs Cubase SX is dedicated to mastering effects. As shown in the routing view of the inserts, the EQ1equaliser plug-in goes before the L1 limiter; after the fader (shown in white) comes the Double Delayand the UV22HR dithering plug-in. This means that the level control wont cut off the Reverb tail or interfere with the dithering.

So does this mean only experts should attempt to do mastering ?
No. Firstly, not all mastering situations require a professionals touch. Maybe you have a live recording that you want to give to friends or sell at gigs. Sure, you can just duplicate the mixes, but a mastered veneer will give your listeners a better experience. Or perhaps you have recorded several tunes and want to test how they flow together as an album.

Why not master it yourself ?
After you have sorted out the order and such, you can always take the individual mixes to a pro mastering engineer. And when you do, you will be able to talk about what you want in more educated terms, because you are more familiar with the process, and you will have listened to your work with mastering in mind. Besides, the only way to get good at anything is practice. For years, I used only professional mastering engineers; I would never have dreamed of doing mastering myself.
But I learned a lot from observing them, started mastering my own material, and now people hire me to master their recordings because they like the results I get. Still, if you have any doubts whatsoever about your abilities, seek out a professional who can present your music in the best possible light. Most mastering is done with specialised digital audio editing programs such as Sonic FoundrySound Forge, Steinberg Wavelab, Bias Peak, Adobe Audition, and so on. These offer good navigation facilities, the ability to zoom in on waveforms, pencil tools to draw out clicks, and plug-ins for mastering tasks (along with the ability to host third-party plug-ins). However, if your requirements are not too demanding, there are several ways to master using conventional multitrack recording programs. And, interestingly, some can even do tricks conventional digital audio editors cant.

Before You Master
The mastering process should actually begin with mixing, as there are several steps you can take while mixing to make for easier mastering. You should do these whether you plan to master material yourself, or hand your project to a mastering engineer. If you recorded your music in high-resolution audio, then mix as high-resolution files. Maintain the higher resolution throughout the mastering process, and only dither down to 16-bit at the very end, when you are about to create CDs. Do not dither individual mixes, and dont add any fades while mixing fades and crossfades should be done while mastering, when you have a better sense of the ideal fade time. Normalising a track before you master it is not necessarily a good idea the extra processing will slightly degrade the sound, and you will probably need to adjust levels between the different tracks at a later stage anyway. As for trimming the starts and ends of tracks, with some music you may decide its better to have a little room noise between cuts rather than dead silence, or to leave a few milliseconds of anticipatory space before the first note to avoid too abrupt a transition from silence to music. Another consideration involves the possible need for noise reduction. Sometimes there may be a slight hiss, hum, or other constant noise at a very low level. If you can obtain a clean sample of this sound, it can be loaded into a noise-reduction program that mathematically subtracts the noise from the track. Even if this noise is way down in level, removing it can improve the sound in a subtle way by opening up the sound stage and improving stereo separation. Dont add any processing to the overall mix, just to individual channels.
Processing completed mixes is best left for mastering. As you mix, you should also watch closely for distortion a few overloads may not be audible as you listen to the mix, but may be accentuated if you add EQ or limiting while mastering.
Its better to concede a few decibels of headroom rather than risk distortion. Its not necessarily a good idea to add normalisation, as that means another stage of DSP (which may degrade the sound, however slightly) and you may need to change the overall level anyway when assembling all the mixes into a finished album. Finally, always back up your original mixed files prior to mastering. If the song is later remastered for any reason for a high-resolution re-release, a compilation, or for use in any other context you will want a mix thats as easy to remaster as possible.
Does It Work In Mono?
As a final reality check, switch the master buss output to mono and make sure that there is no weakening or thinning out of the sound. At the mastering stage, there is not much you can do to fix this; you will need to go back to the mix and analyse the individual tracks to see where the problem resides. Typical culprits include effects that alter phase to create a super-wide stereo spread, but problems can also occur when miking an instrument with two mics spaced at different distances from the source. You can always try flipping the phase of one channel, and if that fixes the phase issues, great. But the odds are against that doing any good. In any event, do not forget to switch the bussing back to stereo when exporting the file or burning a CD! Real-time Mastering Within Your Sequencer A major difference between mastering in a MIDI Audio sequencer and using a digital audio editor is that you have the option to adjust mastering processors (which affect the final mixed output) as you mix. With digital audio editors, you are always working off-line with a previously mixed file.
However, there are advantages and disadvantages to both methods. The process of mixing is daunting enough without throwing mastering into the equation; however, mastering while you mix means you know exactly what the final version will sound like. But remember that a huge part of conventional mastering is about involving someone who can be more objective about what needs to be done with your music. Unless that person can sit in on the mix and adjust the mastering processors, you are better off giving them your files and some space to do their job right. Automation envelopes can reduce the odd rogue signal peak, thus opening up more headroom and allowing a hotter sound without you having to use as much dynamics processing. If you decide to master as you mix, you will be putting your mastering processors in busses.
This is because when you create a non-surround multitrack project, eventually all the tracks are going to dump through a mixer into a master stereo output buss. As with individual channels, this should have provisions for adding plug-in effects.
How effects are accommodated depends on the program; for example, with Cakewalk Sonar, the busses have standard effects slots, just like tracks. But Steinbergs Cubase SX has a few extra touches: both pre-fader and post-fader slots for effects, as well as excellent dithering algorithms for cutting your high-resolution audio down to a lower bit resolution.
(If a program does not include an effects slot after the main output level control, you may be able to feed one buss into another to achieve a similar signal chain — insert the effect into the second buss, and control overall level at the output of the first buss.) Once your plug-in effects have been added and edited as desired, you have three main options to create a mastered file: Render (also called bounce or export) the track to hard disk. This reads the signal at the final output, including the results of any effects you have added, and writes the file to hard disk. This is your final, mastered track. However, it still needs to be assembled with other tracks to create a complete CD. Send the output to a stand-alone CD or DAT recorder.
This will record the final, mastered song although, again, you will still need to assemble these. Send the output through analogue mastering processors, record their outputs into two empty tracks in your multitrack, then export those tracks to your hard disk. (See the Adding Outboard Processors To A Multitrack Host box for more on this). Of course, if you choose to do real-time mastering, you do better get things right the first time, because if you want to make any changes later you wont be working with the raw mix file. For example, if you decide there is too much multi-band compression, you wont be able to undo this, and neither will any mastering engineer; you will have to do another mix.
Adding Outboard Processors To A Multitrack Host
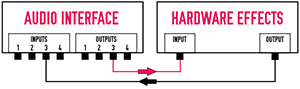
There are some superb hardware outboard mastering tools, both analogue and digital, that you may prefer to plug-ins with similar functionality. If your multitrack host has an audio interface with multiple outputs, there is no reason why you cant use them. Martin Walker wrote a lengthy article on using outboard gear with computer workstations in the SOS March 2004, but the basic idea is that you send the mix buss to a hardware output on your audio interface, process the signal with the hardware processor, then blast the audio back into the computers audio interface inputs. Once you have selected the appropriate inputs within your recording software, you can record the processed results and then replace the original mix with the processed version.
Voilà hardware processing for your tunes.
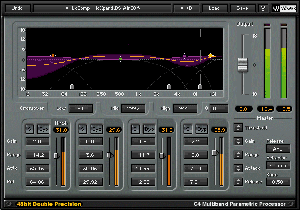
The Best Of Both Worlds For most mastering tasks, a multi-band dynamics plug-in such as Waves C4(bottom) will achieve the most transparent results, but that doesnt mean that you cant use a full-band compressor such as Universal Audios1176SE (top) if you are after a more vintage pumping sound. There is another technique which makes a compromise between mastering as you mix and mastering off-line. After having a song mastered, you will sometimes wish you had mixed the song a little differently, because mastering brings out some elements that might have been less obvious while mixing. For example, its not uncommon to find out when compressing at the mastering stage that the mix changes subtly, requiring you to go back and do a quick remix (another reason why mix automation is so useful). So, to create a more mastering-friendly mix, consider adding some multi-band compression and overall EQ (usually a little more high-end air and some tweaks in the bass) in the master buss to create a more mastered sound. Mix the tune while monitoring through these processors. Then, when you render or otherwise save the file, bypass the master effects you used. This results in a raw mix you can master in a separate program (or give to a mastering engineer) and which anticipates the use of mastering processors without incorporating their effects in the file. Should you do this, make sure that the levels remain optimised when you remove the processors you may need to tweak the overall level. If you plan to use a mastering engineer, do not be tempted to present them with a pre-mastered mix where you have tried to take the sound part of the way towards where you want it. Always provide the raw, two-track (or surround) mix with no mastering effects. However, it may be worth creating a separate version of the tune that uses mastering effects to give the engineer an idea of the type of sound you like.
The engineer can then translate your ideas into something perhaps even better, while taking your desires into account.
Splitting The Stereo Channels
I have also used a multitrack host to do audio restoration and remastering of a tune that was recorded in the 60s; this would have been very difficult to do with a conventional digital audio editor. One instrument was overly prominent in only the left channel and this needed to be fixed. I split the stereo signal into two mono tracks, and loaded each one into the host.
Through a combination of equalisation, dynamics control, and level automation in just the right spots, I was able to reduce the level of the problematic instrument. As this also reduced the apparent level of the left channel, I used a combination of panning on the individual tracks and balance control on the output buss to restore a better sense of balance.
Processing Individual Mixes Mastering a multitrack project in real time is a fairly new technique; its definitely not for everyone, nor is it suitable for all situations. So lets look at two traditional approaches to mastering that use your computer more like a standard digital audio editor. The more old-school approach is to take each tune, master it, then as a separate operation assemble all the tunes into a cohesive whole. A newer approach is to assemble all the tunes first and then apply any processing on a more global level. Basically, this combines both mastering and assembly into one operation.

Lets look at the individual song approach first.
Digital emulations of classic analogue equalisers, such as the TL Audio and Pultec recreations shown above, will often produce the most musical results when you are applying broad and gentle processing during mastering. Open up a new file and import the mix into a track. If you need to process the right and left channels independently (for example, if there is an instrument in the left channel that has excessive treble, and you want to EQ just that channel a bit without processing the right channel), then separate the stereo file into two mono files (typically using a digital audio editor) and import each one into its own track. You may also be able to bring a stereo file into two tracks, use the balance control to separate the left and right tracks, then re-combine them.
Here are some of the editing operations you might want to do: Reduce Peaks Using Automation:
If some peaks are significantly louder than the rest of the material, this reduces the chance to have a higher average level, as the peaks use up much of the headroom. One solution is to add limiting, but another option that can affect the sound less is to use an automation envelope to reduce the levels of just those peaks. If the automation works on just a single cycle of the waveform, you probably wont hear any difference compared to not reducing that peak; but once the major peaks are reduced, you will be able to raise the overall level. Furthermore, if you do add any compression, it wont have to work as hard. Add Dynamics Processing: Generally, you will use a dynamics plug-in for the track holding the file, or possibly for the buss it feeds. Multi-band dynamics processors are your best option; compared to standard compressors, theyre more transparent, because dynamics control in one frequency band doesnt affect other frequency bands.
However, some people like slamming a stereo compressor, because they can hear some pumping and breathing, which gives more of a vintage sound. Another popular option is a loudness maximiser plug-in, like the venerable Waves L1. This type of processor can greatly increase the overall average level, producing a hotter sound. These plug-ins are often overused on nowsdays recordings, which creates distortion and degrades definition. As a rule of thumb, I advise increasing the amount of maximisation until you can hear the effect working. Then reduce the amount so you dont hear it working. Eventually you will find a sweet spot where you can increase overall loudness while retaining good dynamics.
All the different song files on the album have here been assembled into different tracks in Magix Samplitude so that different styles of track can be processed differently. Once the plug-in settings have been finalised, the tracks can be rendered into a single file. No matter what form of dynamics control you use, it will affect the mix by reducing peaks and bringing up lower-level sounds. This is equivalent to having a more even mix, and might be desirable. But if the mix ends up sounding too uniform, reduce the amount of maximisation. Peaks and valleys are essential to a satisfying listening experience. A really loud cut may seem impressive at first, but it becomes fatiguing after a short period of time.
Add Equalisation
For mastering, you will hopefully be dealing in broad strokes a mild bass cut, or a little high-end lift. This is why many older equalisers are favoured for mastering, because they have a subtle, yet pleasing, effect on the sound. Plug-ins like Steinbergs TLA1, PSPs MasterQ, and the UAD1s Pultec emulation fulfil this role in software. Significant EQ problems, like large mid-range or low-end peaks, should have been fixed in the mixing process. If they we are not, you are likely need to plug in a full-blown parametric EQ, and tweak out the individual problems. Your audio editor probably already includes EQ, but be careful about using it. Built-in EQs are usually optimised so you can open lots of instances at the same time, which means they cant consume too much CPU power. Mastering-oriented plug-ins, on the other hand, tend to eat more power, but it doesnt matter because you are using them on a simple stereo file rather than running a bunch of audio tracks and soft synths.

Other Processing Goodies
Some people swear by particular plug-ins for mastering, like enhancers, stereo-image wideners, and the like.
I tend to avoid these because dynamics and EQ cover 99 percent of whats needed in most cases. But I have found situations where a little high-frequency exciter helps add a different kind of sparkle than EQ, and once I even added a phasing effect in the middle of a tune during a spoken-word part (the client loved it). I think if a mix has a certain direction, its often best to enhance what you have rather than try to turn it into something completely different. Assembling Your Album A loudness-maximising limiter such as Waves L2 can increase the overall level off your mastered track with surprisingly few audible artefacts. You can do album assembly in a multitrack host, and once the tracks are in the desired order you render the whole thing to disk as one large file. If needed, you can then import this file into a CD-burning program to add track markers, CD Text, and so forth. If you are editing within a multitrack application, the files can either be placed end to end in a single track, or you can spread them over several different tracks. For example, one project I mastered had three distinctly different flavours of mixes: some were mixed in a studio which probably had bad acoustics, because the bass was too heavy; another set of mixes was very neutral (just the kind I like to work with); and the third set had compression applied to the master buss, and were already somewhat squashed. I sorted each type onto its own track, and applied the same processing to like-sounding files. The bass-heavy ones needed a different kind of EQ to the neutral-sounding ones, and I also added multi-band compression to both of these tracks. The songs that were already compressed did not get any multi-band compression, but did need a fair amount of EQ this created a few peaks, so I added a small amount of limiting. As mentioned earlier, a multitrack host allows you to do tricks that may be difficult with a dedicated digital audio editing program. This is particularly true with dance music, where you have a continuous stream of sound. Its easy to create crossfades, for example, either using an automatic crossfade function where overlapping two tracks creates a crossfade, or by having the tunes on separate tracks and adding fades manually. You can also dedicate a separate track for transitions or sound effects when doing a dance mix, add track automation to bring effects in and out (to increase a high-pass filters cutoff as a song fades, for instance, so it seems to disappear just before the next track comes in), and so on. This process essentially creates a meta-mix where, instead of mixing individual tracks to create a two-track file, you are mixing two-track files to create a final album.

Master Effects Routing
If you process and render one track at a time, you can use a dedicated audio CD-burning utility such as Roxios Toast With Jam to compile them into a finished CD, complete with advanced features such as CD Text. We noted that Steinberg Cubase SXs busses have slots both before and after the gain control. In general, you would place your processing plug-ins prior to the gain control, and your dithering after the gain control. However, things get more complex when you start using effects. Suppose you are mixing a tune that has an abrupt end, but you want a delay or reverb tail to spill over. If the echo is generated before the master output and you pull down the master fader for the abrupt end, the echo will stop too. Therefore, you need to place the delay after the fader, and place dithering after the delay. If there is only one post-fader slot, then chain two busses and insert the dithering in the second buss. Some multitrack hosts dont have an option to place effects after the final gain control, thus making it difficult to implement the delay effect mentioned above. For example, Cakewalk Sonars master fader is always at the buss output. But it also has a trim control that can change the incoming level to the buss. This alters the level going to the effect, but not the effect output.
With the above example of delay, you might even want to use both controls: pull down on the input trim to create the abrupt end, then as the echoes fade out reduce the main buss fader. Alternatively, you could use this technique if you had loudness maximisation patched into a master buss and you wanted to push the sound harder on some tracks. For example, lets say I inserted Waves L1 into the master buss in Sonar, with the threshold set to -3.0dBFS, and the output ceiling set at -0.1dBFS. Any signal louder than -3dBFS will force the limiter to start attenuating the signal. Increasing the level of the input trim control pushes more signal into the L1, causing a greater degree of loudness maximisation. No matter how hard you push the input trim control, the clippingoverload indicators will remain unlit, because the L1s output ceiling has been set to -0.1dBFS, so you have to be careful that you dont overdo things. Mastering For Vinyl Although the market for vinyl is now minuscule at best, it remains important for DJs and some audio purists who regard CDs as an invention of Satan that is destined to cause the end of Western civilisation as we know it. So lets address the issue of mastering for vinyl. Despite what you may have heard, mastering for vinyl is the easiest type of mastering you can do, as it involves only two steps:
Find a mastering engineer who has mastered a ton of recordings for release on vinyl. Present your final mixes to that person and say "Here, you do it." Vinyl is an unforgiving medium, and mastering for it is extremely difficult. Its dynamic range is a puny 50dB or so, even with decent vinyl, compared to the 80dB or more we enjoy with even the most basic digital media. As a result, compression is essentially mandatory to shoehorn musics wide dynamic range into vinyls narrow dynamic range. But vinyl has other problems. there is a trade-off between loudness and length. This is because a groove in a record is just a waveform, and a louder waveform will cause the groove to have a wider physical excursion. So, to get a lot of material on an LP, you have to cut the vinyl at a pretty low level. Bass is also troublesome. Bass waveforms have a very wide excursion and, with stereo, if the left and right channels are even slightly out of phase, the stylus can jump the track as it tries in vain to follow different curves for the right and left channels. We take concepts like stereo bass for granted now, but back in the days of vinyl bass had to be mono. And thats not all!
As the record gets closer to the end, the tone arm hits the groove at more of an angle (except with linear-tracking turntables), causing whats called inner groove distortion. As a result, song orders often used to be created with the softest songs coming at the end of an albums side, so that the inner grooves would be less subject to distortion. In the old days, recording engineers were well aware of the limitations of vinyl, and took them into account during the recording process. Many of todays engineers were brought up in an essentially vinyl-less world, and dont consider the problems discussed above. This makes it more important than ever to use a mastering engineer who is an expert in the art. When it comes to mastering for vinyl, the advice is simple: dont try this at home! Managing Your Levels Although most modern audio software packages use 32-bit floating-point audio engines and have lots of headroom, overloading can still occur unless levels are set properly, especially if the master buss is the sum of different channels. Clipping indicators are helpful, but programs that include a numeric read-out of how much a peak level is above or below 0dBFS are far more useful.
This value, called the margin, is positive if the level is above 0dBFS and negative if below. If possible, I generally enable any kind of peak-hold feature so that I can see the highest level attained at the end of a song without having to keep my eyes glued to the meters. Note that if the margin indicator isnt reset automatically (when you click the transport stop button, for instance), you will have to clear the value manually from time to time. Its extremely useful to have access to exact headroom and gain figures while mastering — these can be seen on this Sonic FoundryVegas master fader at the top and bottom of the meter, respectively. The faders themselves should also be calibrated; heres an example of how to use this feature. Suppose the fader is currently set to 0dB gain, and you send in a signal that reaches -3dBFS. The margin indicator will also show -3dBFS. If the master fader setting is -1.5dB and you feed in the same -3dBFS signal, then the margin indicator would show -4.5dBFS — the original value, less the amount of attenuation provided by the master fader. Ideally, the margin should indicate not 0dBFS but slightly less — say -0.1dBFS. This is important, because if a tune has peaks that hit 0dBFS for more than a few milliseconds, it may be rejected by a CD pressing plant on the assumption that those peaks represent distortion. To set the master fader for the highest possible level short of distortion, first reset the margin indicators, then play the tune through from start to finish. When its over, check the margin and note the reading. Lets say its -4.1dBFS. As you want the margin to read -0.1dBFS, that means the overall level needs to be raised by 4dB. Now note the fader reading. Well assume it shows 1.5dB. We want to add another 4dB of level, so if we set the fader reading to 5.5dB, then the next time the song plays from start to finish the margin should indicate -0.1dBFS. Mastering Mastering I certainly wouldnt want to imply that following the above techniques will make you a mastering engineer. However, I believe that if you apply these ideas correctly you will end up with mixes that sound better than before — and thats the whole point. Besides, if you start working on your mastering chops now, you just might discover a whole new outlet for your creativity. Published in SOS Au
The final stage of production — turning your mixes into a finished CD / MP3 / WAV — requires some specialised tools.
Martin Walker runs through the options and considers how best to set up and use the necessary PC software. Lots of SOS readers have been asking me over the last few months if they can master their albums using a computer, rather than relying on external rackmount hardware to do the job. Mastering basically involves taking the individual songs, placing them in a suitable order (which not always as easy as it sounds), adjusting their relative levels and EQ to make them sit more comfortably together, and adding any final fairy dust if and when needed. Well, of course, this is possible using a computer, and once you have your recordings on a hard drive you could leave them there at every stage right up to CD burning of the final product if you wish. However, the hot debate among traditional studio owners concerns software plug-ins, and whether or not their quality matches up to that of external rackmount outboard effects. This question is particularly important during mastering, since each make and model of the types of processor that get used, tends to have its own unique sound.
As I discussed, there is no inherent reason why a software solution should be inferior for most types of effect, subject to it being given sufficient processing power. Indeed, some existing rackmount effects are nothing more than powerful computers in a box with additional IO. Most modern studios seem to be using at least some plug-ins, and some have embraced them wholeheartedly as another way forward, if not the only way forward. So, the answer is yes — you can master an album without ever leaving the comfort of your computer, and get results that are good enough to release commercially. However, mixing and mastering are very different skills, and its important to know how to make the most of the available software tools. Suitable Software If all you want to do is assemble a set of already perfectly formed audio files into a chosen order and then burn an audio CD you wont need a mastering application, since you can do this with almost any CD-burning utility.
However, this can be a frustrating approach, since unless you can listen to the tracks in sequence before the burn, you wont be able to hear how they sound one after the other until you put the finished CD-R in your hi-fi. The latest versions of products like Adaptecs Easy CD Creator, Ahead Softwares Nero, and CeQuadrats WinOnCD all provide more facilities for those creating audio CDs, but there is no substitute for being able to audition and make changes to the WAV files in context. Professional Mastering While mastering on your PC can give good results, I certainly wouldnt claim that it gives results as good as those achieved by a professional mastering engineer. For a start, you are unlikely to have a state-of-the-art monitoring system thats flat down to 30Hz or less to accurately judge the bass end. You wont have tens of thousands of pounds worth of esoteric EQ, compression, reverb, and other goodies to tweak your sound to perfection. Most of all, however, you are unlikely to have the same level of expertise, objectivity, and impartiality. Good mastering engineers are renowned for their golden ears, and their skills are acquired through years of training and experience.
The next step up is a list-based stereo audio editor that lets you assemble your audio files, add fades in and out where required, and audition the joins. Nowadays most of these have a graphic environment that makes the process far more intuitive, as well as the ability to drag and drop each track relative to each other to adjust spacing, and in some cases even drag one across another to automatically create crossfades between tracks. Since modern multitrack audio software is capable of running plug-ins suitable for mastering purposes, its also perfectly possible to master in the same environment in which you record and mix. However, a dedicated mastering application may still prove easier to use in the long run, for various reasons. First, its vital to be able to zoom in to view waveforms at single-sample level to be able to spot and remove clicks and pops, and not all multitrack applications let you do this without accessing an external audio editor.
In addition, its often easier to assemble a set of stereo mixdowns into the final order and adjust the spacing between them using a list-based approach, even if you can also view them as graphics, since dragging and dropping text in a list is far easier to deal with. Finally, using a dedicated mastering application into which the CD-burning process is fully integrated can make the overall process even easier, especially where the final CD audio file is being calculated on the fly. This is because the individual tracks always remain separate, so that you are not having to deal with single 600Mb image files for an hour-long album. In many cases the fades can also be applied on the fly during the burn, which makes it easier to change things at the last moment if required, and some packages even let you apply plug-in effects to individual tracks as well. I have come across one multitrack application that provides all these facilities —Samplitude 2496 (formerly marketed by SEKD, but now under the banner of Magix, who also offer a dedicated stereo version called Samplitude Master devoted to mastering).
On the PC there are several other software applications that are specifically intended for detailed work on final mono or stereo tracks. The most famous is Steinbergs Wavelab, now at version 3.0, which now incorporates the multitrack Montage function to assemble more complex tracks, add fades and effects on the fly, and has integrated CD-burning facilities. Sonic Foundrys CD Architect is another elegant application, and comes bundled with their Sound Forge Lite editor, although most musicians will prefer the more comprehensive Sound Forge if its within their budget. Sample rates of up to 96kHz have been supported for some time, but only after a wait of several years for the recent version 5.0 have 24-bit files been supported as well. Syntrilliums Cool Edit Pro is also an excellent stereo and multitrack editing package, but doesnt have integrated CD-burning facilities.
IK Multimedias T-Racks provides virtual valve EQ, compression, and multi-band limiting, as well as fade options, and has recently been updated to accept 24-bit files, but unlike the others mentioned here doesnt provide graphic editing — in fact, its more like a rackmount processor such as TCs Finalizer in approach. Application Settings For the best final results when mastering, the stereo audio files of each track should be at 24-bit or higher resolution. This doesnt necessarily mean that you have to record every track in your audio sequencer at 24-bit resolution, since most multitrack applications will let you mix 16-bit and 24-bit tracks at will: the important part is to make the final stereo mixdown at 24-bit, or even 32-bit if you have a suitable application like Cubase VST32.
You will benefit from this even when using 16-bit converters or samples on the original recordings, since as soon as multiple tracks are mixed together there will be more than 16 bits worth of resolution anyway. Visual Information Many musicians find that using analytical tools helps during mastering, and I discussed many of the options in some detail in SOSSeptember 2000. A spectrum analyser is useful to examine frequency response against other recordings, and can also be invaluable in spotting low-end problems that may not be audible on nearfield monitors. Most audio editors, including Cool Edit ProSound Forge, and Wavelab now incorporate them, and shareware plug-ins are also available from Nick Whitehurst (see Contacts box). Steinbergs FreeFilter also has one built in, and can learn the frequency response of another track and apply it to one of yours. A phase display can help check for mono compatibility (which is still vital if you expect radio play). Steinberg has one in its Mastering Edition, Nick Whitehurst incorporates one in his shareware C_SuperStereo, and PSP provide a Stereo Analyser in their StereoPack A sonogram display can help you make decisions about high-frequency enhancement, as well as spotting low-level hums, whistle and DC offset problems. Again, Cool Edit Proand Sound Forge have one built in, while Steinbergs Mastering Edition has one in plug-in form.
Choice of sample rate is a more thorny issue. I still use 44.1kHz since this is my target rate for burning audio CDs and although some people maintain that modern sample-rate converters are now so good that you can start at 96kHz and then down-convert at the end, I prefer not to put my audio through an extra stage of conversion. However, if you are convinced of the audible benefits of high-sample-rate recording for your type of music and gear, and your system can cope with the increased processor and hard disk requirements, go ahead, though bear in mind that 88.2kHz may be a more benign choice than 96kHz, since the down-sampling process to 44.1kHz is so much simpler. If you are transferring a 48kHz DAT tape into your PC for mastering, you will obviously have to convert this to 44.1kHz.
Since this will change the overall sound slightly, I would be inclined to do this as the first process, so that you can add further tonal tweaks to the final 44.1kHz version as required. If you have several applications capable of this conversion, try them all and compare the results, and if there are any quality options make sure that you always use the highest one — it may take considerably longer to process the whole track, but you want to lose as little quality as possible. Whatever sample rate you choose, you should leave recordings at as high a bit depth as you can until the last moment, and then convert to the final format (normally 16-bit for audio CD burning) as the last stage, with suitable dithering. This is because any alterations you make to the audio files — including gain changes, compression, EQ, and fades — will produce rounding errors in the calculations. If they are already at 16-bit then the accumulating errors will gradually make your tracks sound coarse and grainy, and you will lose fine transient detail and stereo localisation. If your software lets you choose a resolution for temporary files, make sure this is also at a suitably high setting. In Wavelab, for instance, choose Create 32-bit float temporary files in the File page of Preferences. While you are there, if you have separate Windows and audio drives make sure that you set the Folder for Temporary Files to the Windows one, since keeping them on a different drive from your audio ones will greatly speed up most Undo operations. You can also do this for Sound Forge in the Perform page of its Preferences. If you are using Cool Edit Pro, ticking the Auto-Convert all data to 32-bit upon opening box will ensure that all subsequent editing is also carried out at 32-bit resolution.

20 Tips There is a world of difference between what happens in a professional mastering suite and what the average project studio owner can do at home. But as more computer-based mastering tools become available it is quite possible to achieve very impressive results with relatively inexpensive equipment. Certainly there is a lot more to mastering than simply compressing everything, though compression can play an important role. The most crucial tool is the ear of the person doing the job, because successful mastering is all about treating every project individually. There is no standard blanket treatment that you can apply to everything to make it sound more produced. Every mastering engineer has preferences regarding the best tools for the job, but if you are just getting started I recommend a good parametric equaliser, a nice compressor limiter, and perhaps an enhancer. Such as an Aphex Exciter or an SPL Vitalizer. You also need an accurate monitoring environment with speakers that have a reasonable bass extension, and some form of computer editor that can handle stereo files. The latter should ideally have digital inputs and outputs, though if you are using an external analogue processor you will probably be going into the computer via its analogue inputs, in which case these need to be of good quality too. A professional may want to start off with a 20- or 24-bit master tape or to work from a half-inch analogue master, but in the home studio most recording is done to 16-bit DAT. This should not be a problem for most pop music, providing you proceed carefully. Most mistakes are due to over-processing, and the old adage. If it is not broke, do not fix it, applies perfectly to mastering. Do not feel that you have to process a piece of music just because you can. You might find that your master sounds worse than the original material.
And now for the tips...
1. Where possible, handle fade-out endings in a computer editor, rather than using a master tape that was faded while mixing. Not only does the computer provide more control, it will also fade out any background noise along with the music, so that the songs end in perfect silence.
2. Editing on DAT is very imprecise, so when you beam the material into the computer (digitally, if at all possible) clean up the starts of songs using the Silence function. Use the waveform display to make sure you silence right up to the start of the song without clipping it. As a rule, endings should be faded out rather than silenced, as most instruments end with a natural decay. When the last note or beat has decayed to around 5% of its maximum level, start your fade and make it around a second long. You can also try this if the song already has a fade-out, though you may want a slightly longer fade time. Listen carefully to make sure you arent shortening any long reverb tails or making an existing fade sound unnatural.
3. Once you have decided on a running order for the tracks on the album, you will need to match their levels. This doesnt simply mean making everything the same level, as this will make any ballads seem inappropriately loud. The vocals often give you the best idea of how well matched levels are across songs, but ultimately your ears are the best judge. Use the computers ability to access any part of the album at random to compare the subjective levels of different songs, and pay particular attention to the levels of the songs either side of the one you are working on. Its in the transition between one song and the next that bad level-matching shows up most."If an albums tracks were recorded at different times or in different studios, they may not sit well together without further processing."
4. If an albums tracks were recorded at different times or in different studios, they may not sit well together without further processing. The use of a good parametric equaliser (hardware or software) will often improve matters. Listen to the bass end of each song to see how that differs and use the EQ to try to even things out. For example, one song might have all the bass energy bunched up at around 80 or 90Hz while another might have an extended deep bass that goes right down to 40Hz or below. Rolling off the sub-bass and peaking up the 80Hz area slightly may bring the bass end back into focus. Similarly, the track with bunched-up bass could be treated with a gentle 40Hz boost and a little cut at around 120Hz. Every equaliser behaves differently, so there are no universal figures you will need to experiment. At the mid and high end, use gentle boost between 6 and 15kHz to add air and presence to a mix, while cutting at 1-3kHz to reduce harshness. Boxiness tends to occur between 150 and 400Hz. If you need to add top to a track that doesnt have any, try a harmonic enhancer such as an Aphex Exciter high-end EQ boost will simply increase the hiss.
5. To make a track sound louder when its already peaking close to digital full scale, use a digital limiter such as the excellent Waves L1 plug-in or Logic Audios built-in Energizer. In most cases you can increase the overall level by 6dB or more before your ears notice that the peaks have been processed. A nice feature of the L1 is that you can effectively limit and normalise in one operation. Its always good practice to normalise the loudest track on an album to peak at around -0.5dB and then balance the others to that track, but if you are using the L1 to do this, make normalising your last process, so that you can use the Waves proprietary noise-shaped dither system to give the best possible dynamic range. Normalising or other level-matching changes should always be the final procedure, as all EQ, dynamics and enhancement involves some degree of level change. Proper re-dithering at the 16-bit level is also recommended if going direct via a digital output to the production master tape, as it preserves the best dynamic range. Analogue outputs will be re-dithered by the A-D converter of the recorder.
6. If a mix sounds middly or lacking in definition, the SPL Vitalizer can be very useful (even the very inexpensive Stereo Jack version produces excellent results). This device combines EQ and enhancer principles in a single box, and one characteristic of the Vitalizer process is that the mid-range tends to get cleaned up at the same time as the high end is enhanced and deep bass is added. As with all enhancers, though, be very careful not to over-use it: keep switching the process in and out, to preserve your sense of perspective. The same applies to EQ and dynamics check regularly against the untreated version to ensure that you are not making things worse.
7. Have a CD player and reference material on hand to use as a comparison for your work. Not only does this act as a reference for your ears, it also helps to iron out any inaccuracies in your monitoring system.
8. Overall compression can add energy to a mix and even out a performance, but it isnt mandatory. Music needs some light and shade to provide dynamics. Often a compressor will change the apparent balance of a mix slightly, so you may need to use it in combination with EQ. Placing EQ before the compressor results in any boosted frequencies being compressed most, while placing it after the compressor allows you to equalise the compressed sound without affecting the compressor operation. Which is best depends on the material being treated, so try both.
9. A split-band compressor or dynamic equaliser gives more scope for changing the spectral balance of a mix, but these devices take a little practice before you feel you are controlling them and not vice versa!
10. One way to homogenise a mix that doesnt quite gel, or one that sounds too dry, is to add reverb to the entire mix. This has to be done very carefully, as excess reverb can create a washy or cluttered impression, but I find Lexicons Ambience programs excellent for giving a mix a discreet sense of space and identity. If the reverb is cluttering up the bass sounds, try rolling off the bass from the reverb send. If you want to add a stereo width enhancing effect to a finished mix, there are two main things to consider: the balance of the mix and the mono compatibility of the end result. Most width enhancers tend to increase the level of panned or stereo sounds while suppressing centre sounds slightly. Sometimes this can be compensated for by EQ, but being aware of whats happening is half the battle. Other than the simple phase-inversion width enhancement used in the SPL Vitalizer, which is completely mono-compatible, width enhancement tends to compromise the sound of the mono mix, so always check with the mono button in. While most serious listening equipment is stereo these days, many TVs and portable radios are not, so mono compatibility is important.
11. Listen to the finished master all the way through, preferably using headphones, as these have the ability to show up small glitches and noises that loudspeakers may mask. Digital clicks can occur in even the best systems, though using good quality digital interconnects that are no longer than necessary helps to reduce the risk.
12. Try to work from a 44.1kHz master tape if the end product will be a CD master. If you have to work from a 48kHz tape or one with different tracks recorded at different sample rates, a stand-alone sample-rate converter can be used during transfer of the material into a computer. If you dont have a sample-rate converter, most editing software will allow you to do a conversion inside the computer, though this takes processing time and the quality is not always as good as that from a good-quality dedicated unit. When using a software sample-rate converter, ensure that the tracks are all recorded with the computer system set to the same sample rate as the source material. If you dont have a sample-rate converter at all, dont worry too much, as transferring in the analogue domain via decent external A-D and D-A converters may well produce better results than an indifferent sample rate converter (with free re-dithering thrown in too!). Alternatively, if your master is for commercial production rather than for making CD-Rs at home, leave your master at 48kHz and inform the mastering house so that they can handle the conversion for you.
13. When you are transferring digital material into a computer, ensure that the computer hardware is set to external digital sync during recording and internal sync during playback. Also double-check that your record sample rate matches the source sample rate people will often present you with DAT tapes at the wrong sample rate, or even with different tracks at different sample rates. All too often this is overlooked, until someone realises that one of the songs is playing back around 10 percent slow!
14. Dont expect digital de-noising programs to work miracles even the best systems produce side-effects if you push them too far. The simpler systems are effectively multi-band expanders, where the threshold of each band is set by first analysing a section of noise from between tracks. For this reason its best not to try to clean up your original masters prior to editing, otherwise there may be no noise samples left to work from. With careful use you can achieve a few dB of noise reduction before the side-effects set in as low-level signals open and close the expanders in the various bands, the background noise is modulated in a way that can only be described as chirping. The more noise reduction you try to achieve, the worse the chirping, so its best to use as little as you can get away with.
15. When editing individual tracks for example, when compiling a version from the best sections of several recordings try to make butt joins just before or just after a drum beat, so that any discontinuities are masked by the beat. However, if you have to use a crossfade edit to smooth over a transition, try to avoid including a drum beat in the crossfade zone, or you may hear a phasing or flamming effect where the two beats overlap. As a rule, crossfades should be as short as you can get away with, to avoid a double-tracked effect during the fade zone. As little as 10-30ms is enough to avoid producing a click.
16. On important projects, make two copies of the final mastered DAT (one as a backup) and mark these as Production Master and Clone. Write the sample rate on the box, along with all other relevant data. If you include test tones, document their level and include a list of all the track start times and running lengths for the benefit of the CD manufacturer. As mentioned earlier, if, for any reason, you have produced a 48kHz sample rate master, mark this clearly on the Production DAT Master so that the CD manufacturer can sample-rate convert it for you. Its always a good idea to avoid recording audio during the first minute or so of a new DAT tape, to avoid the large number of dropouts commonly caused by the leader clip in the tape-spool hub. You can, however, use this section to record test tones, which will also demonstrate to the person playing your tape that it isnt blank! If you put DAT start IDs on each track, check them carefully to make sure that there are no spurious ones, and dont use skip IDs.
17. When deciding on how much space to leave between tracks on an album, listen to how the first track ends and the second one starts. Gaps are rarely shorter than two seconds, but if the starts and ends are very abrupt you may need to leave up to four seconds between tracks. Use the pre-roll feature of your digital editor to listen to the transition, so that you can get a feel for when the next track should start.
18. When using a CD-R recorder to produce a master that will itself be used for commercial CD production, ensure that the disc can be written in disc-at-once mode rather than a track at a time, and that your software supports PQ coding to Red Book standard. Check with your CD manufacturer to confirm that they can work from CD-R as a master, and take note of any special requirements they may have. Be very careful when handling blank CD-Rs there are commercial CDs on the market with beautiful fingerprints embedded in the digital data! The old adage If it aint broke, dont fix it applies perfectly to mastering."
19. Be aware that stand-alone audio CD recorders usually have an automatic shut-off function if gaps in the audio exceed a preset number of seconds, usually between six and
20. This may be a problem if you need large gaps between tracks. Occasionally, even very low-level passages in classical music can be interpreted as gaps. Also note that these recorders will continue recording for that same preset number of seconds after the last track, so you will need to stop recording manually if you dont want a chunk of silence at the end of the album. 20. When making a digital transfer from a DAT recorder to a CD recorder that can read DAT IDs, its best to manually edit the DAT IDs first, so that they occur around half a second before the start of the track. Then you dont risk missing part of the first note when the track is accessed on a regular CD player. Alternatively, there are commercial interface units (or CD-R recorders with the facility built in) that delay the audio stream in order to make coincident or slightly late DAT IDs appear before the audio on the CD-R.

Denis van der Velde
AAMS Auto Audio Mastering System
www.curioza.com
Mastering History
Audio Mastering History.
Magnetic tape was commonly used to create master copies.
Mastering, a form of audio post-production, is the process of preparing and transferring recorded audio from a source containing the final mix to a data storage device, the master. The source from which all copies will be produced, via methods such as pressing, duplication or replication. Recently digital masters have become usual although analog masters, such as audio tapes, are still being used by the manufacturing industry, notably by a few engineers who have chosen to specialize in analog mastering. Mastering requires critical listening; however, software tools exist to facilitate the process. Mastering is a crucial gateway between production and consumption and, as such, it involves technical knowledge as well as specific aesthetics. Results still depend upon the accuracy of speaker monitors and the listening environment. Mastering engineers may also need to apply corrective equalization and dynamic compression in order to optimise sound translation on all playback systems. It is standard practice to make a copy of a master recording, known as a safety copy, in case the master is lost, damaged or stolen.
Pre-1940s
In the earliest days of the recording industry, all phases of the recording and mastering process were entirely achieved by mechanical processes. Performers sang andor played into a large acoustic horn and the master recording was created by the direct transfer of acoustic energy from the diaphragmm of the recording horn to the mastering lathee. Typically located in an adjoining room. The cutting head, driven by the energy transferred from the horn, inscribed a modulated groove into the surface of a rotating cylinder or disc. These masters were usually made from either a soft metal alloy or from waxx; this gave rise to the colloquial term waxing, referring to the cutting of a record. After the introduction of the microphonee and electronic amplificationn in the mid-1920s, the mastering process became electro-mechanical. And electrically driven mastering lathes came into use for cutting master discs, the cylinder format by then having been superseded. Until the introduction of tape recording, master recordings were almost always cut direct-to-disc. Only a small minority of recordings were mastered using previously recorded material sourced from other discs.
Advances
The recording industry was revolutionized by the introduction of magnetic tape in the late 1940s. Magnetic tape was invented for recording sound by Fritz Pfleumer in 1928 in Germany, based on the invention of magnetic wire recording by Valdemar Poulsen in 1898. Not until the end of WW2 could the technology be found outside of Europe. The introduction of magnetic tape recording enabled master discs to be cut separately in time and space from the actual recording process. Although tape and other technical advances dramatically improved audio quality of commercial recordings in the post-war years, the basic constraints of the electro-mechanical mastering process remained, and the inherent physical limitations of the main commercial recording media—the 78 rpm disc and the later 7-inch 45 rpm single and the 33-13 rpm LP record, meant that the audio quality and dynamic range and running time of master discs were still limited compared to later media such as the compact disc.
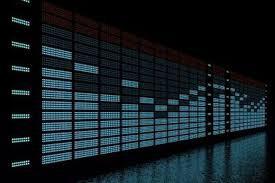
Running times were constrained by the diameter of the disc and the density with which grooves could be inscribed on the surface without cutting into each other. Dynamic range was also limited by the fact that if the signal level coming from the master tape was too high, the highly sensitive cutting head might jump off the surface of the disc during the cutting process. From the 1950s until the advent of digital recording in the late 1970s, the mastering process typically went through several stages. Once the studio recording on multi-track tape was complete, a final mixx was prepared and dubbed down to the master tape, usually either a single-track monoo or two-track stereo tape. Prior to the cutting of the master disc, the master tape was often subjected to further electronic treatment by a specialist mastering engineer. After the advent of tape it was found that especially for pop recordings, master recordings could be made so that the resulting record would sound better. This was done by making fine adjustments to the amplitude of sound at different frequency bands (equalization) prior to the cutting of the master disc.
Record mastering became a highly prized and skilled craft, and it was widely recognized that good mastering could make or break a commercial pop recording. As a result, during the peak years of the pop music boom from the 1950s to the 1980s, the best mastering engineers were in high demand. In large recording companies such as EMI, the mastering process was usually controlled by specialist staff technicians who were conservative in their work practices. These big companies were often reluctant to make changes to their recording and production processes. For example, EMI was very slow in taking up innovations in multi-track recordingg and they did not install 8-track recorders in their Abbey Road Studioss until the late 1960s. More than a decade after the first commercial 8-track recorders were installed by American independent studios.
In multi-track recording each signal input is recorded to its own track on a multi-track recorder. This multi-track tape is mixed down to a mono or stereo tape from which the master tape is copied. A multi-track tape may be remixed many times, in different ways, by different engineers, giving the possibility of several masters (mono version, stereo version, LP version, AM radio version, single version, etc.
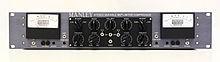
Digital technology Optimum Digital Levels with respect to the Full Digital Scale dBFSD. In the 1990s, electro-mechanical processes were largely superseded by digital technology, with digital recordings stored on hard disk drives or digital tape and transferred to CD. The digital audio workstation DAW became common in many mastering facilities, allowing the off-line manipulation of recorded audio via a graphical user interface GUI. Although many digital processing tools are common during mastering, it is also very common to use analog media and processing equipment for the mastering stage. Just as in other areas of audio, the benefits and drawbacks of digital technology compared to analog technology is still a matter of debate. However, in the field of audio mastering, the debate is usually over the use of digital versus analog signal processing rather than the use of digital technology for storage of audio.
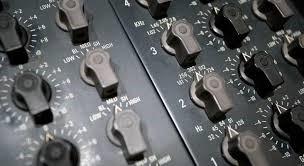
Although there is no optimum mix level for mastering, the example only suggests what mix levels are ideal for the studio engineer to render and for the mastering engineer to process. It is important to allow enough headroom for the mastering engineers work. Bernie Grundman Mastering which mastered 37 Grammy-nominated albums in 2005 alone and Gateway Mastering still embrace analog signal processing (such as analog equalization) within the mastering process. Mastering has a special significance for house, techno and other styles of electronic dance music: The product of mastering, regardless of the type of format, is re-actualised into a performance in the hands of the DJ. In this regard, the shift from vinyl records to digital formats. In many DJ scenes and the appearance of new digital formats for DJs have encouraged new practices also among mastering engineers, whose targets are not only music listeners but, specifically, music performers as well.
Process
The source material, ideally at the original resolution, is processed using equalization, compressionn, limiting, noise reduction and other processes. More tasks, such as editing, pre-gapping, leveling, fading in and out, noise reduction and other signal restoration and enhancement processes can be applied as part of the mastering stage. This step prepares the music for either digital or analog, e.g. vinyl, replication. The source material is put in the proper order, commonly referred to as assembly or sequencing. If the material is destined for vinyl release, additional processing, such as dynamic range reduction or frequency dependent stereo–to–mono fold-down and equalization, may be applied to compensate for the limitations of that medium. Finally, for compact disc release, Start of Track, End of Track, and Indexes are defined for disc navigation. Subsequently, it is rendered either to a physical medium, such as a CD-R or DVD-R, or to computer files, such as a Disc Description Protocol (DDP) file set or an ISO file. The specific medium varies, depending on the intended release format of the final product. For digital audio releases, there is more than one possible master medium, chosen based on replication factory requirements or record label security concerns. Regardless of what delivery method is chosen, the replicator will transfer the audio to a glass master that will generate metal stampers for replication.

The process of audio mastering varies depending on the specific needs of the audio to be processed. Mastering engineers need to examine the types of input media, the expectations of the source producer or recipient, the limitations of the end medium and process the subject accordingly. General rules of thumb can rarely be applied.
Steps of the process typically include the following:
Transferring the recorded audio tracks into the Digital Audio Workstation DAW. Sequence the separate songs or tracks as they will appear on the final release. Adjust the length of the silence between songs. Process or sweeten audio to maximize the sound quality for the intended medium applying specific EQ for vinyl. Transfer the audio to the final master format CD-ROM, half-inch reel tape, PCM 1630 U-matic tape, etc.
Examples of possible actions taken during mastering:
Editing minor flaws. Applying noise reduction to eliminate clicks, dropouts, hum and hiss. Adjusting stereo width. Adding ambience. Equalize audio across tracks for the purpose of optimized frequency distribution. Adjust volume. Dynamic range compression or expansion. Peak limit. Dither.
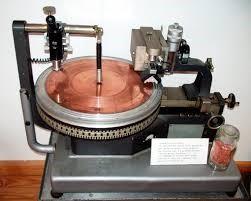
To finish mastering a CD track markers must be inserted along with International Standard Recording Code (ISRC). Along with other information necessary to replicate a CD. Vinyl LP and cassettes have their own pre-duplication requirements for a finished master.
Denis van der Velde
AAMS Auto Audio Mastering System
www.curioza.com
The Loudness War
The Loudness War.
Different releases of Michael Jacksons song Black or White show increasing loudness over time: 1991–> 1995–> 2008.
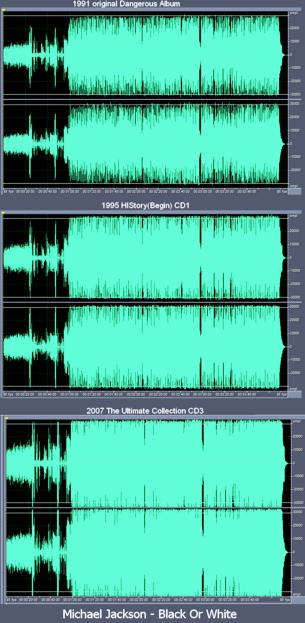
Loudness war or loudness race is the popular name given to the trend of increasing audio levels on CDs and in digital audio files since the early 1990s. Many critics believe reduces sound quality and so too listeners enjoyment. Increasing loudness was first reported as early as the 1940s with respect to mastering practices for 7" singles. The maximum peak level of analog recordings such as these is limited by varying specifications of electronic equipment along the chain from source to listener, including vinyl record and cassette players.
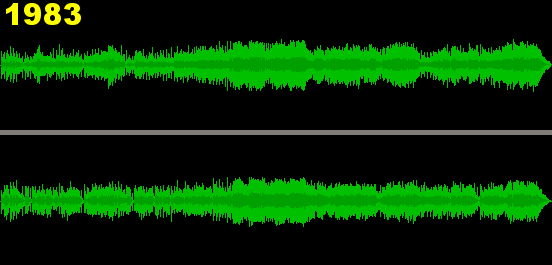
With the advent of the Compact Disc CD, music is encoded to a digital format with a clearly defined maximum peak amplitude. Once the maximum amplitude of a CD is reached, loudness can be increased still further through signal processing techniques such as dynamic range compression and equalization. Engineers can apply an increasingly high ratio of compression to a recording until it more frequently peaks at the maximum amplitude. In extreme cases, efforts to increase loudness can result in clipping and other audible distortion, also a flat sound. Modern recordings that use extreme dynamic range compression and other measures to increase loudness therefore can sacrifice sound quality to loudness. The competitive escalation of loudness has led music fans and members of the musical press to refer to the affected albums as Victims of the loudness war.
History
The practice of focusing on loudness in mastering can be traced back to the introduction of the compact disc itself. But also existed to some extent when vinyl was the primary released recording medium and when 7" singles were played on jukebox machines in clubs and bars. Jukeboxes became popular in the 1940s and were often set to a predetermined level by the owner, yet any record that was mastered louder than the others would stand out. Similarly, starting in the 1950s, producers would request louder 7" singles so that songs would stand out when auditioned by program directors for top 40 radio stations. In particular, many Motown records pushed the limits of how loud records could be made, according to one of their engineers, they were notorious for cutting some of the hottest 45s in the industry. In the 1960s and 1970s, various artists hit compilation albums became popular. When artists and producers found their song was quieter than others on the compilation, they would insist that their song be remastered to be competitive. However, because of the limitations of the vinyl format, loudness and compression on a released recording were restricted to make the physical medium playable restrictions that do not exist on digital media such as CDs. As a result, increasing loudness levels never reached the significance that they have in the CD era. In addition, modern computer-based digital audio effects processing allows mastering engineers to have greater control over the loudness of a song; for example a brick wall limiter can look ahead at an upcoming signal to limit its level.
1980s
Three different releases of ZZ Tops song Sharp Dressed Man show increasing loudness over time: 1983–>2000–>2008. The stages of the CDs loudness increase are often split over the two-and-a-half decades of the mediums existence. Since CDs were not the primary medium for popular music until the late 1980s, there was little motivation for competitive loudness practices then. CD players were also very expensive and thus commonly exclusive to high-end systems that would show the shortcomings of higher recording levels. As a result, the common practice of mastering music involved matching the highest peak of a recording at, or close to, digital full scale. Referring to digital levels along the lines of more familiar analog VU meters. When using VU meters, a certain point usually -14 dB below the discs maximum amplitude was used in the same way as the saturation point signified as 0 dB of analog recording. With several dB of the CDs recording level reserved for amplitude exceeding the saturation point often referred to as the red zone, signified by a red bar in the meter display. Because digital media cannot exceed 0 decibels relative to full scale dBFS. The average level of the average rock song during most of the decade was around -18 dBFS.
1990s
In the early 1990s, CDs with louder music levels began to surface, and CD levels became more and more likely to bump up to the digital limit. Resulting in recordings where the peaks on an average rock or beat-heavy pop CD hovered near 0 dB, but only occasionally reached it. The concept of making music releases hotter began to appeal to people within the industry. In part because of how noticeably louder some releases had become and also in part because the industry believed that customers preferred louder sounding CDs. Even though that may not have been true. Engineers, musicians, and labels each developed their own ideas of how CDs could be made louder. In 1994, the digital brickwall limiter with look-ahead to pull down peak levels before they happened was first mass-produced. While the increase in CD loudness was gradual throughout the 1990s, some opted to push the format to the limit, such as on Oasis widely popular album Whats the Story Morning Glory? Which averaged -8 dBFS on many of its tracks a rare occurrence, especially in the year it was released 1995. In 1997, Iggy Pop assisted in the remix and remaster of the 1973 album Raw Power by his former band The Stooges, driving the level to -4 dBFS in places.
2000s
As this waveform shows, the Guitar Hero downloadable version (bottom) is far less compressed than the CD release of Death Magnetic (top). In 2008, loud mastering practices received mainstream media attention with the release of Metallicas Death Magnetic album. The CD version of the album has a high average loudness that pushes peaks beyond the point of digital clipping, causing distortion. This was reported by customers and music industry professionals, and covered in multiple international publications. A mastering engineer involved in the Death Magnetic recordings, criticized the approach employed during the production process. A version of the album without dynamic range compression was included in the downloadable content for the video game Guitar Hero III. In late 2008, mastering engineer Bob Ludwig offered three versions of the Guns N Roses album Chinese Democracy for approval to co-producers Axl Rose and Caram Costanzo. They selected the one with the least compression. Ludwig wrote, I was floored when I heard they decided to go with my full dynamics version and the loudness-for-loudness-sake versions be damned. Ludwig said the fan and press backlash against the recent heavily compressed recordings finally set the context for someone to take a stand and return to putting music and dynamics above sheer level.
2010s
In March 2010, mastering engineer Ian Shepherd organised the first Dynamic Range Day, a day of online activity intended to raise awareness of the issue and promote the idea that Dynamic music sounds better. The day was a success and its follow-ups in the following years have built on this, gaining industry support from companies like SSL, Bowers & Wilkins, TC Electronic and Shure. As well as engineers like Bob Ludwig, Guy Massey and Steve Lillywhite. Shepherd cites research showing there is no connection between sales and loudness, that people prefer more dynamic music. He also argues that file-based loudness normalization will eventually render the war irrelevant. In October 2013, Bob Katz announced on his website that The last battle of the loudness war has been won. Claiming that Apples mandatory use of Sound Check for iTunes Radio meant that The way to turn the loudness race around right now, is for every producer and mastering engineer to ask their clients if they have heard iTunes Radio. When they respond in the affirmative, the engineer/producer tells them they need to turn down the level of their songs to the standard level or iTunes Radio will do it for them. He or she should also explain that overcompressed material sounds wimpy and small in comparison to more open material on iTunes Radio. He believes this will eventually result in producers and engineers making more dynamic masters to take account of this factor. His point of view has been widely reported and discussed.
One of the biggest albums of 2013 was Daft Punks Random Access Memories, with many reviews commenting on the albums great sound. Mixing engineer Mick Guzauski deliberately chose to use less compression on the project, commenting We never tried to make it loud and I think it sounds better for it. In January 2014 the album won five Grammy Awards, including Best Engineered Album (Non-Classical). Analysis suggests that the loudness trend may have peaked around 2005 and subsequently reduced, with a pronounced increase in overall and minimum album DR crest factor for albums since 2005.

Replay Volume Normalization
With music sales moving towards file-based playback, digital downloads and away from CDs, there is a possibility that the loudness war will be blunted by normalization technology. Such as ReplayGain and Apples Sound Check. Most cloud-based music services perform loudness normalization by default and may reduce the market pressure to hypercompress material. Replay volume normalization also helps when listening to playlists or shuffle play where otherwise variations in perceived loudness of recordings results in uncomfortable loudness shifts. In August 2011, the EBU published EBU Recommendation R 28, which specifies a new way of metering and normalizing audio. Based on ITU-R BS.1770, it is accompanied by the EBU Loudness Metering specification EBU Tech 3341. Which includes the so-called EBU Mode to make meters interoperable. | Also, a Loudness Range descriptor is defined in EBU Tech 3342, which helps audio mixers understand what loudness range their material consists of.
Broadcasting
Broadcasting is also a participant in the loudness war. Competition for listeners between radio stations and competition for clients between recording studios has also caused a loudness arms race. Loudness jumps between broadcast channels and between programmes within the same channel, and between programs and intervening adverts are a frequent source of audience complaints. The European Broadcasting Union is addressing this issue in the EBU PLOUD Group, which includes over 230 audio professionals, many from broadcasters and equipment manufacturers.
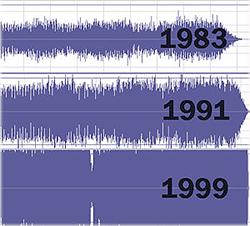
Criticism
This practice excessive compression, dynamic range reduction, loudness level enhancement, etc, has been condemned by several recording industry professionals. Including Alan Parsons, Geoff Emerick noted for his work with The Beatles from Revolver to Abbey Road. And mastering engineers Doug Sax, Steve Hoffman and many others, including music audiophiles, hi-fi enthusiasts, and fans. Musician Bob Dylan has also condemned the practice, saying: You listen to these modern records, they are atrocious, they have sound all over them. There is no definition of nothing, no vocal, no nothing, just like static. The compact disc editions of Dylans more recent albums Modern Times and Together Through Life are examples of heavy dynamic range compression, although Dylan himself might not have been responsible for it. When music is broadcast over radio, the station applies its own signal processing, further reducing the dynamic range of the material to closely match levels of absolute amplitude. Regardless of the original recordings loudness. Opponents have called for immediate changes in the music industry regarding the level of loudness. In August 2006, the vice-president of A&R for One Haven Music, a Sony Music company, in an open letter decrying the loudness war. He claimed that mastering engineers are being forced against their will or are preemptively making releases louder to get the attention of industry heads. Some bands are being petitioned by the public to re-release their music with less distortion. The nonprofit organization Turn Me Up! was created by Charles Dye, John Ralston and Allen Wagner to certify albums that contain a suitable level of dynamic range. Encourage the sale of quieter records by placing a Turn Me Up! sticker on albums that have a larger dynamic range. The group has not yet arrived at an objective method for determining what will be certified. Hearing experts, such as a hearing researcher at House Ear Institute in Los Angeles, are also concerned that the loudness of new albums could possibly harm listeners hearing, particularly that of children. A 2-minute YouTube video addressing this issue by audio engineer Matt Mayfield has been referenced by The Wall Street Journal and The Chicago Tribune. Pro Sound Web quoted Mayfield: When there is no quiet, there can be no loud. The book Perfecting Sound Forever: An Aural History of Recorded Music (Faber, 2009), by Greg Milner presents the Loudness war in radio and music production as a central theme. The book Mastering Audio: The Art and the Science 2nd Edition, Focal Press, 2007, by Bob Katz, includes a chapter about the origins of the loudness war and another suggesting methods of combatting the war. Based on Bob Katz presentation at the 107th Audio Engineering Convention 1999 and his Audio Engineering Society Journal publication 2000.
Dissenting Views
In September 2011, Emmanuel Deruty published an article in leading music technology magazine Sound on Sound, in which he argued that the Loudness War has not led to a decrease in dynamic variability in modern music. Possibly because the original digitally-recorded source material of modern recordings is more dynamic to begin with than analogue recorded material. This conclusion was supported in May 2012 by artificial intelligence researcher Joan Serrà, in an article published in Natures Scientific Reports. It is also the main argument in an article published by Deruty and Damien Tardieu in the Journal of the Audio Engineering Society in January 2014. These conclusions have been challenged on the basis that the R128 Loudness Range (LRA) Deruty used to track dynamic variability was designed for assessing loudness variation within a track sometimes called macro dynamics where R128 Peak to Loudness Ratio (PLR) is a measure of the peak level of a track relative to a reference loudness level (sometimes called micro-dynamics. Shepherd and Katz claim that PLR is a more helpful metric in assessing overall perceived dynamic range which clearly does show a downward trend over the 1990s. Additionally, in January 2014, the Journal of the Audio Engineering Society published an article in which authors Jens Hjortkjær and Mads Walther-Hansen formally tested whether the use of dynamic compression deteriorates sound quality. According to the summary of the article, the results failed to reveal any evidence of the effects of dynamic range compression on subjective preference or perceived depth cues. Perceptual data suggest that listeners are less sensitive than commonly believed to even high levels of compression.

Some of the albums that have been criticized for their sound quality include the following:
Arctic Monkeys Whatever People Say I Am, Thats What I'm Not
Black Sabbath 13
Bob Dylan Modern Times
Together Through Life
Christina Aguilera Back to Basics
The Cure 4:13
Dream Depeche Mode Playing the Angel
The Flaming Lips At War with the Mystics
Lily Allen Alright, Still
Los Lonely Boys Sacred
Metallica Death Magnetic
Miranda Lambert Revolution
Oasis What's the Story Morning Glory?
Paul McCartney Memory Almost Full
Paul Simon Surprise
Pearl Jam Ten 2009 remaster
Queens of the Stone Age Songs for the Deaf
Red Hot Chili Peppers Californication
Rush Vapor Trails
The Stooges Raw Power 1997 remaster
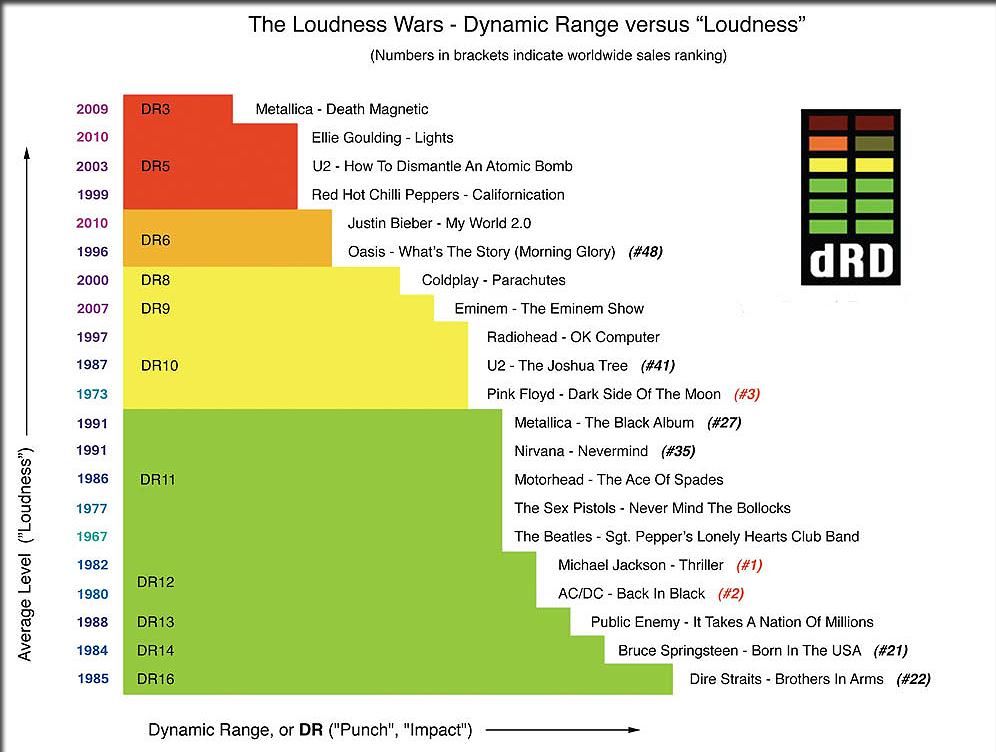
Dynamic Range Day.
What is the Loudness War ?
The so-called Loudness War is entirely based on a modern myth a fairy-tale full of nonsense that has somehow hypnotised the entire music industry for the last ten years and is permanently damaging the music we listen to as a result. The Loudness War is a sonic arms race where every artist and label feel they need to crush their music onto CD at the highest possible level, for fear of not being competitive and in the process removing all the contrast, all the light, shade and depth – ruining the sound. This short video demonstrates the effect of the Loudness War and how pointless it is using real world examples. In order to achieve these super-high levels, the music has to be squashed up against the digital maximum level ceiling reducing the difference between the peak and average levels in the music. In the process, the contrast between loud and soft moments often referred to as the dynamic range is dramatically reduced. Strictly speaking, this terminology isn’t quite correct the Loudness War Sound suffers from limited crest factor, low RMS variability and in the worst cases distortion. But limited dynamic range is an intuitive way to describe all this for Dynamic Range Day.

What is Dynamic Range Day ?
The Loudness War is built on the idea that louder is better. However this concept is fatally flawed. The goal of Dynamic Range Day is to reveal this flaw and spread an alternative message: You don’t need to compete in the Loudness War. In fact in the 21st Century your music can gain a competitive advantage not by being louder, but more dynamic.
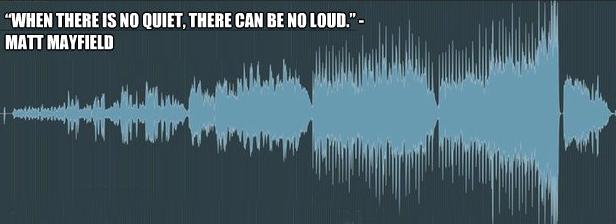
The fatal flaw of the Loudness War sound
In a nutshell: it doesn’t sound good. Research shows there is no connection between loudness and sales People don’t notice loudness when comparing songs Dynamic music sounds better on the radio – here’s the proof Modern music players undo loudness by using ReplayGain Most listeners just turn loud music down ! So loud music has no benefit on the radio, online, mp3 player or in your CD player. That’s why I call it a legend the Loudness War makes no sense, in the 21st Century. And yet almost every new release is crushed to within an inch of it’s life. The effect is now so extreme that we have reached a bizarre situation where Justin Bieber’s new CD is louder than Motorhead, ACDC and The Sex Pistols ! So why do people do it ? Great question ! The Loudness War’s dirty little secret!
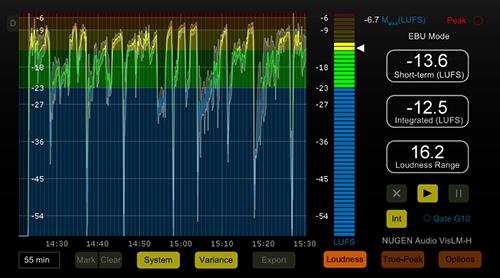
What can we do ?
Join in with Dynamic Range Day on March 28th ! Here are some ideas: Click to Like the Facebook page Accept the Dynamic Range Day Challenge ! Follow @DynamicRangeDay on Twitter - use the #DRD14 hashtag Put a post on your site or blog telling people about the day – include a link to this page Host your own Dynamic Range Day Meetup all you need is good company and a sound system that goes to eleven ! Sign up to the Dynamic Range Day Newsletter for the latest information using this form.
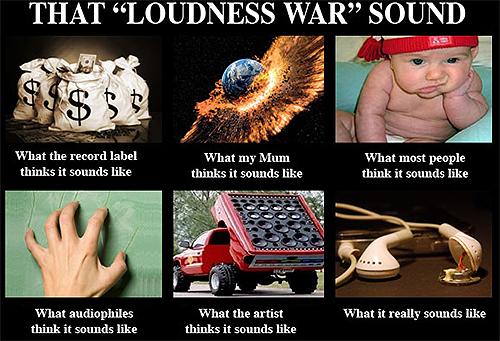
Where did the idea for DRD come from ?
Dynamic Range Day is organised by Mastering Engineer Ian Shepherd, a long-standing opponent of the Loudness Wars. DRD is also supported by Allen Wagner from TurnMeUp.org, as well as our wonderful sponsors. You can read more about the original Dynamic Range Day idea.
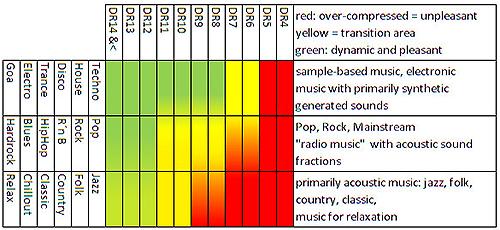
TT Dynamic Range Meter
In January 2009, The Pleasurize Music Foundation launched a wide-ranging initiative for ending the "Loudness War" being waged by successive music releases. This initiative aims to introduce a dynamic standard through several phases.Makes it possible to provide releases with a whole-number dynamic value to be printed on the recording medium as a logo, giving consumers an immediate means of knowing the dynamic quality of a recording. An online database is planned for furnishing information on music already released with the standard. In this way, conditions have been met for the creation of a single standard for audio recorded media – a step which was taken by the film industry over thirty years ago. Music with small dynamic range has a low value, for example DR4 (Dynamic Range = 4dB). Music with a large dynamic range has a higher DR value, for example DR14 or more. In this case, music can breathe and loud events are actually louder.
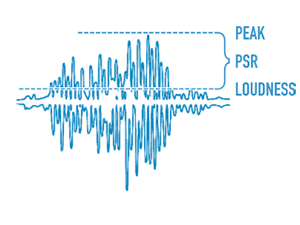
Founder and conceptual father Friedemann Tischmeyer on the functions and aims of the Foundation:
"We believe that music – as an artistic means of expression – should transmit emotions. Nowadays, this is possible only to a limited degree because dynamics — a fundamental part of expressivity — are often missing. On a subconscious level, emotions are expressed by musicians emphasized with a feeling of urgency or insistence. Modern mainstream music sounds like a flatly pressed board being rammed through loudspeakers and uses the greatest possible amount of intrusiveness just as advertising does – as a means of constantly trying to get the listener's attention. In this way, a fundamental aspect of music is lost. Countless consumers who are old enough to remember more dynamic music are not even aware of what is wrong with releases nowadays. The experience of buying music has become frustrating. Who wants to spend money for music that just beats your ears? This process of over-compressing music has been occurring in such a gradual, insidious way that many industry professionals are unable to draw clear boundaries between music that is over-compressed and music that is not. One thing is for sure: when we turn music off because it is getting on our nerves, then it is probably because of a lack of dynamics. Unfortunately, strongly compressed music is also an unpleasant way of generating aggression. We who create music have a certain responsibility with regards to the rest of society."
"The arrival of digital technology has made it technically possible for this process, thereby answering the commercial need of simply wanting to be heard. The principle is: 'Whoever shouts the loudest will be heard.' For labels and radio stations, loudness is the most important criterion in music. And that is where our work begins: We aim to provide qualified information so that people understand that loudness is not a measure of quality in music! There is a great lack of information in this area which has taken on huge proportions: most young people have never heard truly dynamic music played over a good-sounding hi-fi system. I believe that some of them would be so emotionally overwhelmed that they would cry with joy when hearing truly dynamic music under such conditions."
"As a mastering engineer I stand right in the crossfire between the detail-work of trying to obtain the best possible sound and the commercial pressures of my customers. Even when a customer knows that the sound suffers when dynamic range is further decreased, they accept this for fear of not being heard. This makes all my efforts involving working on fine nuances of sound practically obsolete. The only choice we are given is to make the loudest possible master with the least amount of sound-quality damage. Of course, that is not a satisfying way of working – all of the leading mastering engineers in the world agree here."
"We therefore believe that our standard will increase the value of music. It is too simplistic to make the MP3 format out to be the scapegoat with regards to the current market situation in the entire music industry. The truth is more complex. The loss of emotional value in music is also a big part of this. We believe that our standard will strengthen the entire music industry. As soon as good-sounding music is once again purchased, musicians and all the creative people involved in making and producing music will profit."
How to use the TT Dynamic Range Meter.
The TT so-called dynamic range meter doesn’t really measure dynamic range at all. It is still an invaluable tool for mixing and mastering, and gives you vital feedback on the ‘dynamics’ of your music and how it measures up in the loudness wars. Loudness has always been an important topic in mixing, and especially mastering, never more so than today. Knowing how loud is too loud has always been difficult. TT comes in two flavours, one is the real-time plugin version, available for both Mac and PC in AU, RTAS and VST versions. There is also a second, off-line version of the meter, which generates an overall DR measurement for a complete WAV file or CD and allows you to generate a log file. The real-time plugin version shows peak and RMS level metering for the left and right channels, but also the difference between them in the centre, labelled DR. Broadly speaking, the idea is to stop this DR measurement getting too low up to a point, at least.
DR stands for dynamic range although that’s not really an accurate name. The DR value is actually closer to the Crest Factor of the music, the difference between the peak and RMS levels. This measurement is still unique to the TT Meter, and is extremely useful because it gives an intuitive idea of how squashed the music is. The closer the RMS level gets to the peak level (usually close to 0 dBFS) the more compressed and limited the music is likely to be, and the smaller the DR measurement gets.
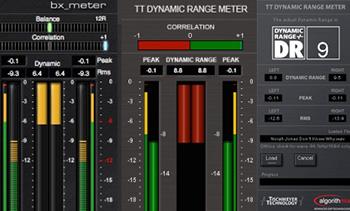
How to read the meter
Peak level, loudness and DR are all measured in Decibels dB. Very dynamic material, raw acoustic recordings, for example will often read DR14 or more. Whereas heavily compressed and limited loudness war casualties typically read DR6 or less in extreme cases even as little as 2 or 3. As a rule of thumb, anything with an overall reading of DR12 or more will sound very dynamic and in this case, the central DR meters of the plugin will stay green much of the time. Louder material will sometimes have less range than this, any less than 8dB runs the risk of sounding squashed and crushed, and the DR meters start to fade from green to orange to red to represent this. So, to ensure you aren’t over compressing your mix, keep the meters in the green for most of the time. Not all of the time, but a track where they are always red is almost certainly pushed too hard.
More detail
Firstly, if you are making electronic music, or using lots of synths and sample loops, the sounds you have may already have quite a limited crest factor or DR reading. So, if your mix is only DR8 without any extra compression, do not worry that is just the way it is naturally. And also, this green rule of thumb applies to mixing. If you are using the meter in mastering, pushing up into the orange and occasionally red is probably OK. But use your ears and remember there is always a price to be paid. One of the cleverest things about the DR meter is that it works independently of the overall level of the music. So, something very loud, crushed and distorted, will be in the red, almost all the time even if you turn the level down. This means you can objectively compare how squashed different recordings are, regardless of the overall level. Which in turn makes it a great mixing tool. If you over compress everything in your mix, the meters will show you are in the red, even if the overall level is not that high, yet.
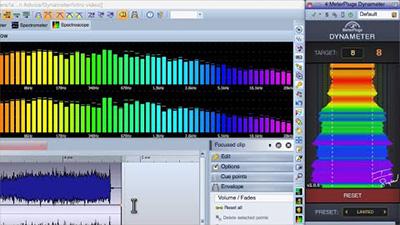
Ian Sheppards - Dynameter
Dynameter displays a measurement called PSR - the difference between the peak level and the loudness. Higher PSR readings are typically found with more dynamic recordings, whereas heavily limited or clipped material usually shows lower PSR values. Dynameter measures the PSR in realtime, and also displays a colour-coded history graph, giving you an intuitive snapshot view of the dynamic profile of your music.
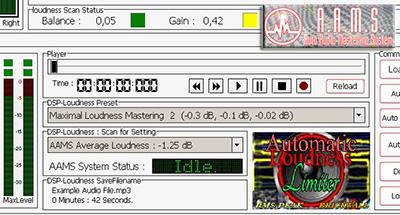
AAMS Auto Audio Mastering System - DSP Loudness (AAMS Default Loudness System)
The same system for Dynamics in Loudness is done with AAMS DSP-Loudness processor. For single files and genres of music, when mastering to a certain level is needed. Dbfs system is the same as RMS system but it relies on other measurement system called dbfs. Both RMS and dbfs systems are good when you are wanting to do things manually and adjust the loudness. When mastering or even after mastering. You can hunt down your appropriate levels and setup AAMS DSP-Loudness to follow. That must be digital distortion? Both systems AAMS system and the RMS System are not opponents, but friends! The AAMS Loudness system is based on a percentage of peaks and RMS levels or RMS/Peak Levels. The AAMS system will do a more peak based search of the audio and also scans for RMS levels. But however AAMS system will calculate and process audio as being more careful to avoid distortion levels. This means that for most it will bring your audio input to appropriate levels. Not doing the Loudness War, but being careful and still have a loud sound. AAMS DSP-Loudness process will anticipate troubles and avoids them. Still Loudness that is applied to much, will still have distortion or overflows. So limiters and calculations in processing are used in the AAMS Loudness Based system option. When needed this system can do full album mastering based on AAMS System of transferring loudness levels. Also on its main settings Single Audio Mastering can be an advantage over the RMS Dynamic Levels system.
AAMS RMS Dynamic Level System
The RMS Dynamic Level system is based on more known RMS and Peak scanning methods. If you are into RMS levels, there is much to say about it. Because it is the main system used by everyone into the discussion of the loudness war. So read about that on the internet if you are unknown. The main function is RMS and Dynamics / some say Dynamic Range.
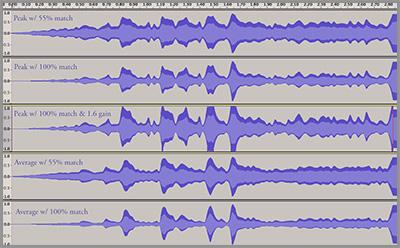
Compare with reference tracks
Try it yourself, watch how the meters react to your favourite recordings. Remember though they may have been pushed to a higher level in the mastering. Try comparing older CDs from the late eighties and earlier 90s, usually the overall level will be lower, and compared to releases from the last few years they will be more dynamic. Do not be fooled into thinking that you need a low DR reading for a loud sound. It is important to note though that the realtime DR meter only gives readings at an instant. And it is quite permissible and necessary to push into the red at some points. To get an overall measurement of a track’s dynamic range, you should use the off-line version. Both meters are free, but to get them you need to be an Active Member of the PMF.
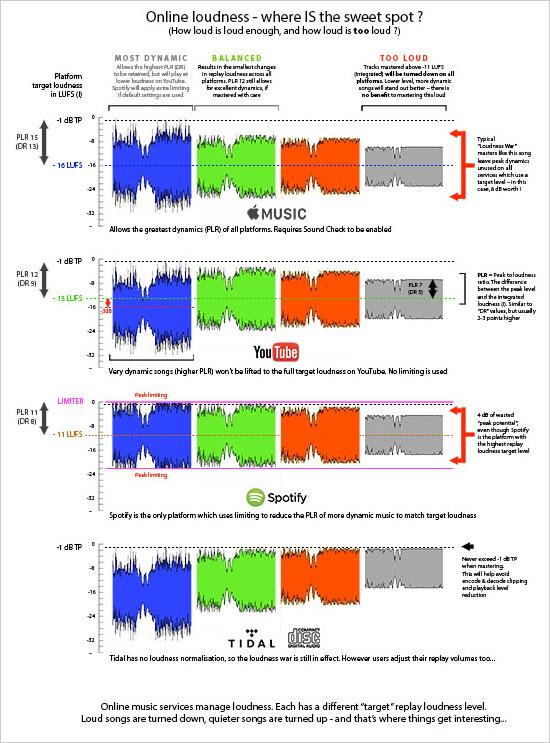
Denis van der Velde
AAMS Auto Audio Mastering System
www.curioza.com